Cabinet finishing – whether you’re using, paint, stain, oil, urethane or something else – is an easy, fun job that doesn’t require a ton of tools or years of experience. There are a few common tricks and techniques that will help you get that perfect factory finish. In fact, with the great deals that you can find on unfinished cabinetry, there is really no reason not to tackle the finishing job yourself! If you want to try painting, staining or varnishing unfinished cabinets, here are some of the things you’ll need to know to do a flawless finishing job.

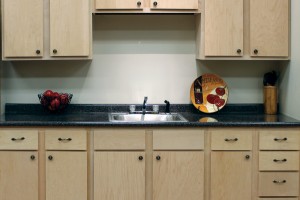
Unfinished Oak Cabinets

Unfinished Oak Cabinets

Sanding and Surface Preparation

The biggest mistake that you can make is failing to prepare the surface of the cabinet properly, or neglecting to sand your finish between coats. On an unfinished base cabinet or wall cabinet, the manufacturer will have already done most of the sanding. However, one more light sand with a fine sandpaper – at least 200 grit, although 400 grit is even better – will help you get a silky-smooth finish.

As you sand, there are two things to remember: Always sand with the grain, and sand gently so that you don’t damage the veneer. Avoid power sanders, because the rotational or back-and-forth motions that these tools use can cause scratches across the wood grain.

Sanding between coats is even more important than sanding before the first coat. As you apply the finish, tiny bubbles will form and small bits of dust and debris will adhere to the surface, leaving the initial coats with a somewhat rough texture. Use 400-grit sandpaper or steel wool to open up those bubbles and remove any roughness.

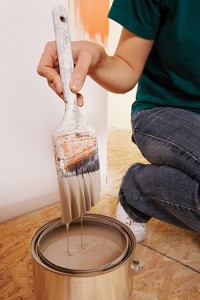
Painting From the Can

Painting From the Can

Less is More

Another key to success is remembering that less is more. When you apply the first coat or two to an unfinished wall cabinet, it’ll be tempting to apply a thick coat simply because the finish will soak into the wood and look extremely patchy. However, thick coats of finish come with several problems:

• Heavy layers of finish tend to bubble more than thin coats.

• They take longer to dry, which means the wet finish has more time to collect dust and debris.

• Thick coats of finish are prone to drips, runs and other flaws.

If you want smooth paint or a perfectly glossy urethane finish, shoot for at least three to five thin coats rather than one or two thick coats of finish.

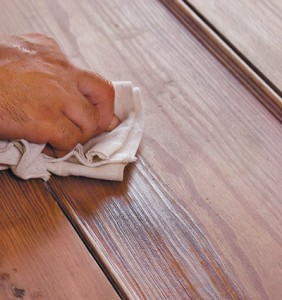
Staining By Hand

Staining By Hand

Which Tools are the Best Tools?

The beauty of cabinet finishing is that it doesn’t require lots of expensive or complicated tools. You’ll need brushes, cloths, sandpaper and something to clean up the mess – water for water-based finishes and paint thinner or mineral spirits for oil-based finishes. But how do you decide when to use a brush and when to use a cloth for the finish? Here’s a run-down of the best way to apply a variety of finishes:

• For stain, use a cloth. Traditional stains are very thin and runny, which means it will be difficult to get an even coating with a brush. Gel stains are too thick for a brush – you’ll just push them when you should be rubbing them into the wood grain.

• Urethane, polyurethane, varnish and other oil-based clear coats can be applied with either a brush or a cloth. However, cloths are generally the preferred method because they allow you to apply the thinnest, most even coating.

• Oils – like teak oil or tung oil – are somewhat thin, so they should always be applied with a cloth.

• Paints – both latex paint and oil paint – need to be brushed on. Use a soft brush for the thinner latex paints and a stiffer brush for oil paints.

As you can see, most finishes are best applied with a clean, lint-free cloth. Use either cheesecloth or old t-shirts. If you go the t-shirt route, cut them up into rags and then run them through the washing machine at least twice to remove any loose threads or fuzzy bits from the edges.

Unfinished Birch Cabinets

Unfinished Birch Cabinets

Finishing your own cabinets is an easy, rewarding job. These tips and techniques will give you that perfect showroom look no matter what finish you choose. So the next time you see a great deal on unfinished kitchen cabinets, don’t hesitate to take them home and give DIY finishing a shot!

The bookcase. It’s functional by maximizing space and aesthetically pleasing by adding height to balance out a room. The bookcase is also not just for books. It is a wonderful place to add treasures that personalize your space. Here are some tips on how to style a bookcase.

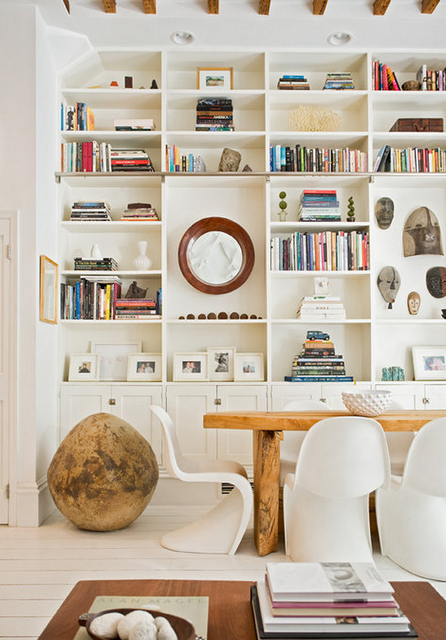
Built-in Bookcases

Built-in Bookcases

A Clean Start
Remove all items from your shelves. Store or donate unsightly paperback books.

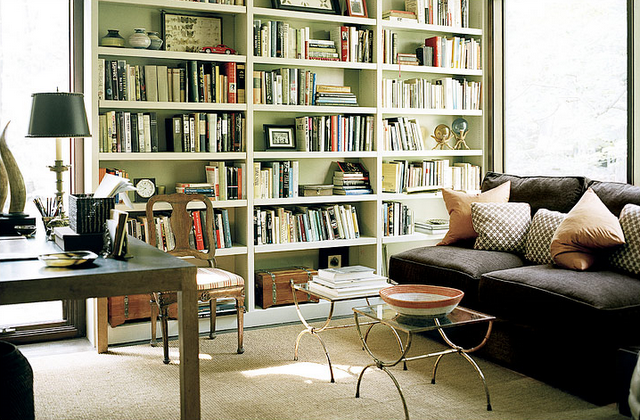
The study below is a beautiful example of how bookcases help maximize a space, while adding height for overall balance.

Stylish Study Bookcases

Stylish Study Bookcases

Add a Splash of Color
For visual interest, back your shelves with a contrasting wallpaper print or colorful paint. This gorgeous bookcase below is backed with Schumacher’s Imperial Trellis by Kelly Wearstler in Charcoal.

Bookcases with Wallpaper

Bookcases with Wallpaper

Some Up and Some Down

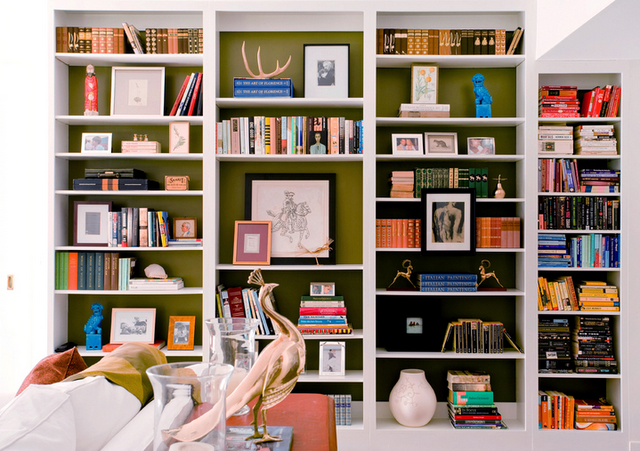
Books can be wonderful home accessories, so showcase the most beautiful ones in your collection. Arrange the books by size, subject and color. Create a rhythmic pattern by placing books vertically as well as horizontally. Horizontal books can also act as bookends. I love how the books and accessories are arranged in the built-in bookshelf below.

Bookcases with Accessories

Bookcases with Accessories

Make it Pretty
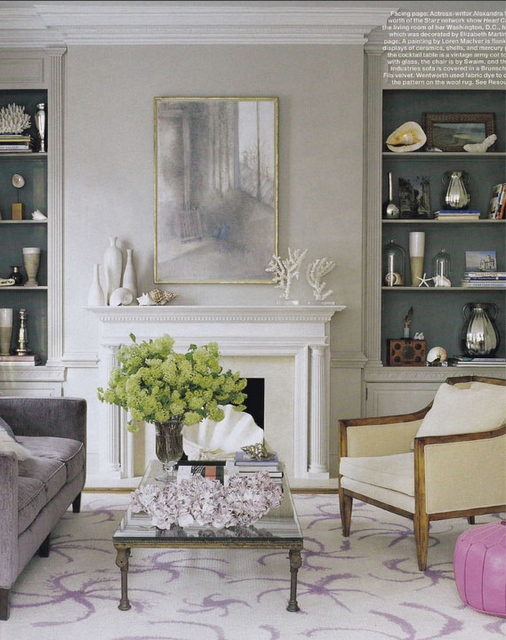
Adding objects such as shapely ceramics, decorative boxes, small sculptures, family photos and original artwork makes your bookcase more visually interesting and personal. When selecting objects, be aware of the scale and color. Objects shouldn’t blend in or get lost on the shelves. Below is an example of beautiful bookcases flanking a fireplace that showcase more decorative objects than books. It makes me think that “bookless” bookshelves may show up more often as people go high tech and move to the Kindle or iPad to read books.

Bookcases with Decorative Objects

Bookcases with Decorative Objects

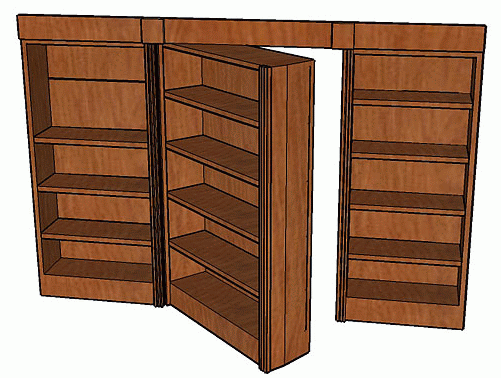
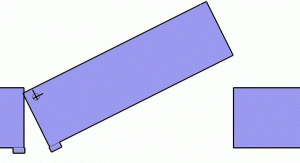
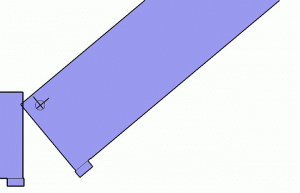
Here are detailed drawings for a nifty swinging-bookcase hidden door. by Gary M. Katz.

I drew this detail of a hidden bookcase door swung on a Rixson pivot hinge. It works easily. I was asked to show how the trim would work/look for a fluted-casing/rossette detail. I forgot to include the plinth blocks, but they’d be split, too. I was also asked how a swing-in book case might work, and whether an offset Rixson hinge would work. Those drawings are included at the bottom of the page.

Bookcase Front View

Bookcase Front View

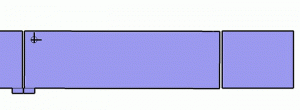
Front view (above)

Bookcase Front View Open

Bookcase Front View Open

Front view opening (above). Pivot case just clears head casing. If the bottom of the pivot door isn’t swinging over a hard surface level floor, then a toe-kick should be added to the bottom of all the units and the case should pivot above the toe kick.

Front View Opening

Front View Opening

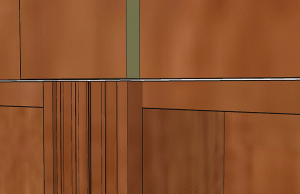
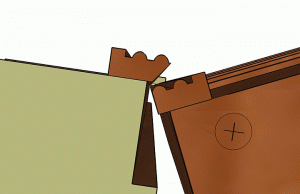
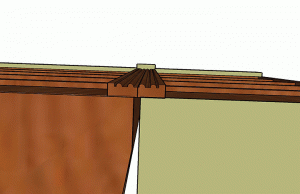
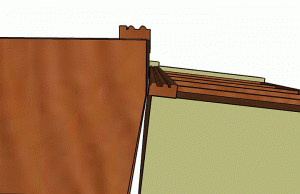
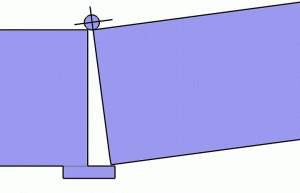
Looking close at the top head casing: Leave a 1/16 – 1/8 in. gap between the head casing and the top of all cases. Install a small 1/2 in. ogee nosing on all top shelves, but hold it down 1/16 in. everywhere, on flanking cases, too, so it will cover the head gap but not interfere with the swing.

Bottom View

Bottom View

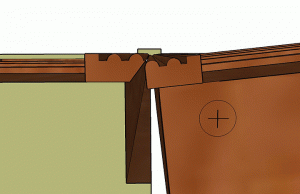
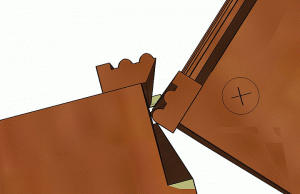
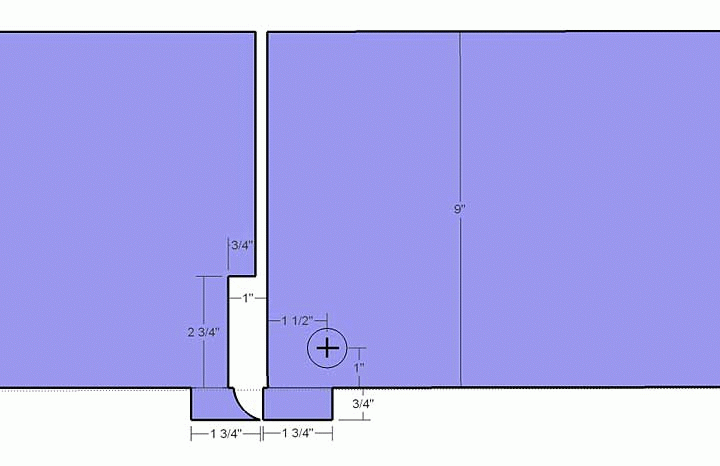
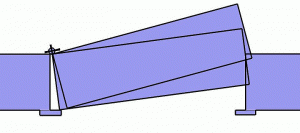
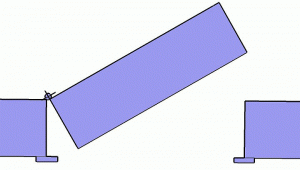
Bottom View (above), case just beginning to open. Split in casing must be located precisely where bead meets fillet. I’d cut a test piece first, about six inches long, tack each side to the cases and open the door a few times… all the way.

Bottom View Beginning to Open

Bottom View Beginning to Open

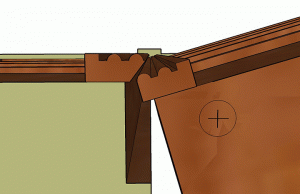
Casing opening a little more (above).

Casing Opening a Little More

Casing Opening a Little More

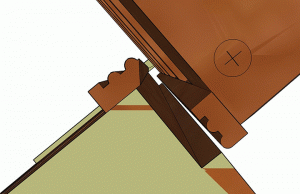
Casing clears flanking case, but not by much (above).

Casing clears flanking case, but not by much

Casing clears flanking case, but not by much

Bottom view with case swung to 90°

Bottom view with case swung to 90°

Bottom view with case swung to 90° (above).

Strike side viewed from top

Strike side viewed from top

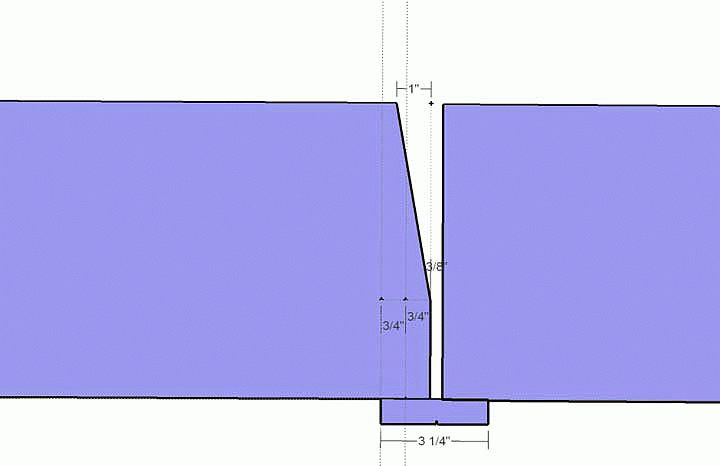
Strike side viewed from top (above).

Strike side, viewed from top and opening out.

Strike side, viewed from top and opening out.

Strike side, viewed from top and opening out (above).

Plan View, with hardware layout and trim dimensions on hinge side.

Plan View, with hardware layout and trim dimensions on hinge side.

Plan View, with hardware layout and trim dimensions on hinge side.

Plan View: Strike side with clearance dimensions.

Plan View: Strike side with clearance dimensions.

Plan View: Strike side with clearance dimensions.

Strike side requires 1 3/8 in. clearance

Strike side requires 1 3/8 in. clearance

Strike side requires 1 3/8 in. clearance

Rixson Center Hung Pivot.

Rixson Center Hung Pivot.

The hardware in the example above is a Rixson Center Hung Pivot. A Center Hung Pivot is the only type of pivot hinge which isn’t visible. There are several grades of Center Pivots. I’ve used the Model #370 frequently for doors of many sizes. It’s rated up to 500 lbs. But for a heavy bookcase, the H117-3/4 will support up to 1,000 lbs. Dorma also has a line of pivot hinges. Often they’re less expensive than Rixson hinges. I’ve used several Dorma pivots, including the CP440 (440 lbs) and the CP 660 (660 lbs).

Swing In Bookcase on Center Hung Pivot

Swing In Bookcase on Center Hung Pivot

Swing In Bookcase on Center Hung Pivot

Swing In Bookcase on Center Hung Pivot

Swing In Bookcase on Center Hung Pivot

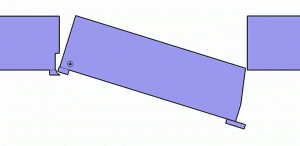
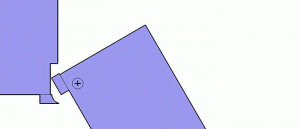
You can reposition the pivot but no matter where it’s located, the strike side of the case is going to hit the other case, which requires a beveled or stepped construction.

The step in the 'jamb' case would have to be about 1 1/4 in.

The step in the ‘jamb’ case would have to be about 1 1/4 in.

The step in the ‘jamb’ case would have to be about 1 1/4 in.

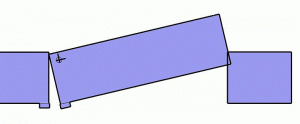
And no matter where the center hung pivot is located, the hinge side would hit its flanking case, too.

And no matter where the center hung pivot is located, the hinge side would hit its flanking case, too.

And no matter where the center hung pivot is located, the hinge side would hit its flanking case, too.

Not by much, but enough to require a step in the construction of that box, too.

Not by much, but enough to require a step in the construction of that box, too.

Not by much, but enough to require a step in the construction of that box, too.

Swing-in Bookcase on Offset Pivot Hinge

Swing-in Bookcase on Offset Pivot Hinge

Swing-in Bookcase on Offset Pivot Hinge

Swing-in Bookcase on Offset Pivot Hinge

Swing-in Bookcase on Offset Pivot Hinge

The offset hinge would work even better on a swing-in case. The front hinge-side edge wouldn’t hit the casing or trim on the front of the units. And the back would clear without cutting a bevel or step into the flanking case.

But the strike side would still hit.

But the strike side would still hit.

But the strike side would still hit.

But the strike side would still hit.

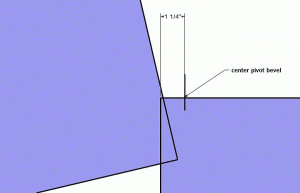
The step in the strike-side flanking case would have to be about 1 1/4 in.

The step in the strike-side flanking case would have to be about 1 1/4 in.

The step in the strike-side flanking case would have to be about 1 1/4 in. (it actually measures 1 1/16 in. so 1 1/4 in. should clear for sure, but I’d mock up the hardware and check that before building the cases).

Reprinted with permission from Gary Katz Online, a comprehensive educational community devoted to trim carpentry, finish carpentry, and architectural millwork, and hosted by nationally recognized author and finish carpentry specialist Gary M. Katz.
– See more at: http://www.woodweb.com/knowledge_base/HiddenPivot_Bookcase_Door.html#sthash.pdqJzgQ6.dpuf

October 5, 2006
Eight Rooms, Well, Nine, but That’s Their Secret

By MATTHEW SUMMERS-SPARKS
Winnetka, Ill.

ON a recent Saturday morning Cami Beghou, 13, pushed the right side of the tall, white bookcase that is built into one of the powder-pink walls in her bedroom. The bookcase, holding rows of books, a stuffed dachshund and a volleyball, silently swung outward, revealing a tiny, well-lighted room. Containing a desk, a chair and a laptop computer, it serves as her study area.
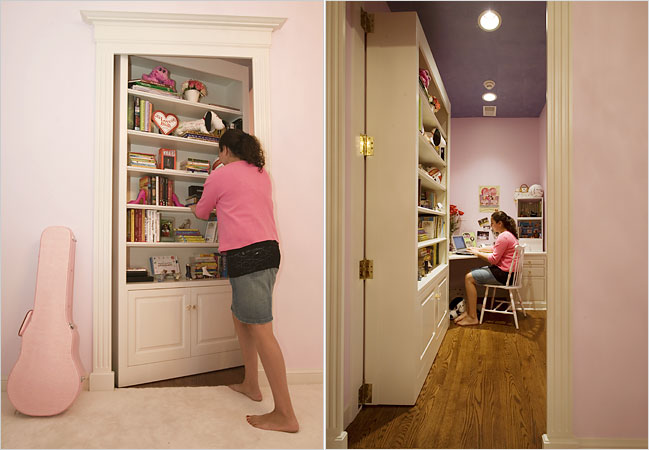
Cami Beghou swings open a bookcase to reveal her study area.

Cami Beghou swings open a bookcase to reveal her study area.

Cami, an eighth grader, considers the hidden room the best thing about her family’s five-month-old French colonial-style house in this Chicago suburb. “When I heard that I could have a secret room, it sounded like so much fun,” she said, noting that the room initially conjured images of secret passages from Scooby-Doo cartoons. “My parents told me, ‘You could just put curtains over the doorway,’ but that wasn’t nearly as cool.”

Since March, when the Beghous moved into the house, Cami estimates that she has had about 30 friends over. Not one was able to detect the bookcase’s secret without guidance. “Most people don’t even recognize that it’s there,” said her father, Eric Beghou, who owns a consulting company with his wife, Beth. “When the home inspector came by to examine the house, our builder shut the bookcase, hiding the room. The inspector went up and down the stairs a couple times — he knew that something was unusual — but he couldn’t figure out what was there.”

Soon, however, inspectors and other guests may get wise to hidden rooms like the Beghous’. Although hard data is not available, architects report an increase over the last five years in the number of clients installing concealed rooms.

During roughly the same period, at least four companies have come into existence producing doors that range from the very basic to the highly mechanized.

The Beghous’ architect, Charles L. Page, who is based in Winnetka, said he had designed seven other houses with hidden rooms since 2001, after designing none in his previous 40 years as a residential architect.

“Absolutely, there has been an increase,” said Timothy Corrigan, an architect and designer in Los Angeles, who noted that he has been practicing for 12 years but was not asked to design a secret room until four years ago. Since then, he has created five.

Although highly fortified rooms have become more widespread — and the idea reached a large audience with the release of “Panic Room,” a 2002 movie that starred Jodie Foster — many of those adding hidden rooms are more concerned with creating a sense of wonder than defending against a home invasion. “I think people like the mystery of them,” Mr. Corrigan said.

One popular trick is to hide a room behind a bookcase that looks like a standard built-in but is equipped with hidden hinges, rollers and handles, as at the Beghous’ house. Contractors can either build the bookcases themselves or buy a piece from a growing collection of companies, including Niche Doors, the Hidden Door Company, Hide a Door, Secret Doorways and Decora Doors. Prices range from about $800 for the most basic models to more than $10,000 for custom-made versions.

Steven Humble is the owner and chief engineer of Creative Home Engineering, a two-year-old business in Tempe, Ariz., that specializes in mechanized doors that conceal rooms or safes. He echoed others in the business in saying that his customers are evenly split between those who plan to use their hidden rooms for security (either to hide valuables or to hide themselves in an emergency) and those who just think they are “really cool.” His company has built about 25 customized doors, bookcases, safes and assorted pieces, for new and remodeled homes, including a fireplace with a rear wall that swings open to reveal a room beyond, for a house in Arkansas. Prices run from about $5,000 to $25,000.

Last month Mr. Humble installed a pair of hidden doors in a house in a town north of Sioux Falls, S.D., for ABC’s “Extreme Makeover: Home Edition.” “Whether it’s for home security or people’s images of living like James Bond, it seems to be something people respond to,” he said.
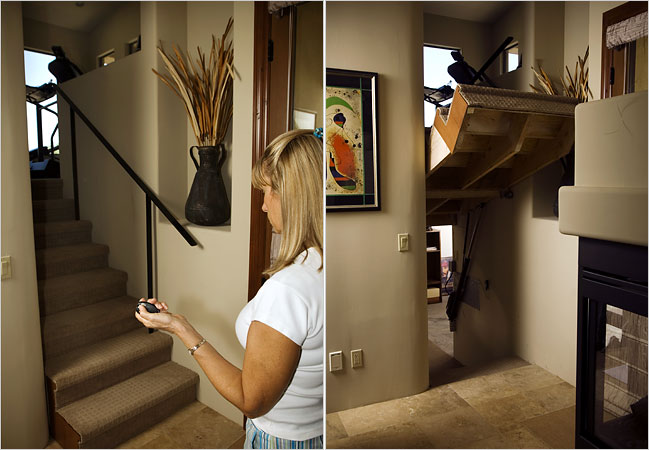
Louise Kircher raises the staircase in her home in Mesa, Ariz., to reveal the secret room behind it.

Louise Kircher raises the staircase in her home in Mesa, Ariz., to reveal the secret room behind it.

James Bond, or Herman Munster. When Louise Kircher, a retired teacher, and her husband, Dennis, a former accounting manager at Boeing, moved into their year-old, 4,300-square-foot contemporary home in Mesa, Ariz., in January, the staircase in the master bedroom was “something extra that came with the house,” Mrs. Kircher said, and reminded them of something out of “The Munsters.” It rises to reveal a hidden room, where she and her husband store an antique bedroom set and a replica of a gilded mummy’s coffin. “The ceiling is only five and a half feet in there,” she said. “I think it would make a great playroom for grandkids.”

Secret rooms speak to the homeowner’s sense of playfulness and perhaps to something deeper. “When we started the company we thought we were going to only attract eccentrics,” said Krystal Strong, co-owner of Hide a Door in Humble, Tex., whose doors’ average cost is $1,600. “But I think everybody is on the eccentric side; they want to make their home unique.”

To Sarah Susanka, a residential architect based in Raleigh, N.C., and author of “The Not So Big House,” a hidden room is “a way to individualize your house.” She said, “For a house to feel like a home, people have to put more of themselves in their house.” She remembered a woman in St. Paul who asked for a room hidden behind the rear wall of a closet. “She said she wanted a secret room for her art studio,” Ms. Susanka said. “She was a very introverted person, and she had to hide in order to let this expressiveness out.”

A concealed room can also function as a direct passage to childhood memories. When David Lee and his wife, Daphne, moved into their house in Plano, Tex., in March, they found themselves with too many unused bedrooms. Mr. Lee set up a workroom with tools, a computer and a workbench in one of the empty rooms. But it did not take long for the couple to decide to install a bookcase door, at a cost of almost $2,000, and turn the space into a secret room. “I always wanted one,” he said, “since watching Scooby-Doo way back when.”
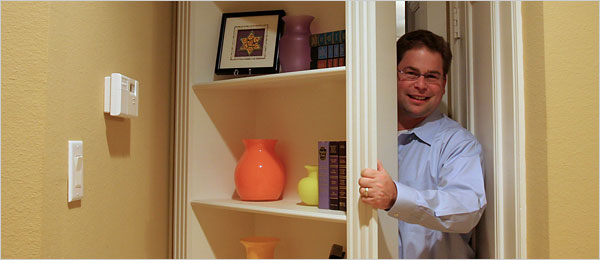
David Lee of Plano, Tex., got a bookcase door to hide the mess of his workroom, but also because he had wanted a secret room, he said, “since watching Scooby-Doo way back when.”

David Lee of Plano, Tex., got a bookcase door to hide the mess of his workroom, but also because he had wanted a secret room, he said, “since watching Scooby-Doo way back when.”

Hidden doors have their complications. Cami Beghou said that while the books stay put when she opens her bookcase door, the volleyball once rolled off, and she generally leaves the door open unless she is expecting company. Jon Coile, chief executive of a Maryland realty company, said that he has had some problems with the magnetic latch on the bookcase door at the house he shares with his wife, Wendy, in Crownsville, Md., and that they secure the objects on the shelves to make sure they stay put.

Ray Sullivan, a manager with a financial services organization based in Phoenix, has two hidden doors in his house and is working on a third. But he ran into a potential problem. One of the doors, a motorized bookcase, can be opened either by using a remote control or by knocking in a particular rhythm. “One time I accidentally left the remote on the other side of the door and forgot the knock code,” Mr. Sullivan said.

Fortunately for him, the hidden room has another entrance, so he took a circuitous path to get back in. He has since memorized the knock sequence. “It’s one of those things you do once, hopefully, like locking your car keys in your car,” he said. “After you do it, you won’t do it again for a long time.”

For Mr. Coile, building a home with a secret room was a once-in-a-lifetime opportunity. Behind a bookcase in the library of his house is a compact spiral staircase that connects to an upstairs writing area overlooking the library and to a downstairs home theater as well as to a nondescript room with a view into a bar through a one-way mirror.

They have shown the setup to so many friends that its secrecy has evaporated, which Mr. Coile said is fine with him.

“What use does this have?” he said. “Absolutely none. My builder’s eyes rolled back in his head when I told him I wanted a secret room. What can I say? I watched too many Disney movies when I was a boy.”

By Scott Murfey, Dec. 19, 2014

Remodeling Trends

Remodeling Trends

As we close out another year, many of us look forward to the rejuvenated possibilities and fresh starts that a new year presents to us. One way that new opportunity might manifest itself is in giving some part of your house a make-over. In fact, according to the National Association of Home Builders, home remodeling is at an all-time high, and it’s anticipated that it will only continue to grow in 2015. Here are ten of the home remodeling trends that we anticipate to see a lot of in the coming year:

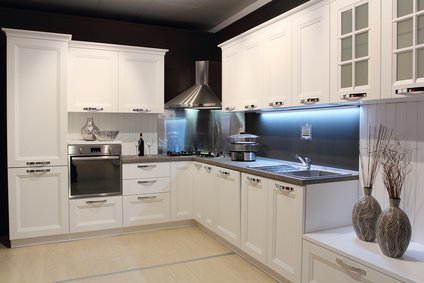
1. Cabinets: The trend here is definitely fresh and simple cabinets with a modern look and feel. As a more affordable option, some people are refinishing their existing cabinetry to try and achieve that updated feel.

2. Countertops: While beautiful and durable granite is still a favorite, there is another strong, nonporous material called Caesarstone that is quite popular. Caesarstone is a quartz composite (93% quartz) that is resistant to stains, scratches and heat, and also doesn’t need sealing. In comes in a wide variety of colors, uses recycled material, and is easy to clean.

3. Backsplashes: When using granite or Caesarstone countertops, a natural stone or tile mosaic backsplash is an excellent compliment. They add texture and an extra visual component. Many of the more modern kitchens are using a glass backsplash to finish off a clean, polished look.

4. Sinks: The most popular current trend in sinks right now is the deep, single bowl. While the single-bowl size is large enough to accommodate pots and pans, people are utilizing fitted strainers and dish drains to maintain the benefit of a double sink. As for materials, stainless and quartz composites are popular for the bowl, while satin nickel is still most popular for the fixtures.

5. Color: To create the sophisticated modern look in the kitchen that works well with the natural stone of countertops and backsplashes, we are seeing a lot of charcoal shades, along with black and white.

6. Bathrooms: This next year will see many people knocking down walls and expanding their bathrooms to create that luxurious spa environment. It will continue to be popular to either rip out the tub to build a large walk-in shower or create separate tub and shower areas altogether. Other popular upgrades include double vanities and separate water closets.

7. Flooring: Pre-finished wood flooring is a popular trend as it offers a durable finish, easy installation, and come in a variety of colors, designs and textures.

8. Universal Design: The idea of universal design is to create a home that is customized to accommodate everyone living in it. This includes kitchen and bath upgrades to increase functionality and in general, knocking down walls to create a roomier, open, communal living space.

9. Green homes: 2015 will continue to see homeowners opting for a living space that is free of toxins and chemicals. Additionally, people are also becoming more and more energy-conscious which is reflected in the move towards energy-efficient appliances, materials, and designs.

10. Outdoor space: Not only are we seeing all of the above upgrades and additions to the houses themselves, but this next year will continue to see a growing focus on the outdoor space. This includes outdoor fireplaces, livable-screened porches, and luxurious eating and socializing areas.

These are just a few of the trends that we anticipate seeing continue and expanding into 2015.

by Matt Goering

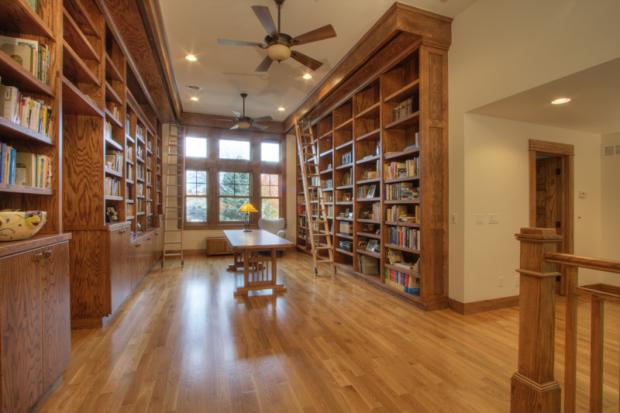
Library Bookcases

Library Bookcases

Bookshelves are often overlooked when it comes to designing the interior of a home. The truth is that the right bookcase in the right place can make a world of difference, increasing the beauty of an interior and decreasing the clutter. Here are a few suggestions for different types of book shelves to consider if you’re in the market.

Freestanding Models
You can’t beat a good freestanding bookcase for convenience. Not only are they great places to store books and knick knacks, but they can be attractive furniture additions to your living spaces as well. The beauty of freestanding book shelves is the incredible variety of styles available. Corner bookcases are wonderful for making use of those odd corners in the living room or den, and provide an attractive place to store and display books and other valuables.

Rotating models are also available, and are very handy when used as end tables to store books, magazines, remotes, and other things you want to have within arm’s reach when stretching out on the couch.

If you’re looking for something really distinctive, consider a doored bookcase, a close cousin of the china cabinet. These are great for displaying everything from grandma’s old dishes to that autographed copy of The Old Man and the Sea that you’re always telling everybody about.

The fact is that when you’re talking freestanding book shelves, there’s a model out there that will satisfy just about any space, taste and budget.

Built-In Bookshelves
If you’re feeling overwhelmed with the amount of furniture you already have, you’ll want to consider having built in bookcases installed instead. These can be custom designed to fit your living spaces, and often can be fitted in out of the way places or recessed into a wall where a freestanding model just wouldn’t work.

Some examples of places where built in bookshelves can really bring a room together include around fireplaces, doors and windows, beneath stairs or running up them, and in odd corners throughout the house. Bookcases have even been built in to serve as a barrier and divide a room into two distinct areas. If you have a space you think a custom built-in bookcase might be the ticket, Highlands Designs can make it happen.

installing a window seat

Custom Window Seat Installation

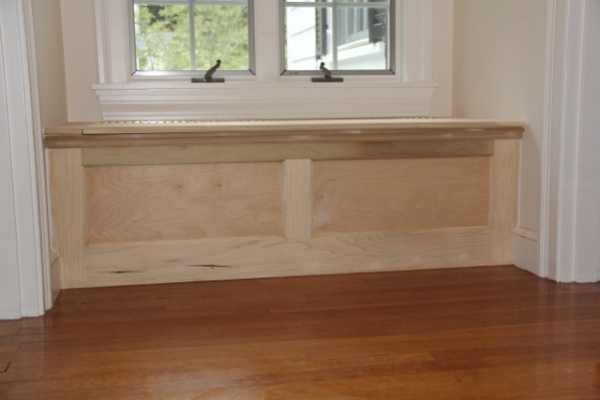
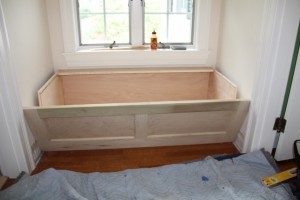
I recently made a custom window seat for this window alcove.  [photo above] The customer originally had a bench in this spot but wanted something more permanent with storage.  We decided installing a window seat with a hinged lid was the best option.

Measuring and making this window seat was done earlier and in my shop, this post is only the installation portion of the finished window seat.

Preparing the space:

The first step involved with installing the window seat was to carefully remove the existing baseboard trim.  I decided that I was going to save the old trim so that it matched trim in the area.

I used a utility knife to cut the baseboard caulking seams and a scrap block and pry bar to gently pry the baseboard off the wall.  The scrap block of wood is placed against the plaster wall to prevent damage from the pry bar.

Installing the box:

I purposely made my window seat box a few inches narrower than the opening.  I did this so I wold not have to fit it to fit.  the front panel was made larger and will be scribed to fit wall to wall.

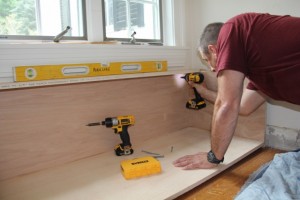
Using a level and shims, I make sure the window box sits level in its resting spot as well as centered in the opening.  I located the wall studs and pre-drilled and counter sunk 2 1/2″ screws through the box and into the studs.  I try to keep my screws up high, under the hinge rail, to hide them.

As much as I hated to, I also installed two screws in the bottom front of the window seat box and into the hardwood floor.

Installing the front panel:

I checked the floor which was level and both side walls, which were plumb.  I was lucky because that meant minimal scribing.

I place the edges of the panel to the walls to see how they would sit and they looked really good, so instead of scribing I measured side to side, added 1/16″ of an inch and then cut my panel to that measurement with 30 degree bevels on both ends.

The bevels allow the panel to slide into place without a fight, but with the sharp point of the bevel tight to the walls.  The top portion of the bevel is also hidden by the seat frame, so I had no worries of an exposed cavity.

Once I had the window seat front panel in place, I applied Gorilla wood glue and then secured the panel with finish nails.  I used my Paslode cordless finish nailer for this project.  I have to say that this was not an easy spot in the house to get to and dragging a compressor and hose would have been torture.

installing a window seat

Installing The Window Seat Lid Top:

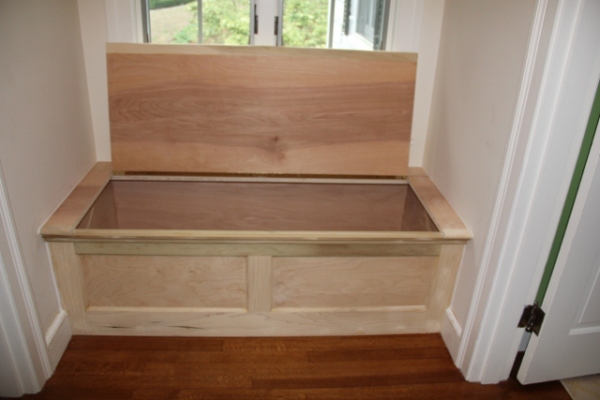
I pre-assembled the lid and frame in the shop. On site, I installed the lid top similar to the front panel by scribing to the walls.  I also use a back bevel to get a super tight fit to the walls.

I secured the lid frame to the box frame with glue and finish nails. Once this was complete, I installed a piece of decorative molding along the top edge of the front panel located just under the window seat lid.

Lastly, I reinstalled the baseboard, used wood filler at all exposed nail holes, sanded flush, vacuumed up and notified the painter.

The post Installing A Window Seat appeared first on A Concord Carpenter.

Time to go above and beyond library walls.

The classic rolling library ladder often evokes images of majestic libraries, full of epic bookshelves, and maybe Belle sing-songing about escaping her provincial life. But they can be used for a great variety of purposes – from straight utilitarian practicality, or adding a unique sense of design and room architecture. You may even be able to combine the two; let’s browse how a rolling library ladder could be just the right addition for your room. (Note: all photos were customer submitted!)

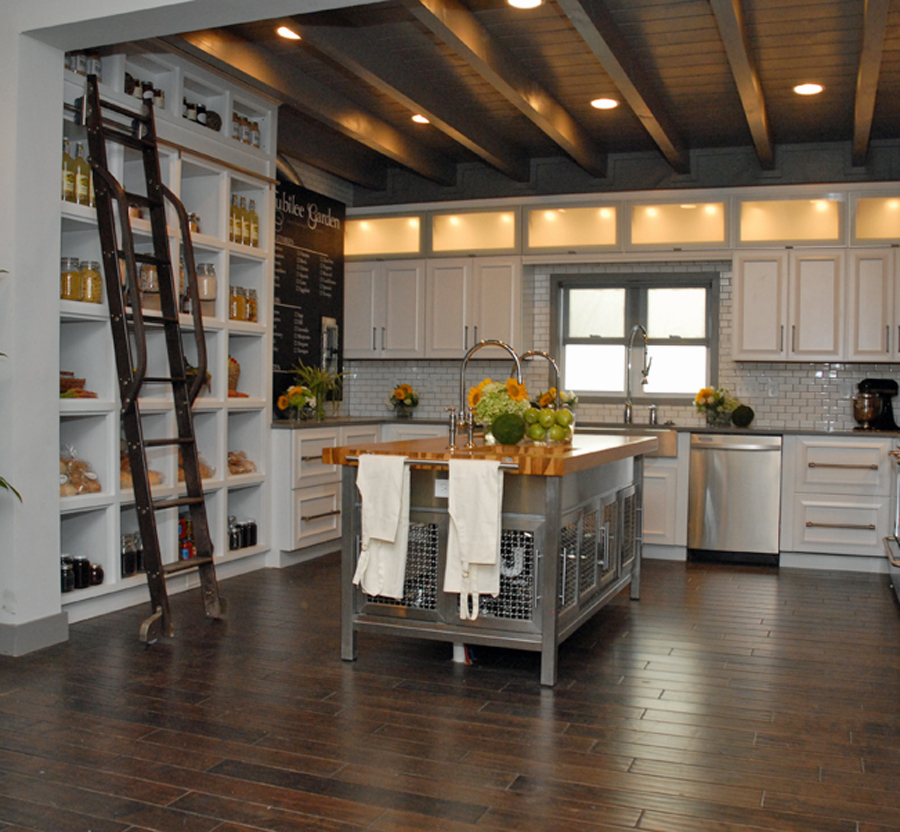
Kitchen Rolling Ladder

Rolling Ladder

Why not maximize your space? Finding a ladder set up that will provide access yet give you flexibility and room to cook is the way to go.

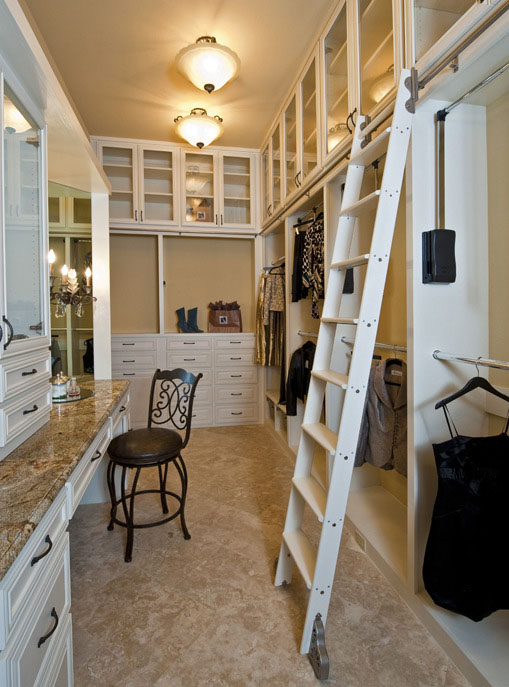
Dressing Room / Boudoir Rolling Ladder

Rolling Ladder

A great use of space for fashion-savvy folks. Especially if you are shuffling multiple outfits or bodies in and out of a compact area, the dressing room rolling ladder may make it all come together.

Living Room / Sitting Room Rolling Ladder

Rolling Ladder

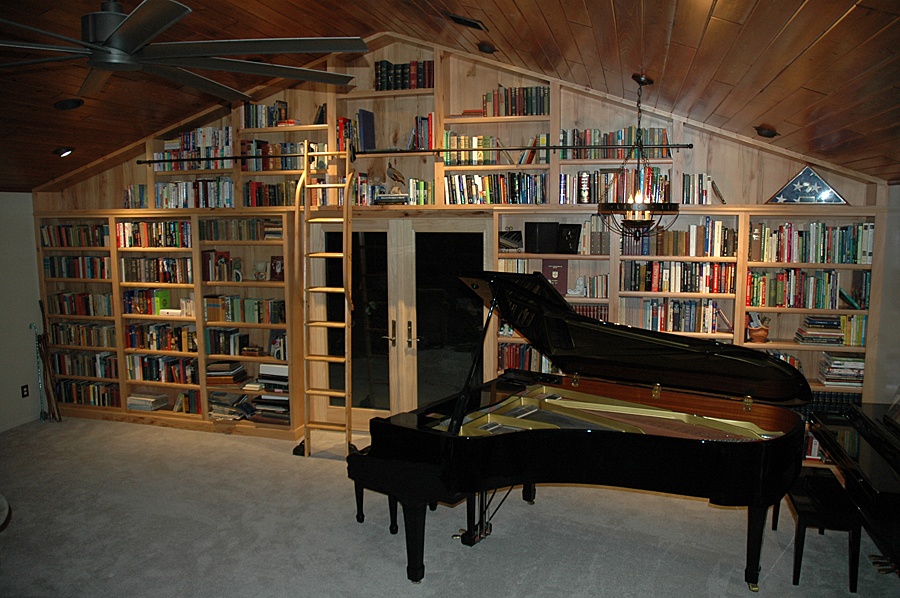
The right rolling ladder can bridge elegance in design to enabling so many options – wouldn’t you want to explore those sprawling bookshelves with your guests, as the piano plays on through the night?

Home Office Rolling Ladder

Rolling Ladder

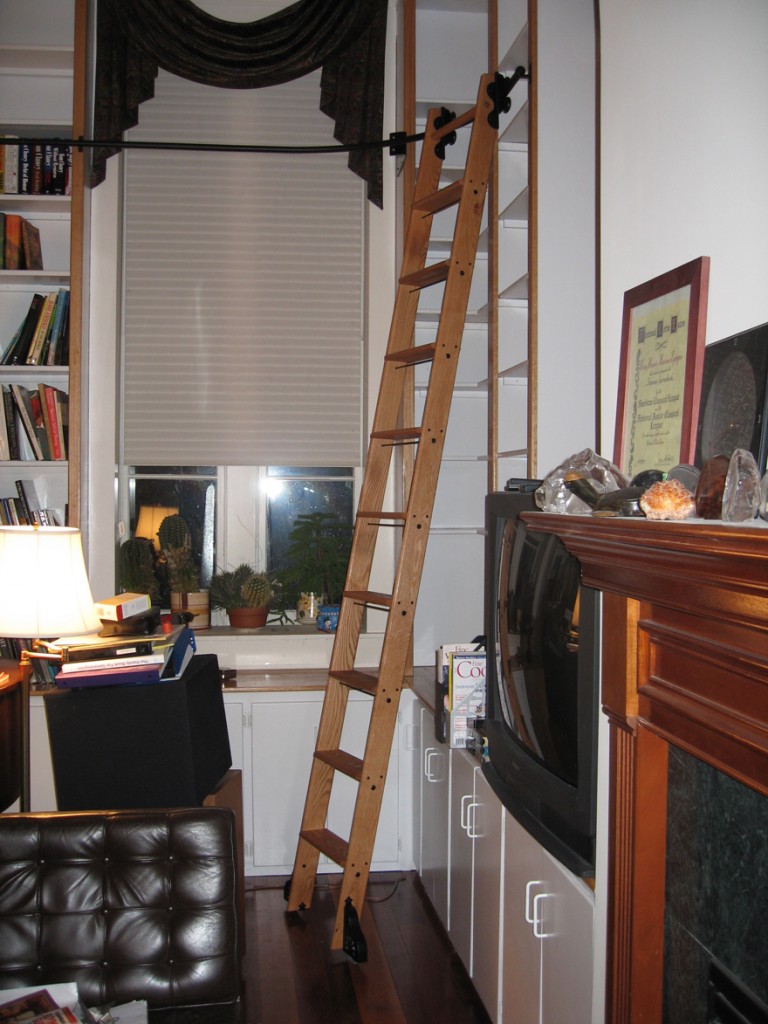
If you have files up to your eyeballs, or higher – maybe it’s time to maximize the shelving space available. Or if you are in a tight city apartment, and your “office” and “living room” (and more) don’t exactly have clear boundaries, the rolling ladder can help. Did you notice how the curved support rail connects between shelves, passing over the window?
(Stationary) Rolling Ladders In Place of Stairs

Sometimes fitting a true stairwell into a space just doesn’t work. With the right set up, a bit of strategy and some innovation, a rolling ladder could do a good stand-in for a full stair case.

Atrium / Side Exit Rolling Ladders

Rolling Ladder

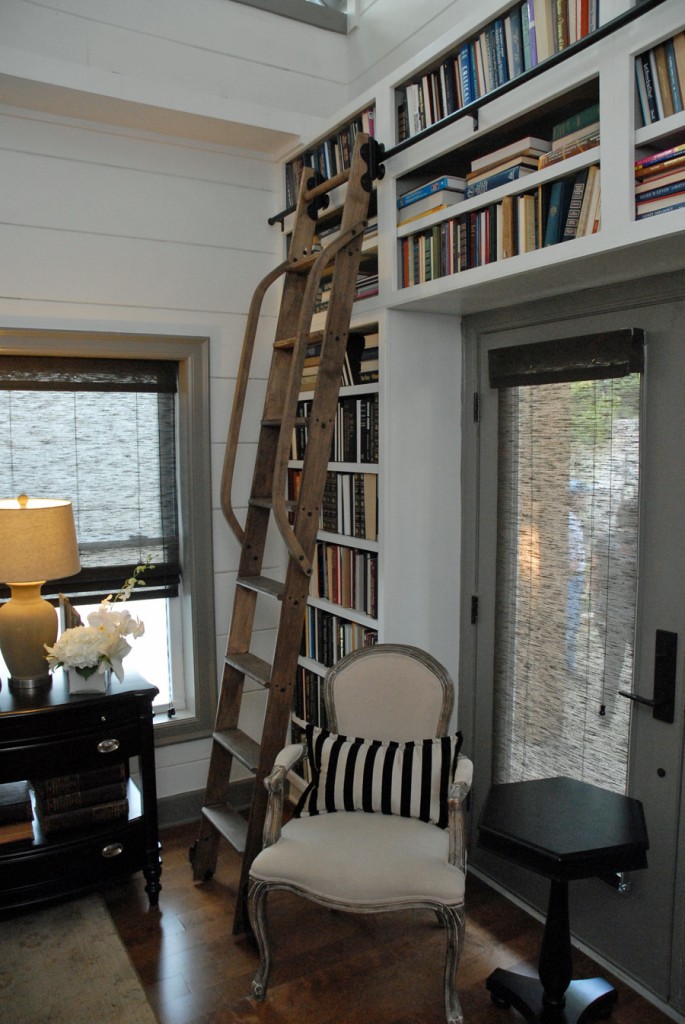
Don’t let that extra wall space go to waste. A well-placed rolling ladder can give you access to storage or shelving that a doorway might otherwise inhibit. With a built-in ladder you can re-position at will, there is no more hassle.

Pantry Rolling Ladders

Rolling Ladder

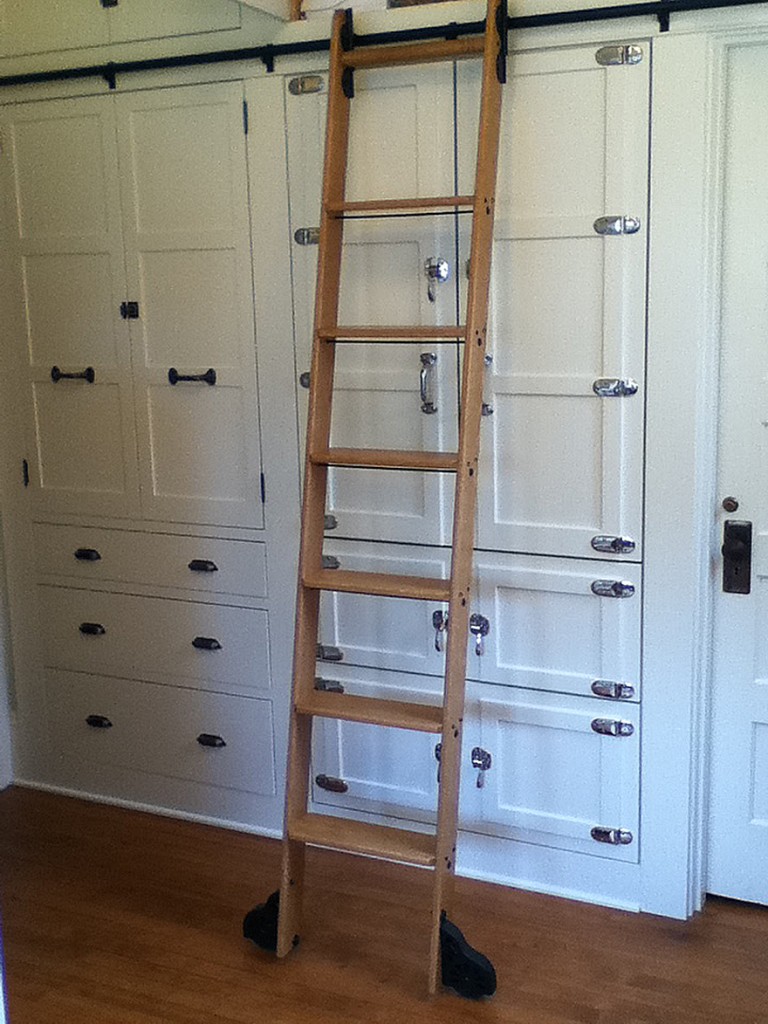
Got a tall pantry or alcove where you store particular items? Maximize the area by using a rolling ladder – compact and flexible.

Rolling Ladders In The Closet

Rolling Ladder

Are you a collector? Is your spouse one? Maybe you have an extensive wardrobe or need to maintain one for your other activities; this might be the perfect solution for you. Keep your accessories and special items within arm’s reach, and bring some serious style to your wardrobe with a rolling ladder in your closet.

With all of these great ideas, have you found out where a rolling ladder would best fit in your home? Let us walk you through selecting all the right parts with our step by step ordering process – we’ll help you every step of the way. Or check here if you want to browse our Ladder Kits and various components.

by

Looking for some new kitchen design ideas for your remodel? We’ve created this handy infographic to help you out along the way! Find out the most popular themed kitchens, most popular kitchen materials, and how to create your favorite kitchen design theme.

  • Traditional Kitchen Theme: Use raised panel cabinets, granite countertops, marble backsplash, and maple wood flooring.
  • Transitional Kitchen Theme: Use flat paneled cabinets, marble countertops, ceramic backsplash, and ash wood flooring.
  • Contemporary Kitchen Theme: Use shaker style cabinets, concrete countertops, stone backsplash, and tile flooring.
  • Modern Kitchen Theme: Use flat/high gloss cabinets, quartz countertops, glass backsplash, and vinyl/high gloss flooring.
  • Rustic Kitchen Theme: Use inset/distressed cabinets, butcher block countertops, brick backsplash, and travertine or chipped flooring.
  • Industrial Kitchen Theme: Use a custom cabinets, stainless steel countertops, ceramic tile backsplash, and concrete flooring.

History of Kitchen Design – Infographic

The History of Kitchen Design Infographic by Kitchen Cabinet Kings