October 5, 2006
Eight Rooms, Well, Nine, but That’s Their Secret
By MATTHEW SUMMERS-SPARKS
Winnetka, Ill.
ON a recent Saturday morning Cami Beghou, 13, pushed the right side of the tall, white bookcase that is built into one of the powder-pink walls in her bedroom. The bookcase, holding rows of books, a stuffed dachshund and a volleyball, silently swung outward, revealing a tiny, well-lighted room. Containing a desk, a chair and a laptop computer, it serves as her study area.
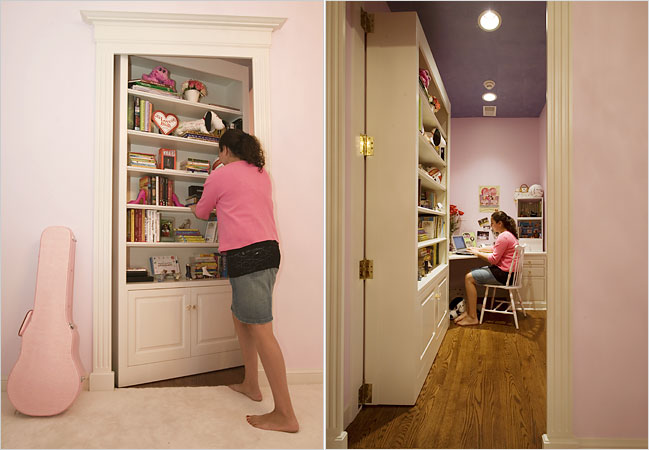
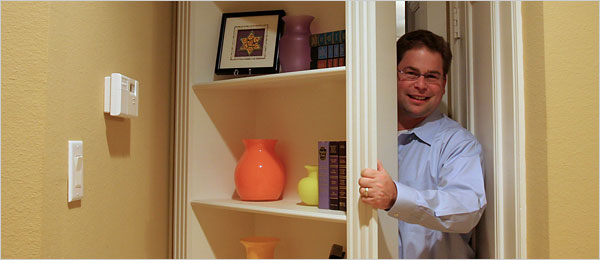
Cami Beghou swings open a bookcase to reveal her study area.
Cami, an eighth grader, considers the hidden room the best thing about her family’s five-month-old French colonial-style house in this Chicago suburb. “When I heard that I could have a secret room, it sounded like so much fun,” she said, noting that the room initially conjured images of secret passages from Scooby-Doo cartoons. “My parents told me, ‘You could just put curtains over the doorway,’ but that wasn’t nearly as cool.”
Since March, when the Beghous moved into the house, Cami estimates that she has had about 30 friends over. Not one was able to detect the bookcase’s secret without guidance. “Most people don’t even recognize that it’s there,” said her father, Eric Beghou, who owns a consulting company with his wife, Beth. “When the home inspector came by to examine the house, our builder shut the bookcase, hiding the room. The inspector went up and down the stairs a couple times — he knew that something was unusual — but he couldn’t figure out what was there.”
Soon, however, inspectors and other guests may get wise to hidden rooms like the Beghous’. Although hard data is not available, architects report an increase over the last five years in the number of clients installing concealed rooms.
During roughly the same period, at least four companies have come into existence producing doors that range from the very basic to the highly mechanized.
The Beghous’ architect, Charles L. Page, who is based in Winnetka, said he had designed seven other houses with hidden rooms since 2001, after designing none in his previous 40 years as a residential architect.
“Absolutely, there has been an increase,” said Timothy Corrigan, an architect and designer in Los Angeles, who noted that he has been practicing for 12 years but was not asked to design a secret room until four years ago. Since then, he has created five.
Although highly fortified rooms have become more widespread — and the idea reached a large audience with the release of “Panic Room,” a 2002 movie that starred Jodie Foster — many of those adding hidden rooms are more concerned with creating a sense of wonder than defending against a home invasion. “I think people like the mystery of them,” Mr. Corrigan said.
One popular trick is to hide a room behind a bookcase that looks like a standard built-in but is equipped with hidden hinges, rollers and handles, as at the Beghous’ house. Contractors can either build the bookcases themselves or buy a piece from a growing collection of companies, including Niche Doors, the Hidden Door Company, Hide a Door, Secret Doorways and Decora Doors. Prices range from about $800 for the most basic models to more than $10,000 for custom-made versions.
Steven Humble is the owner and chief engineer of Creative Home Engineering, a two-year-old business in Tempe, Ariz., that specializes in mechanized doors that conceal rooms or safes. He echoed others in the business in saying that his customers are evenly split between those who plan to use their hidden rooms for security (either to hide valuables or to hide themselves in an emergency) and those who just think they are “really cool.” His company has built about 25 customized doors, bookcases, safes and assorted pieces, for new and remodeled homes, including a fireplace with a rear wall that swings open to reveal a room beyond, for a house in Arkansas. Prices run from about $5,000 to $25,000.
Last month Mr. Humble installed a pair of hidden doors in a house in a town north of Sioux Falls, S.D., for ABC’s “Extreme Makeover: Home Edition.” “Whether it’s for home security or people’s images of living like James Bond, it seems to be something people respond to,” he said.

Louise Kircher raises the staircase in her home in Mesa, Ariz., to reveal the secret room behind it.
James Bond, or Herman Munster. When Louise Kircher, a retired teacher, and her husband, Dennis, a former accounting manager at Boeing, moved into their year-old, 4,300-square-foot contemporary home in Mesa, Ariz., in January, the staircase in the master bedroom was “something extra that came with the house,” Mrs. Kircher said, and reminded them of something out of “The Munsters.” It rises to reveal a hidden room, where she and her husband store an antique bedroom set and a replica of a gilded mummy’s coffin. “The ceiling is only five and a half feet in there,” she said. “I think it would make a great playroom for grandkids.”
Secret rooms speak to the homeowner’s sense of playfulness and perhaps to something deeper. “When we started the company we thought we were going to only attract eccentrics,” said Krystal Strong, co-owner of Hide a Door in Humble, Tex., whose doors’ average cost is $1,600. “But I think everybody is on the eccentric side; they want to make their home unique.”
To Sarah Susanka, a residential architect based in Raleigh, N.C., and author of “The Not So Big House,” a hidden room is “a way to individualize your house.” She said, “For a house to feel like a home, people have to put more of themselves in their house.” She remembered a woman in St. Paul who asked for a room hidden behind the rear wall of a closet. “She said she wanted a secret room for her art studio,” Ms. Susanka said. “She was a very introverted person, and she had to hide in order to let this expressiveness out.”
A concealed room can also function as a direct passage to childhood memories. When David Lee and his wife, Daphne, moved into their house in Plano, Tex., in March, they found themselves with too many unused bedrooms. Mr. Lee set up a workroom with tools, a computer and a workbench in one of the empty rooms. But it did not take long for the couple to decide to install a bookcase door, at a cost of almost $2,000, and turn the space into a secret room. “I always wanted one,” he said, “since watching Scooby-Doo way back when.”
David Lee of Plano, Tex., got a bookcase door to hide the mess of his workroom, but also because he had wanted a secret room, he said, “since watching Scooby-Doo way back when.”
Hidden doors have their complications. Cami Beghou said that while the books stay put when she opens her bookcase door, the volleyball once rolled off, and she generally leaves the door open unless she is expecting company. Jon Coile, chief executive of a Maryland realty company, said that he has had some problems with the magnetic latch on the bookcase door at the house he shares with his wife, Wendy, in Crownsville, Md., and that they secure the objects on the shelves to make sure they stay put.
Ray Sullivan, a manager with a financial services organization based in Phoenix, has two hidden doors in his house and is working on a third. But he ran into a potential problem. One of the doors, a motorized bookcase, can be opened either by using a remote control or by knocking in a particular rhythm. “One time I accidentally left the remote on the other side of the door and forgot the knock code,” Mr. Sullivan said.
Fortunately for him, the hidden room has another entrance, so he took a circuitous path to get back in. He has since memorized the knock sequence. “It’s one of those things you do once, hopefully, like locking your car keys in your car,” he said. “After you do it, you won’t do it again for a long time.”
For Mr. Coile, building a home with a secret room was a once-in-a-lifetime opportunity. Behind a bookcase in the library of his house is a compact spiral staircase that connects to an upstairs writing area overlooking the library and to a downstairs home theater as well as to a nondescript room with a view into a bar through a one-way mirror.
They have shown the setup to so many friends that its secrecy has evaporated, which Mr. Coile said is fine with him.
“What use does this have?” he said. “Absolutely none. My builder’s eyes rolled back in his head when I told him I wanted a secret room. What can I say? I watched too many Disney movies when I was a boy.”