Are you thinking about incorporating a custom bookcase into your home? These units are versatile and multifunctional, adding character and functionality to your space. We’ll discuss the various ways these units can enhance your living space.
Office
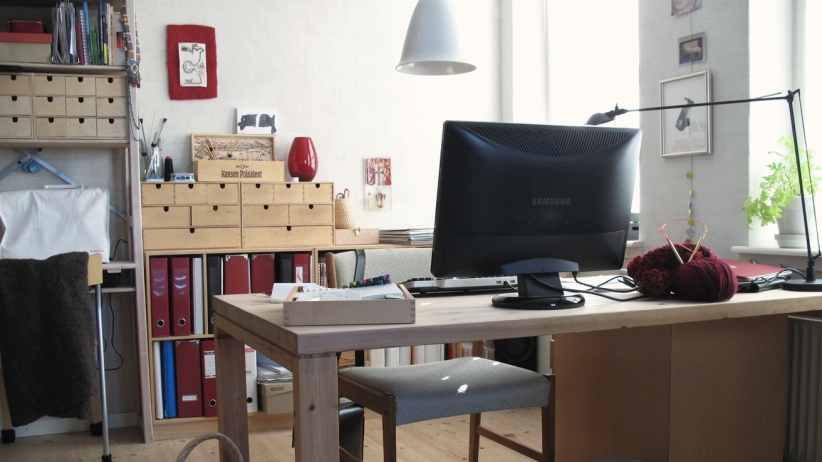
Do you need a home office with custom office furniture to work at home or just to have a place to set up a desktop computer? Custom bookcases are ideal for such workspaces, especially to homeowners who own a significant number of books. These shelves can hold more than books and offer the perfect way to display collectibles and memorabilia. Our bookcases can also be made with doors or drawers to serve as concealed storage units or file drawers.
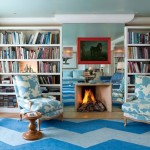
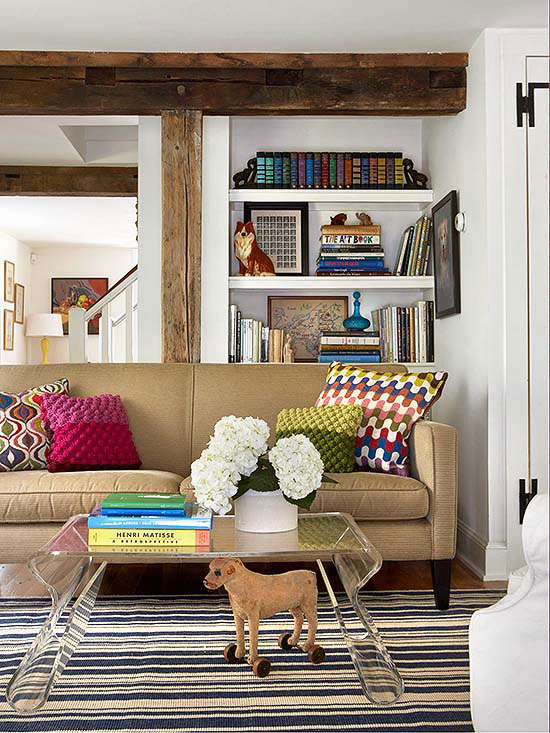
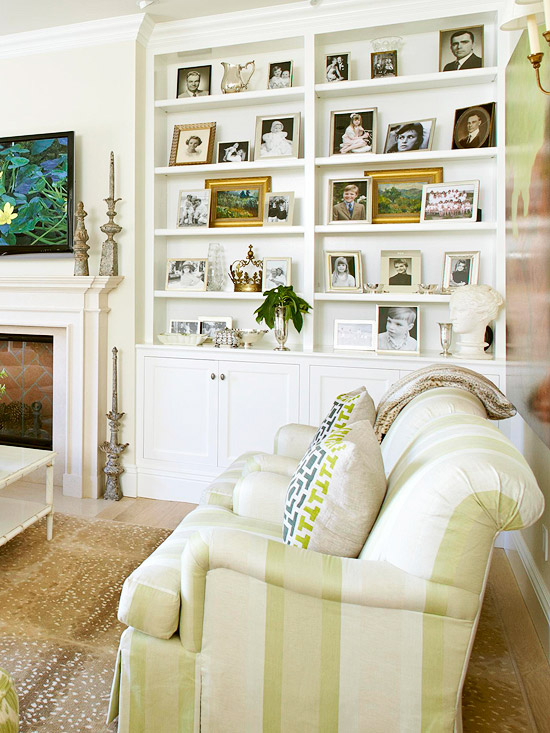
Living Room
Floor-to-ceiling units are particularly attractive and provide significant display and storage space in the living room. You can also choose to design your shelves with fluting, arched tops, and even lighting, making the pieces part of this location’s architecture. Bookcases can flank an entertainment console to create a larger entertainment system.
Nursery
More and more parents are also deciding to incorporate custom bookshelves into a child’s nursery. This is largely because the cases offer plenty of space for storing and displaying items. They often remain a key room feature as children grow. Be sure to secure it to the wall to make sure a toddler does not climb up and tip it over!
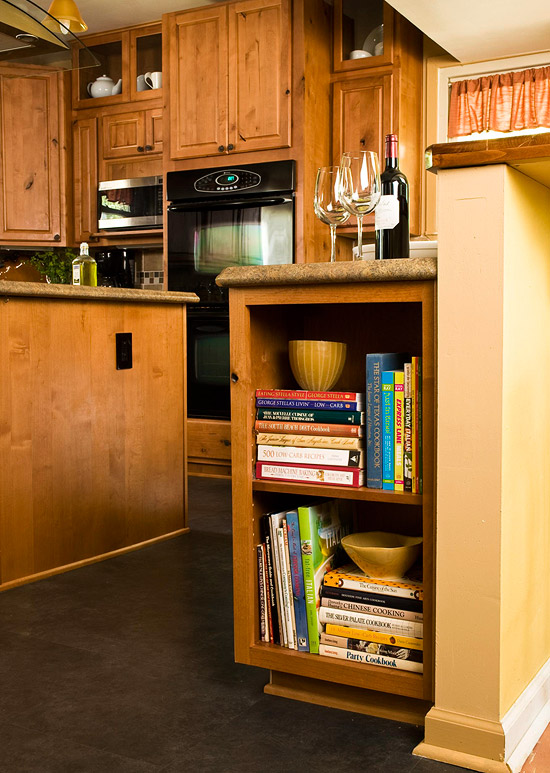
Basement Pantry
Basements are good for just about anything, but they are especially good for storing extra packaged food items, holiday dishes and servers, and kitchen equipment that is not currently in use. Why cram your kitchen full with items you only use a couple of times a year?
Interested in a Custom Bookcase?
Now that you’ve thought about some of the common locations for these units, browse our selections online or contact us to discuss your unique needs with a professional. We’ve served the thousands of customers for many years and our highly-trained contractors always deliver expert design advice, quality workmanship and seamless installation. Big job or small, you can expect us to have the knowledge, skills and equipment we need to complete it quickly and efficiently. You can also count on us for built-in entertainment centers, storage systems and kitchen/bathroom cabinets.
Small-business owners and entrepreneurs who work from home could save big money on their taxes by taking the home office deduction, as long as they meet the IRS’ requirements and keep good records.
If you use part of your home regularly and exclusively for business-related activity, the IRS lets you write off associated rent, utilities, real estate taxes, repairs, maintenance and other related expenses. Here’s what small businesses should know about the home office deduction. In this case, ordering our home office components, cabinets, or bookcases, might even qualify as a business deduction!
Who qualifies for the home office deduction
You can claim the deduction whether you’re a homeowner or a renter, and you can use the deduction for any type of home where you reside: a single-family home, an apartment, a condo or a houseboat. You can’t use it for a hotel or other temporary lodging.
The home office deduction rules also apply to freestanding structures. You can use a studio, garage or barn space as your home office as long as the structure meets the “exclusive and regular use” requirements.
Here are the conditions you’ll need to meet:
Regular and exclusive use: The space you’re using for business must be used exclusively for conducting business. For example, using a spare bedroom as both your office and a playroom for your children likely makes you ineligible.
There are two exceptions. If you provide day care services for children, elderly (65 or older) or handicapped individuals in that part of the house, you can probably still claim business deductions, as long as you have a license, certification or approval as a day care center under state law, according to the IRS. The other exception is if you use the office for storage of inventory or product samples you sell in your business.
Principal place of business: Although your home office doesn’t have to be the only place you meet your clients or customers, it must be your principal place of business. That means you use the space exclusively and regularly for administrative or management activities, such as billing customers, setting up appointments and keeping books and records, according to the IRS.
» Ready to work with a financial planner? The form below will put you in touch with an advisor at Facet Wealth, a fee-only, fiduciary online planning firm. They aren’t tax preparers, but they can help you with tax and estate planning.
How to determine your home office deduction
You can determine the value of your deduction the easy way or the hard way.
With the simplified option, you aren’t deducting actual expenses. Instead, the square footage of your space is multiplied by a prescribed rate. The rate is $5 per square foot for up to 300 square feet of space.
The regular, more difficult method values your home office by measuring actual expenditures against your overall residence expenses. You can deduct mortgage interest, taxes, maintenance and repairs, insurance, utilities and other expenses.
You can use Form 8829 to figure out the expenses you can deduct.
Simplified version vs. actual expense deduction
The choice whether to use the simplified deduction, if you’re eligible for it, or to deduct actual expenses depends mainly on which would net you the bigger tax deduction.
The actual expense method
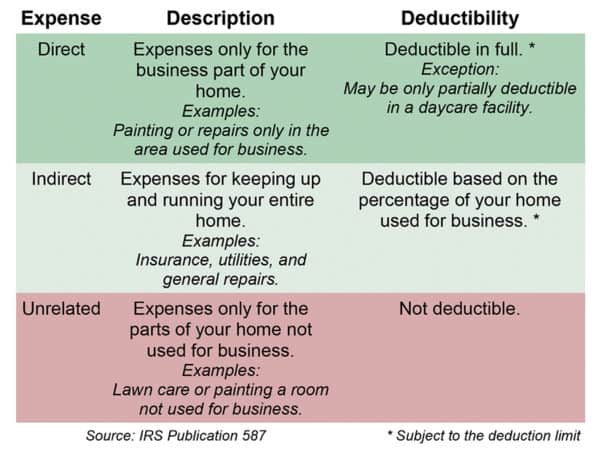
If you use the actual-expenses method, you can deduct direct expenses — such as painting or repairs solely in the home office — in full. Indirect expenses — mortgage interest, insurance, home utilities, real estate taxes, general home repairs — are deductible based on the percentage of your home used for business.
Example: Let’s say you paid $3,000 in mortgage interest, $1,000 in insurance premiums and $3,000 in utilities (all indirect expenses) plus $500 on a home office paint job (direct expense) during the year. Your home office takes up 300 square feet in a 2,000-square-foot home, so may be eligible to deduct indirect expenses on 15% of your home.
That could mean a deduction of $1,050 in indirect expenses ($7,000 in expenses, multiplied by the 15% of space used in the home), plus $500 for the direct expense of painting the home office, for a total deduction of $1,550.»
The simplified version
If your home office is 300 square feet or less and you opt to take the simplified deduction, the IRS gives you a deduction of $5 per square foot of your home that is used for business, up to a maximum of $1,500 for a 300-square-foot space.
In this case, using the simplified method could make more sense because you’d get only $50 more in deductions by documenting actual expenses. You should also consider the time it will take you to gather receipts and records.
The simplified method can work well for single-room offices and small operations.
The actual-expenses method might work better if the business makes up a large part of the home.
Things to watch out for
Receipts. If you plan on deducting actual expenses, keep detailed records of all the business expenses you think you’ll deduct, such as receipts for equipment purchases, electric bills, utility bills and repairs. If you’re ever audited by the IRS, you’ll be prepared to back up your claims.
Anxiety. Don’t let the fear of an audit keep you from taking the home office deduction.
Home sales. If you’re a homeowner and you take the home office deduction using the actual-expenses method, it could cancel out your ability to avoid capital gains tax when selling your primary residence. People who sell their primary residence after having lived in it for at least two of the five years before the sale generally don’t have to pay taxes on up to $250,000 in profit on the sale, or $500,000 if married filing jointly, according to IRS Publication 523.
Depreciation. If you use the actual-expenses method, you’re required to depreciate the value of your home. Depreciation refers to an income tax deduction that lets taxpayers recover the costs of property, due to wear and tear, deterioration or obsolescence of the property, according to the IRS. The depreciation you’re required to take in home office deductions is subject to capital gains tax when you sell your home. For example, if you own your home, use 20% of it as a home office and deduct depreciation, 20% of your profit on the home’s sale may be subject to capital gains tax. However, if you use the simplified method, depreciation isn’t a factor and you may not be subject to the tax.
The rules on tax deductions for a home office can be hard to digest. Consult with a tax advisor or use the appropriate online tax software if you’re unsure about how to proceed.
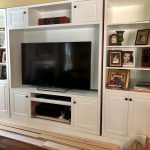
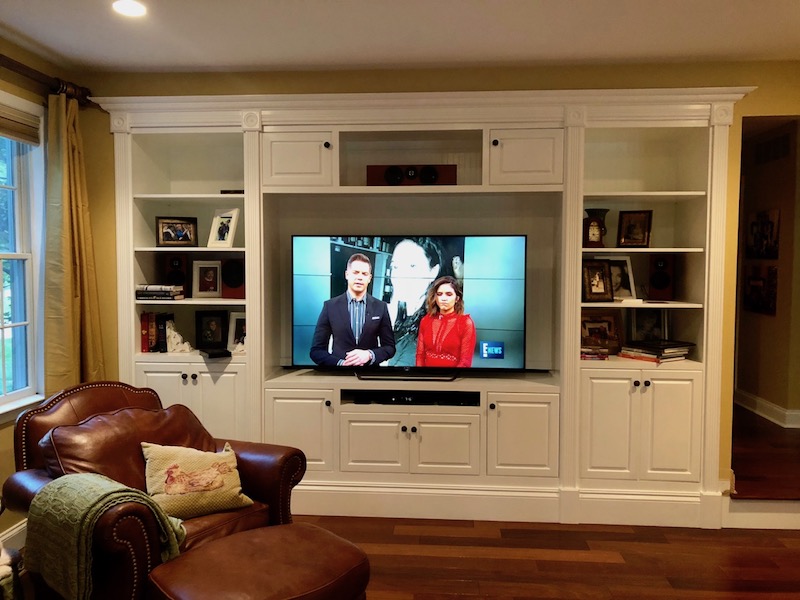
This article describes the steps I took to create a built-in entertainment system using Arthur Brown Face Frame bookcases and cabinets with custom wood moulding used to trim it out and give it a built-in look. The bookcases and cabinets have a simple face frame style so that separate mouldings could be chosen and added to fill in the gaps between the cabinets and the wall.
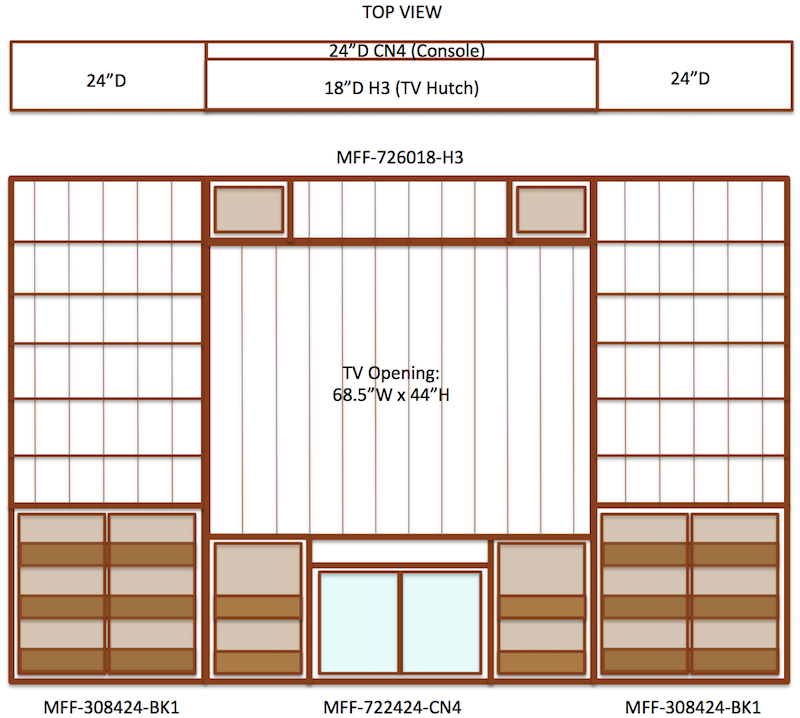
This particular home has a step-down family room with a raised opening in the wall, which isn’t exactly your typical situation. This made it all the more tricky, since the base of the opening is 12 inches off the floor. The top bulkhead is 12 inches from the ceiling, leaving only 7 feet of vertical space to work with for the cabinetry. The opening is about 11.5 feet wide.
Step 1: Design of the Space and Ordering of Components
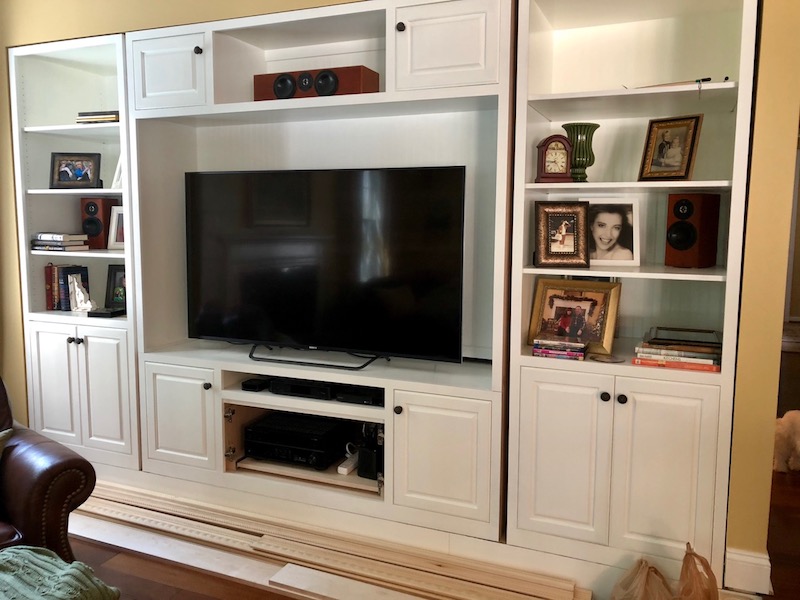
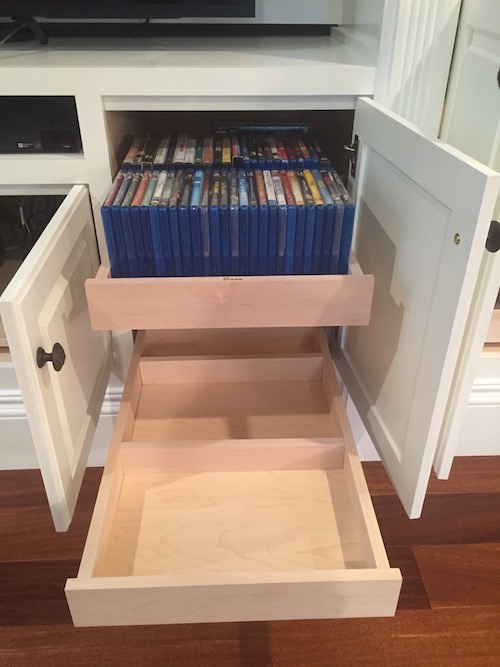
To start the project, I began by coming up with a design plan and then choosing bookcases and cabinets that would fit comfortably into the space without leaving too much space to fill on the sides and top. Since I wanted this to be used as an entertainment system, there needed to be space for a large TV, speakers to the sides and above, media components below, and plenty of storage space for DVDs, books, and other items. The center bottom piece is a CN4 entertainment console with a TV hutch above. The side pieces are Arthur Brown bookcases with doors at the bottom. Each piece has custom pull-out trays behind the doors. They were sized to fit rows of DVDs and Blu-Ray discs. The center console section has a pull-out shelf so that a heavy receiver can be rolled in and out to make it easier to connect the wiring.
Step 2: Preparation of the Area
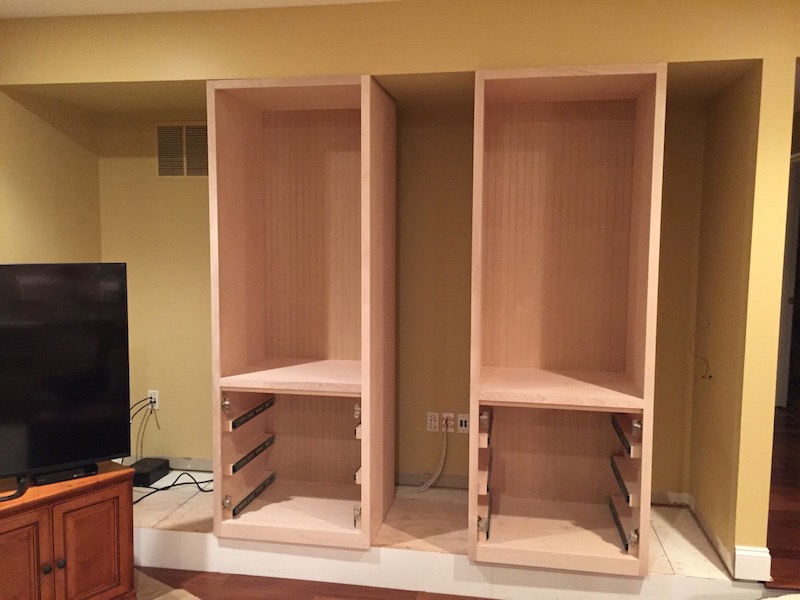
First, I removed the wood flooring from this area since it was no longer needed. Plus, the extra 3/4″ of space gained by removing the flooring made sure the 84″ tall bookcases fit in easily. The photo below shows two 30″W x 84″H x 24″D unfinished bookcases, which just barely fit into the space after having removed the flooring. The bottom section has pull-out trays and doors, but I took these off so that they could be more efficiently painted. The other pieces were moved to another area for painting.
Step 3: Painting and Installation
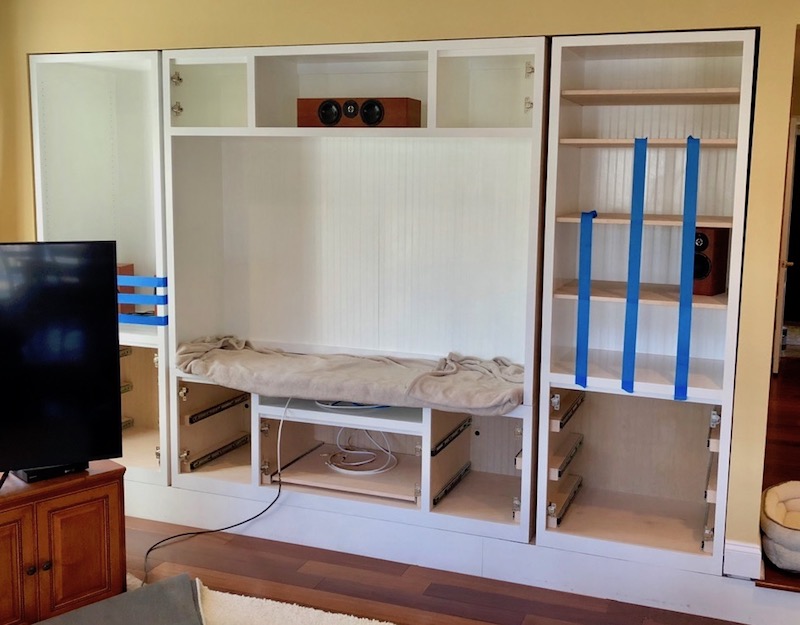
I painted all the bookcases and other components, shelves, and doors, and then positioned them in the wall space, leaving some gaps between them. They will later be covered with crown, base, and side moulding.
Step 4: Installation of Wiring and Power Access
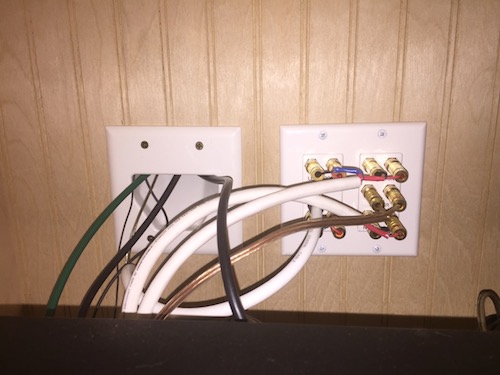
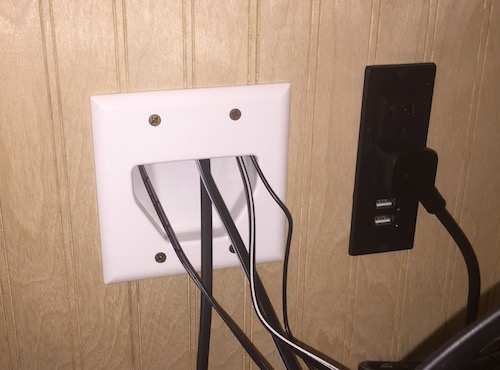
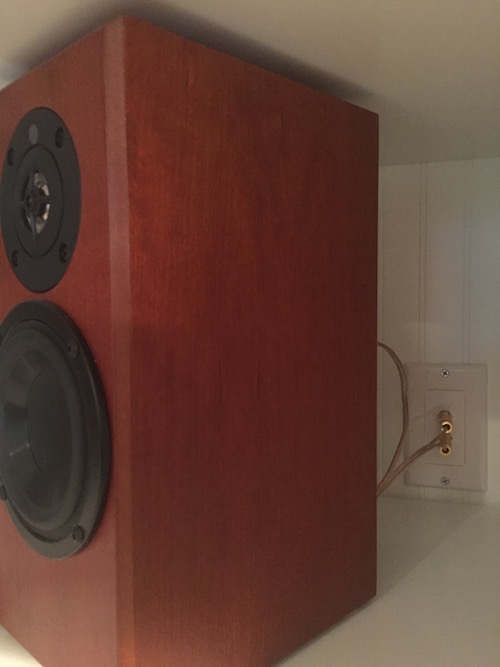
Before the pieces were permanently installed, it was necessary to run wires from where the media components go to where the speakers and TV will go. I cut holes into the back panels and installed connector panels to enable wires to easily pass through from one piece to the next. For some larger cables, like HDMI and power cables, I fed them through an open panel instead of using connectors. I then connected cables to the backs of the panels and fed them into the shelf above so that they could be quickly and easily plugged directly into the front of each panel. Power was run to the bottom cabinet.
Step 5: Finishing the Installation of Doors and Accessories
I screwed the outer two bookcases to the side walls to ensure they were not able to move, and then screwed the center pieces to the side pieces to make it a secure unit. On the floor, you can see the moulding that will be used to frame out the pieces and cover the gaps, thus making it a built in system of shelves and entertainment units.
Step 6: Installation of Equipment
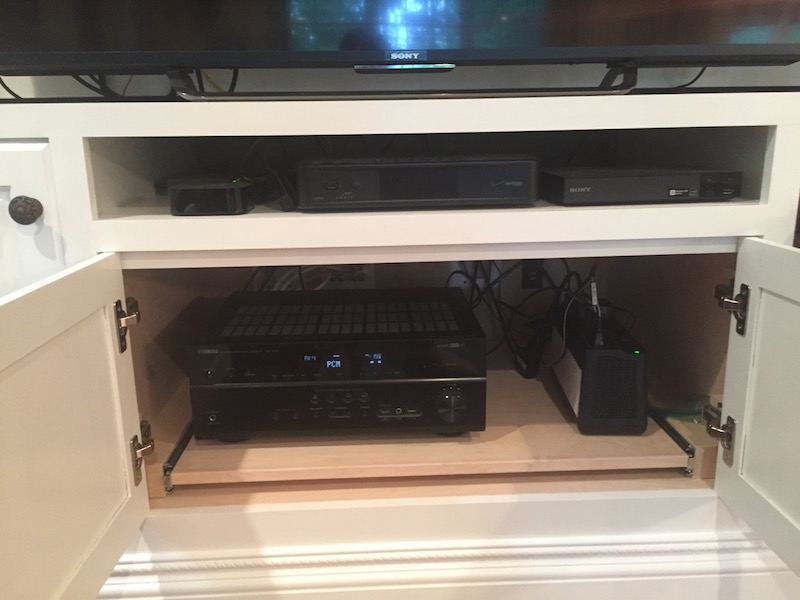
I installed equipment into the entertainment console and connected the cables and power cords. At the bottom center opening of the entertainment cabinet is a battery backup/surge protector and a receiver. A pull-out shelf was installed to make it easier to slide the receiver in and out while connecting cables. In the short open shelf above are the media boxes, such as a cable TV box, Apple TV, and Blu-Ray player.
Step 7: Installation of Moulding Around Frame
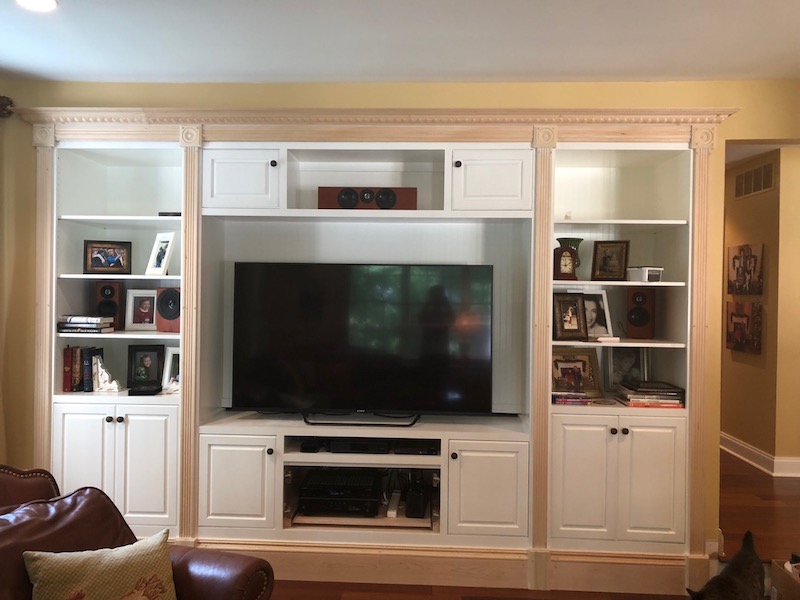
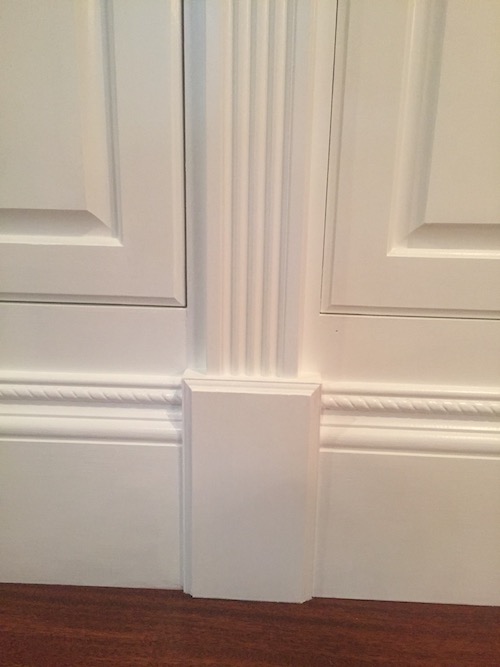
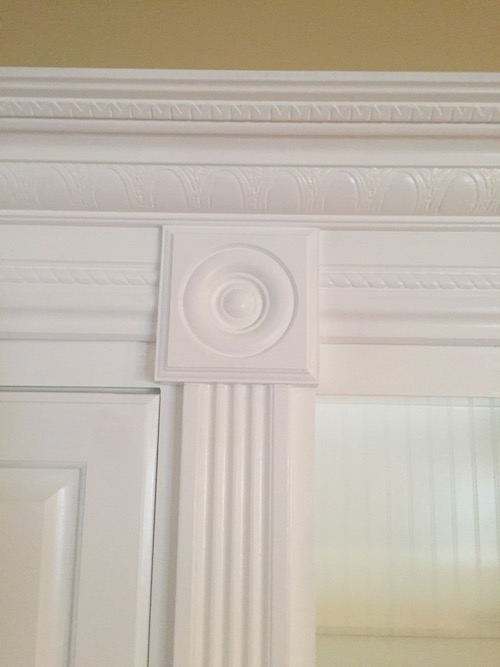
Finally, I nailed unfinished moulding from Home Depot to the wall and face frames of the bookcases and cabinets. In between each piece is a custom-built column consisting of several stacked pieces: a plinth block at the bottom, a piece of fluted column above, and a rosette at the top. In between the plinth blocks are flat pieces of Maple wood with upside down chair rail moulding added to its top. Above the cabinets is an inverted piece of base moulding that was placed in between the columns. Finally, a piece of crown moulding was added at the very top.
Step 8: Painting of Moulding
I filled in nail holes in the moulding using wood filler and applied caulk to all gaps. Then I painted the moulding so everything flowed seamlessly together. You can’t even tell which pieces are separate from each other. As far as anyone can tell, it is a custom built in. The first photo below shows the plinth block with fluted moulding stacked on top. To the side are flat pieces of wood with chair rail placed upside down on top. The second photo shows the rosette block at the top of the fluted moulding, with upside down base moulding on each side and crown above.
Step 9: Finishing Touches
Finally, I installed all the rest of the entertainment components, added books, photo frames and other nick knacks to the shelving, and plugged it all in. No more hole in the wall–it now looks completely built in! Inside the taller doors are pull-out trays for DVDs and other items. It was a lot of work, but much simpler than a fully custom job since I was able to use pre-built component bookcases and cabinets from Highlands Designs.
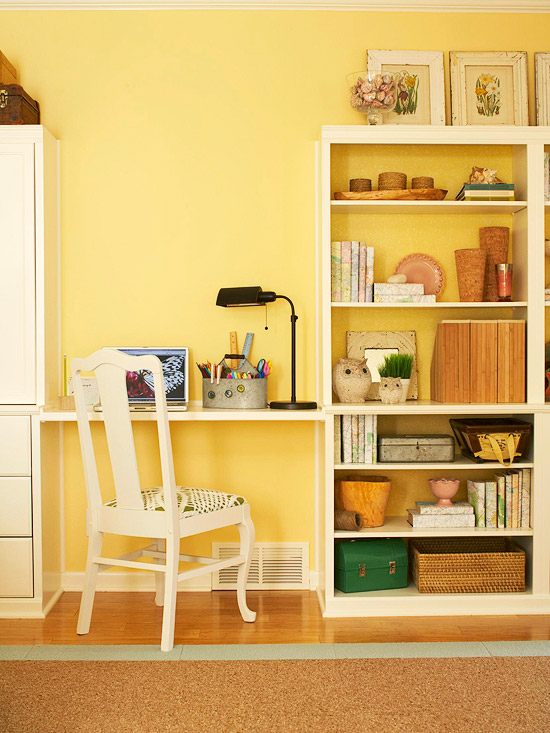
This article is about home office design using off-the-shelf cabinet, desk, and related components, like we offer at Highlands Designs. A typical home office includes at least one of the following items: a desk, a file cabinet, cabinets for storage of supplies, and bookshelves for books, manuals, business information, or other personal items. The following is one story about getting started.
Jo Heinz is president of Dallas interior architecture and design firm Staffelbach. Entrepreneur.com asked Heinz for advice on designing a home office for maximum efficiency. Here’s what she had to say:
How does designing an effective home office differ from designing a commercial office? And what considerations do you need to keep in mind even before you get started? Working from home is exciting because it offers an opportunity for real comfort and efficiency, but if the office is too casual, or isn’t effectively separated from the home environment, peak productivity may be lost.
While comfort is essential in any office, an office that is too casual may seriously impede the ability to get things done. You have to find a way to separate yourself from the rest of the goings-on in the home and to convey a sense of “off limits” to all other normal and natural home sounds and interruptions.
A distinction has to be made regarding the physical boundaries of this working space. The most effective way to do that is with the design of the space itself.
Ask yourself these questions before you begin:
What will you be doing in the space?
What type of work needs to be done?
Will external clients be visiting the space?
Will colleagues visit for collaborative work?
What type of materials will be referenced and/or stored?
What type of equipment is required?
When will I be doing the bulk of my work?
Will I be making conference calls?
Will I be video conferencing?
The answers to these questions will begin to develop the program for your home office.
The next step is setting up your space. Where are you going to put your office? It doesn’t need to be large or expansive, but it should be separate from other areas. You might be able to convert the guest room you only use a few times a year or another underutilized area into your office. Evaluate how the space you find can be dedicated for your use and can be “your space.”
Keep all of your work in that space because it’s important that you be able to find things, retrieve things and be efficient within this space. You will also want to keep the non-office space in your home free of work items. This promotes healthy balance and allows you to relax at home when you are not at work.
Establish set hours for your work at home. This contributes to your life balance, and should also help you be more productive and organize your day. The biggest problem home workers have is the loss of distinction between work life and home life.
Compartmentalizing your day into identifiable segments will help. Set up an established outline of time that you know you will spend in your office. That will help you develop a plan for productivity.
What are the most common mistakes people make when they’re setting up a home office?
There are five:
Thinking you can “tune out” the plasma screen on the wall. Don’t hang it anywhere near where you’ll be working.
Inadequate storage components
Lack of space for reference materials
Slow and inefficient equipment
Inadequate wire management (cords and wire spaghetti everywhere)
What are the most important five things to consider when you’re setting up a home office?
Equipment. Speed and efficiency are critical at home. But make careful decisions. Question whether that large color copier is a real necessity or if a trip to the neighborhood Kinkos will suffice. Don’t pay for equipment you won’t use on a daily basis.Investigate a wireless hub for your office so you have the flexibility to work on your laptop from your desk, your chair or a table, and at both standing and sitting heights. This simple option can enhance your creative problem-solving and thinking ability.You’ll want a separate phone line to your office so no business associate or client gets a busy signal. Also, make sure your phone has the capability for messaging, conferencing and speaker functions.
Be sure you have a local and responsive computer support team that will make home service calls promptly. You need to know you can rely on the equipment you have to work.
Be sure you invest in the fastest equipment available, so you don’t spend your time waiting for things to work.
And don’t forget insurance on that equipment. Affordable policies will insure your home office equipment in the event of a loss or disaster. You’ll want this peace of mind. Many insurance companies offer special coverage for home workers.
Lighting. Good lighting is essential. Ideally you want as much natural daylight as possible. If your space has a window, it will enhance the lighting. Daylight is the most evenly balanced source of white light available, in that sunlight has an approximately equal proportion of each color of the spectrum. This light, however, never has a constant color and its beauty comes from the way it is reflected and from the way it is refracted by the earth (as in differing times of day). The color of natural light also differs based on geographic location. It is always beneficial to have as much natural light as possible in the working area.If no daylight is available, a combination of general and task lighting will be required. A high-quality task light will be essential for late nights or cloudy days. If your home office is in a basement or a room without windows, check out daylight-replicating light sources that will provide energy-efficient, full-spectrum lighting. Many ergonomic task-lighting fixtures have dimmer switches so you can control the amount of light.The most effective lighting brings out the fullest quality of the colors illuminated. If lighting levels are too low, there can be negative psychological effects, including depression. For human comfort, a yellow-cast illumination is best. It is the color of brightness, and midway through the color progression from cool to warm.
To avoid glare, don’t place overhead lighting directly above computer screens, and don’t put a computer screen directly in front of a light source. That will cause eyestrain.
Energy guidelines are leading to new reduced-light levels in offices that are easier on the eyes. The most critical factor with lighting is the ability to control its brightness and intensity.
Privacy. No one can work effectively in a sea of noise or interruptions. When planning your office area, ensure that it affords a degree of privacy from surrounding activities. While headphones may serve to isolate certain sounds, no one wants to be forced to wear headphones all the time. Portable screens can be used to shield the work area from nearby activities. Alternatively, divider walls that double as bookcases will not only divide the area but provide superior storage solutions.To assist in creating the quiet needed for real concentration and work, a degree of white noise can be helpful. Air filters and low fans will operate at a quiet speed to muffle other noises.If a door to the office area is not practical or available, it may be helpful to add signage (e.g., “No interruptions” or “Quiet please”) to remind others in the space that this is “work time.”
Layout/organization. The old rule, “a place for everything and everything in its place” was coined to relieve stress. If you have carefully thought through your storage requirements, you’ll have the space you need.The desk surface of your choice will serve to support your laptop or desktop computer and work-related items. Your desk will likely be the place where you spend the most time. Consider the myriad of options available for organization of papers on your desk. What is essential for productivity is an organized desk that keeps pending work in order and prevents the chaos of disorganized piles.Solutions are as simple as pencil cups or trays to keep all writing instruments in one place, plus memo and business card holders so, literally, there is a place for everything. Shops such as The Container Store make it easy for you to get organized and stay that way. In this day and age, there are so many options for storage, the challenge is more in finding what works best with your flow of paper and work. Do you find yourself working from left to right? Does your paper trail have a distinct flow? Remember than when planning how you store your items.
Italian product designer and manufacturer EmmeBi has amazing examples of how it organizes an office, both commercial and residential. You can use those ideas for inspiration and, if your budget requires a more modest approach, mimic the same look with some of the items found at Target , Ikea and similar stores.
Ergonomics. Your health, safety and welfare are critical. Therefore, the items you choose should be ergonomically designed to promote your health and well-being while using them.Chair manufacturers have made significant improvements in adjustability and comfort for computer users. They have even researched the biomechanics of seating. Task chairs reflect this research and are making individuals’ lives easier even when they work on a computer the entire day.Keilhauer has produced chairs that feature a pelvis balance point and free shoulder technology. They are truly kind to your back and spine during computer work. Another favorite of ours is Humanscale . It has also taken a great amount of time and effort to study the needs of the human body when it comes to working. If you are in a position where you write or create most of the time, the company’s chairs are an investment you will be thankful for for many years.Consider foot rests, ergonomic mouse instruments shaped to fit your hand and soft keyboard pads that allow rest and relaxation for the wrist, and foot rests. All enhance the work experience and make your time at work less stressful to your body. The goal is make work comfortable for your body and to support the areas of the human form that are brought into play with the work you do.
How can you set up an office to take advantage of the “green” mind-set?
Consider sustainability. Computers contain hazardous materials such as heavy metals, vinyl and toxic chemicals. They also rely on electricity for power. Keep the computer, your printer and other office equipment turned off when idle. Activate power-saving features on your computer. When trading in for new equipment, make sure your home office equipment will be recycled. Avoid throwing office equipment into the trash. A simple internet search will offer many options in your area.
Keep the planet in mind. Eco-friendly design ensures earth-friendly materials. Consider items such as recycled glass countertops and specify materials that use resources most efficiently, such as woods from sustainable forestry and products that are recyclable. Use local and regional resources when available, as this keeps the money local, supports local business and keeps shipping and freight costs (as well as resources used) at a minimum. Also, don’t be afraid to look into ways to integrate energy conservation such as “daylighting,” which takes advantage of natural light. That will not only help you feel better as you work, but it will also help the planet.
What are the best colors for an office?
The psychology of color is real. Certain colors elicit emotional and physical reactions and responses from individuals. Color impacts mood and energy levels. Therefore, be aware of the psychological impact of the color you choose for your home office.
Blues, greens and violets are considered cool colors. These colors evoke feelings of peace and relaxation. Blue can actually make a room feel cooler and can lull occupants to sleep. It’s an ideal bedroom color, but not an ideal office color.
As the dominant color in nature, green is considered a neutral. We are very comfortable in green surroundings. Green evokes organic, fresh, restful emotions and can foster concentration. Today’s new brand images feature a lime green tint that combines yellow hues. This color can add freshness and vitality to an office. The addition of green to an office area will enhance its balance.
Yellow grabs attention. That’s why the most popular highlighters are yellow. It catches the eye like no other color. It makes people happy and evokes optimism. But a bright yellow might be distracting or overpowering in an office area and could even cause a degree of anxiety.
Red is energetic and stirring. It often produces strong feelings and can create excitement. If used in a home office, it should be used as an accent only.
White, ivory, gray and tan can carry subtle variations of color. So they can be neutral with overtones of the colors you feel most comfortable with, such as a warm gray or a cool gray. These colors do not distract and can be combined with accent colors for vitality and energy.
Accents and shades of purple have been proven to stimulate imagination. Purple or lavender tones cross the line between warm and cool tones and can evoke a favorable response when focus and concentration are required.
With all colors, it’s important to test the colors on the wall in large enough areas to ensure compatibility.
There is no real hard and fast formula for color associations. The color blending is subject to the occupant’s wishes.
How would you sum up the concept of home office design?
Make the space your own. Ensure that the space reflects your personality and that you enjoy being there. Ensure that your office reflects you and that it contains a favorite object or photo that will give you the break you need when you pause in your work. It is these small touches that help you make the space your own.
Your office should be a connection to yourself, your spirit and your productivity. It should afford focus rather than distraction and be a place you want to be and want to spend time in. That will positively influence you in the space and enhance the work you do there.
“There is no furniture so charming as books, even if you never open them or read a single word,” said the nineteenth-century writer Sydney Smith. A shelf full of books adds instant appeal to any room, whether in the form of bespoke joinery or stand-alone shelves. We’ve looked for the most inspiring designs for bookshelves in the living room, bedroom or study. From modern designs, to mid-century classics and spy novel numbers which conceal hidden doors, there are bookshelves of every type in this gallery to inspire something as intriguing as the tomes that fill them.
Once you’ve decided on the bookshelf for you, have a think about how best to organize your books. Are you someone who likes them color-coded? Or by size? Take a look at our piece on how to arrange your bookshelf for more advice.
Entryway Bookcases
In the library at Wolterton Hall in Norfolk, two panels of faux book spines, on either side of a door, drop down to reveal a drinks area hidden behind – aperitif bottles are on the left and digestifs on the right. Once closed, they are indistinguishable from the other shelves and you would never know they are there. woltertonpark.co.uk
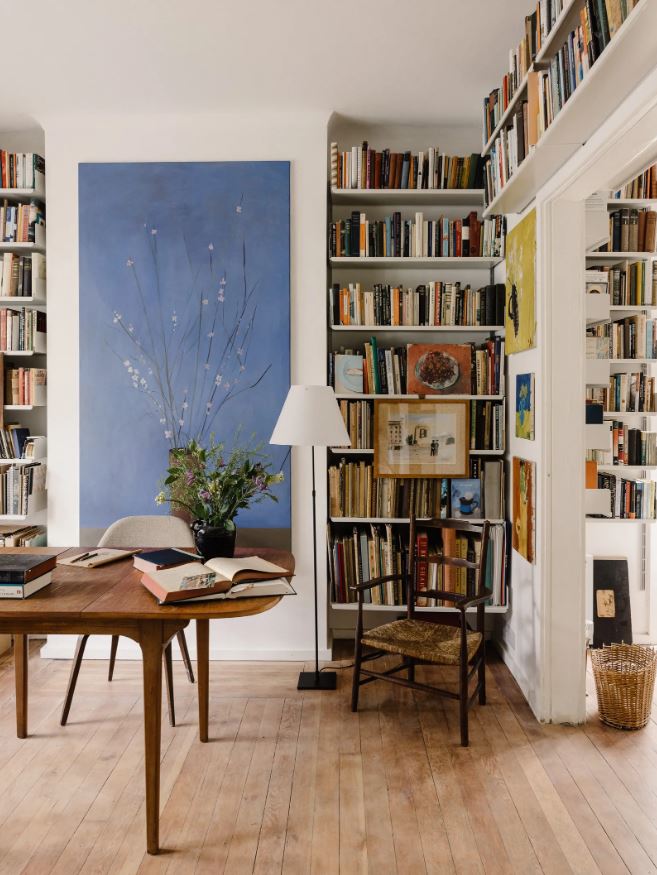
In the painter Haidee Becker’s north London house, bookshelves have been built into the recess of the wall and along the top of the archway. In the fairly neutral space, the addition of hundreds of books adds color and texture.
Floor-to-ceiling bookshelves, in a bespoke green, frame the doorway with a view across the hall to a bedroom beyond in Thomas Dane’s Gloucestershire house.
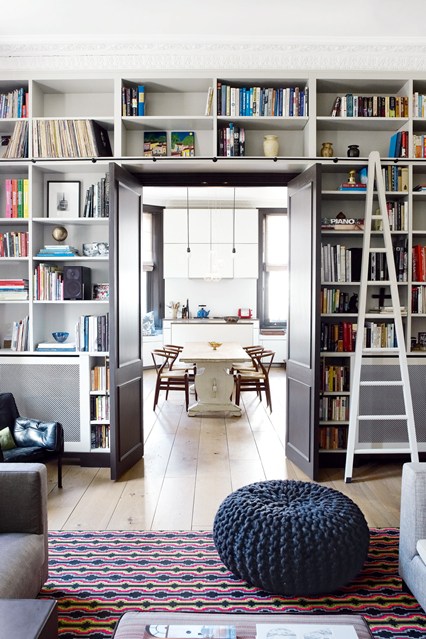
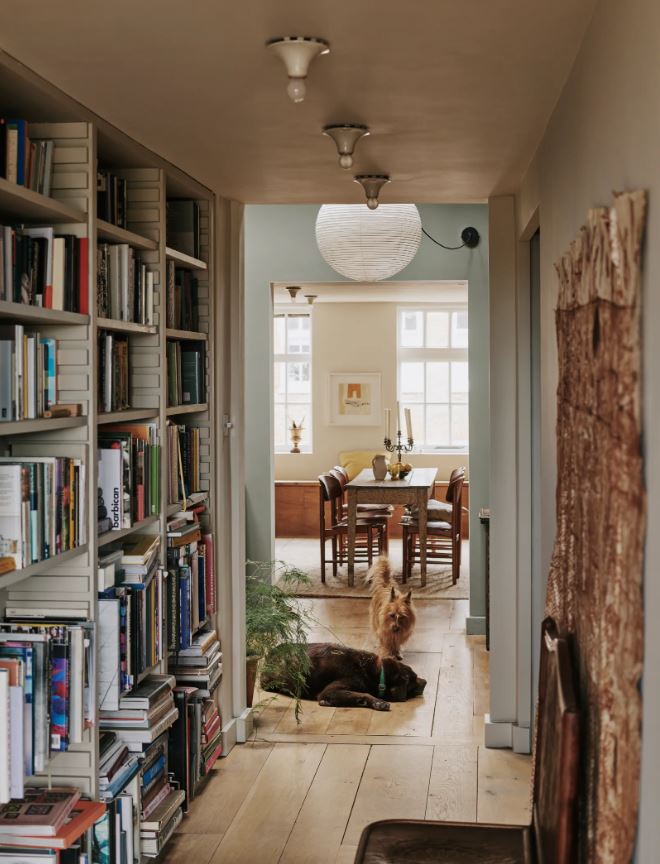
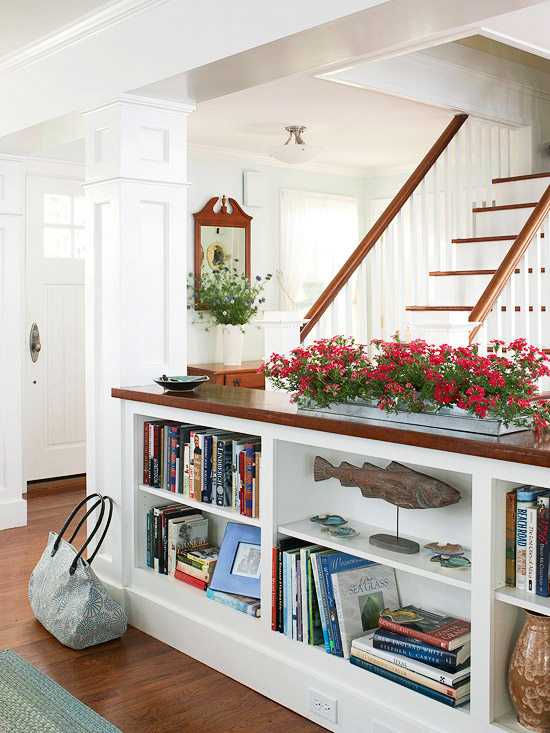
If you happen to have a reasonably wide hallway or landing, adding bookshelves can be a brilliant way to add interest (and storage). At her converted schoolhouse in Battersea, Atelier Ellis founder Cassandra Ellis has created a library with floor-to-ceiling shelves in the hallway.
Stepped Library Bookcases
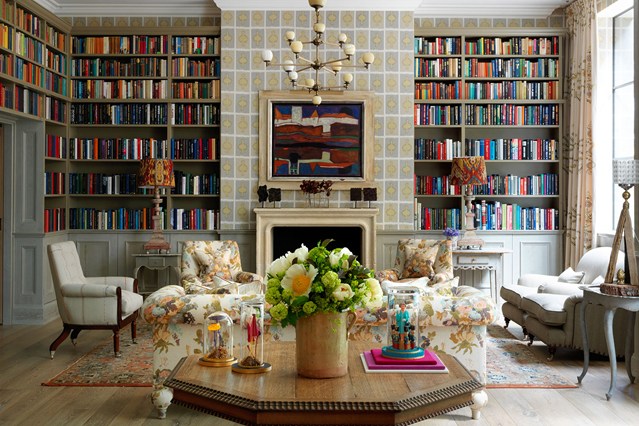
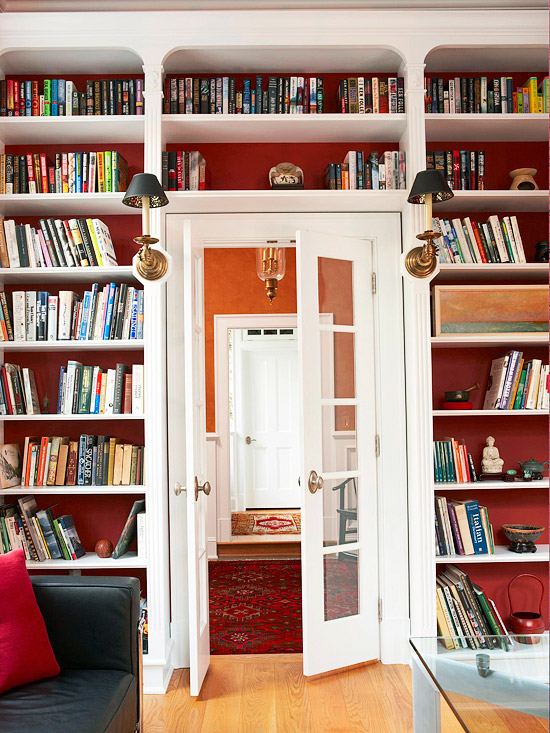
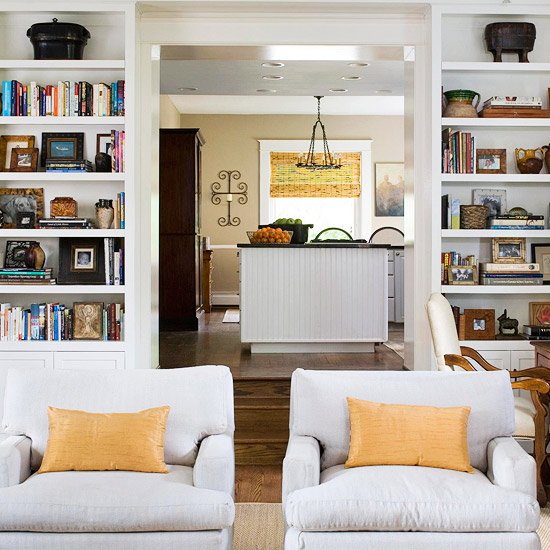
Work with the architecture of your room. The alcoves to either side of a fireplace are the ultimate spot for built-in bookshelves. In Kit Kemp’s new hotel Ham Yard, the designer has carried them round the wall and over the door-frame, (a trick also favored by our editor Sue Crewe in her home) and teamed them with a chic patterned paper in muted colors.
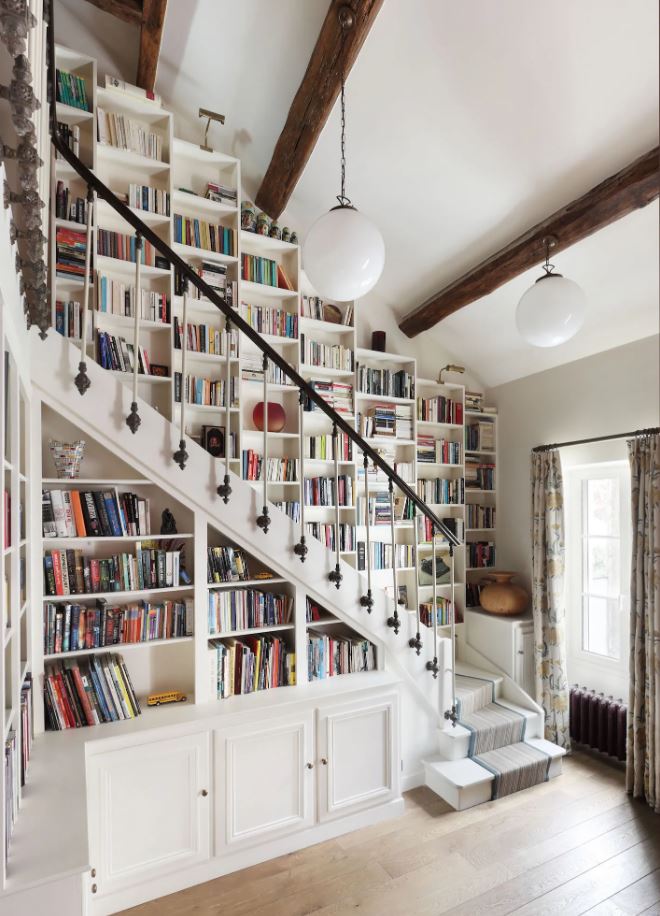
Kate Aslangul of Oakley Moore decorated this light-flooded library on the second floor of a Parisian home, in which architect Pascal Collange incorporated a bookshelf into the staircase, a signature style. The room is painted in Farrow & Ball‘s ‘New White’ while the pendant lights are from Mullan. Bespoke metal spindles create an arts and crafts feel together with a striped runner from Hartley Tissier, an Anglo-French carpet company.
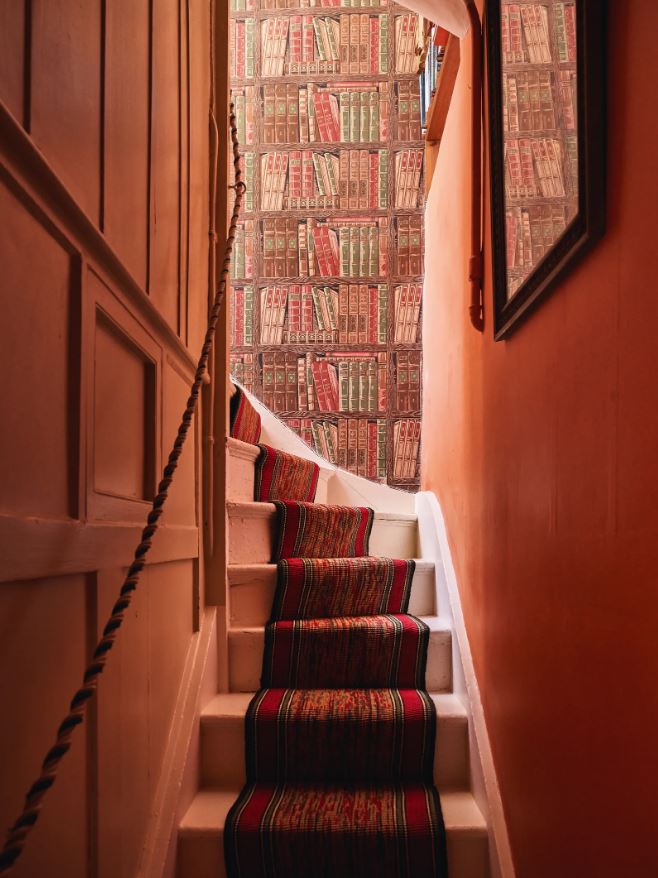
In lieu of an actual bookcase, antiques dealer Sarah Fenwick installed this Cole & Son wallpaper in the stairwell of her London home. The effect is playful and adds a sense of depth to the space.
Fireplace Bookcases
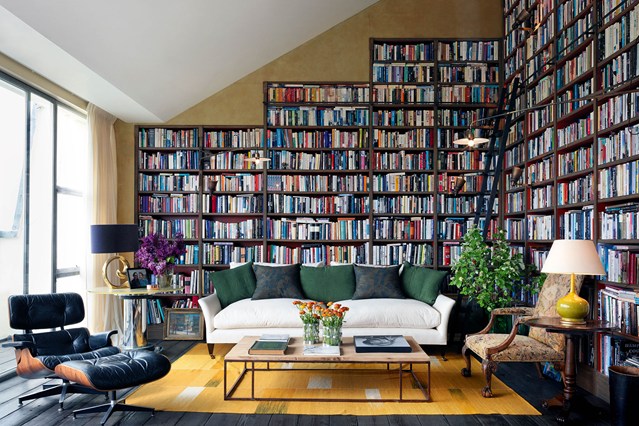
Floor to ceiling bookshelves add visual impact and character in the home of designer Beata Heuman.
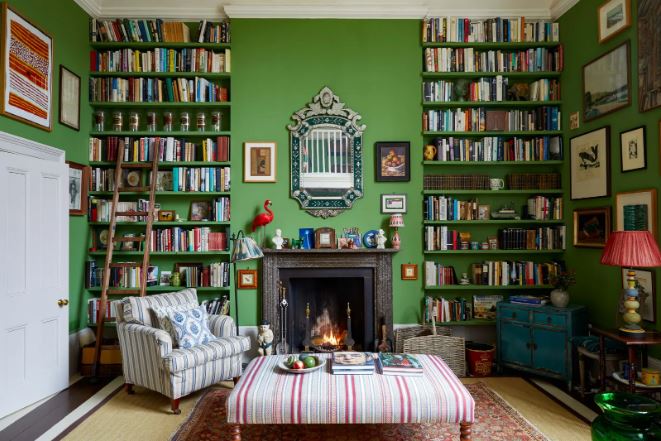
Green covers both the walls and bookshelves in the eclectic, colourful London house of a novelist and lifelong collector. A vintage Venetian mirror from Tarquin Bilgen is flanked by paintings by Anne Rothenstein and a pink lamp by Cressida Bell. A flamingo from Graham & Green is beside an armchair in an Ian Mankin blue stripe, next to which is a statue of a boy from Bora Bora.
Try combining books with mirrors. Lulu Lytle, owner and director of the interiors shop Soane, uses mirrors on the walls that are not shelved to ‘maintain the feeling of open skies in our sitting room’. The clever use of storage, wrapped beautifully around the Peter Twining designed chimney wall makes the room feel lighter than air.
Breakfast Room Bookcases
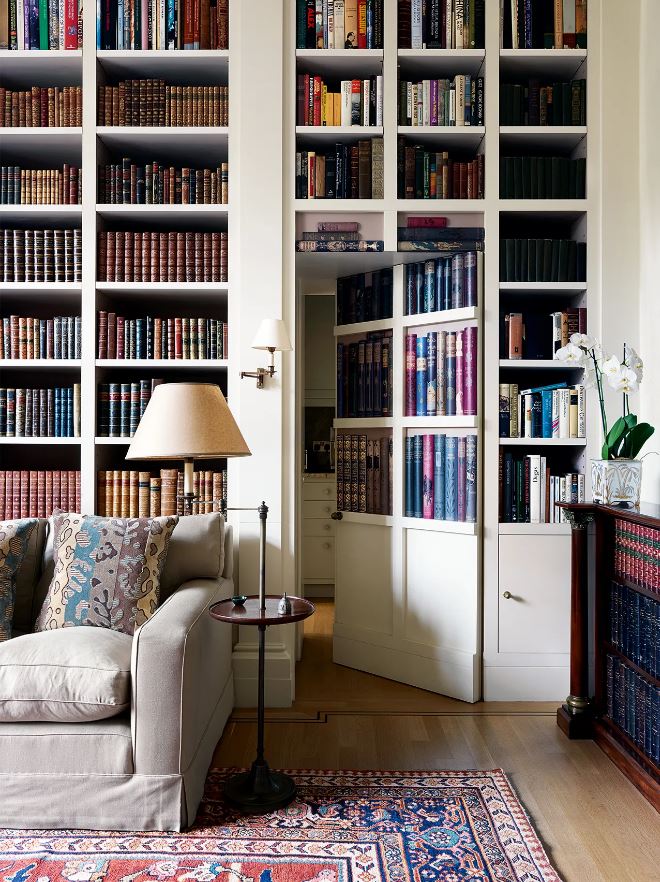
Hidden Door Bookcases
This eighteenth-century barn has been converted into a stylish sitting-room-cum-guest-cottage, by its owner Emma Burns, managing director at Sibyl Colefax & John Fowler. Emma adapted the internal configuration to create a striking way of displaying her book collection. The built-in bookcase equipped with a ladder also acts as a secret door to a hidden bathroom.
Bookshelves are often overlooked when it comes to designing the interior of a home. The truth is that the right bookcase in the right place can make a world of difference, increasing the beauty of an interior and decreasing the clutter. Here are a few suggestions for different types of book shelves to consider if you’re in the market.
Freestanding Models
You can’t beat a good freestanding bookcase for convenience. Not only are they great places to store books and knick knacks, but they can be attractive furniture additions to your living spaces as well. The beauty of freestanding book shelves is the incredible variety of styles available. Corner bookcases are wonderful for making use of those odd corners in the living room or den, and provide an attractive place to store and display books and other valuables.
Rotating models are also available, and are very handy when used as end tables to store books, magazines, remotes, and other things you want to have within arm’s reach when stretching out on the couch.
If you’re looking for something really distinctive, consider a doored bookcase, a close cousin of the china cabinet. These are great for displaying everything from grandma’s old dishes to that autographed copy of The Old Man and the Sea that you’re always telling everybody about.
The fact is that when you’re talking freestanding book shelves, there’s a model out there that will satisfy just about any space, taste and budget.
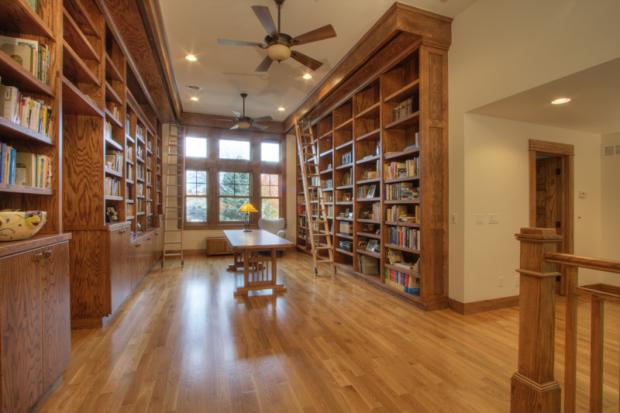
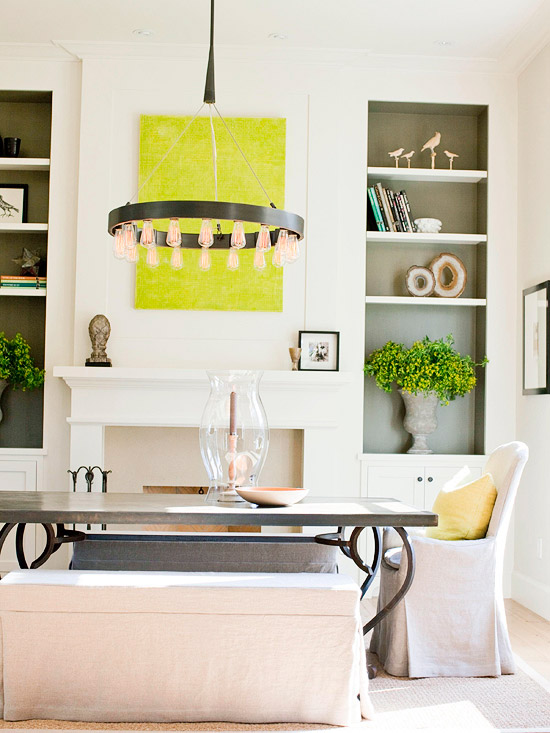
Built-In Bookshelves
If you’re feeling overwhelmed with the amount of furniture you already have, you’ll want to consider having built in bookcases installed instead. These can be custom designed to fit your living spaces, and often can be fitted in out of the way places or recessed into a wall where a freestanding model just wouldn’t work.
Some examples of places where built in bookshelves can really bring a room together include around fireplaces, doors and windows, beneath stairs or running up them, and in odd corners throughout the house. Bookcases have even been built in to serve as a barrier and divide a room into two distinct areas. If you have a space you think a custom built-in bookcase might be the ticket, Highlands Designs can make it happen.
Create illuminated space in any bookcase using a light bridge. This type of lighting is installed below any shelf using simple ambient lights to add depth and character to the bookcase. Typical light bridges illuminate objects other than books such as vases, flowers pictures or keepsakes. They serve to open up the bookcase by providing light between rows of books on on either side. Typical light bridges are installed in bookcases that have three sections, with the middle section receiving the light bridge. It’s fine to add a light bridge to any shelf for the same effect.
1. Measure the length horizontally across the top shelf of the bookcase. Purchase a light bridge that will fit between the two vertical sides of the bookcase. The light bridge doesn’t need to fit tight flush on either end. For example, if the shelf is 48 inches wide, use any light bridge fixture measuring between 18 and 36 inches.
2. Stain and lacquer the front of the light bridge if needed. Lots of light bridge fixtures have a single piece of molding across the front. Choose a molding profile that matches your existing trim, and apply stain that matches the existing bookcase.
3. Locate the nearest power outlet. Use a drill/driver and 1-inch Forstner bit to drill a hole through the back of the bookcase on the side needed to access the power outlet. Drill the hole one inch diagonally from the back corner. If the bookcase is installed to the wall, it’s OK to drill the hole through the side of the bookcase, one inch diagonally from the back corner on the side needed.
4. Place the light bridge fixture under the top of the bookcase. Center it flush with the front edge.
5. Hold the light bridge with one hand. Use your other hand to place two 5/8-inch screws in drilled holes on either end of the light bridge. Screw the screws in tight to secure the light bridge to the bookcase.
6. Pull the cord straight back from the light bridge fixture to the point where the shelf contacts the back. Use a hammer to tap one horseshoe nail over the cord to secure it to the back of the bookcase. If the bookcase has no back, or the back is no thicker than 1/4 inch, tap the nail into the underside of the shelf to secure the cord.
7. Insert the end of the cord through the 1-inch hole. Pull it snug. Tap two more horseshoe nails into the cord to finish installing the light. Plug it in. The switch to turn the light off and on may be on the cord or the fixture itself, depending on the model.
Things You Will Need
Stain (optional)
Lacquer (optional)
Light bridge fixture
Drill/driver
1-inch Forstner drill bit
5/8-inch screws
Hammer
Horseshoe nails
You can also place the light bridge on the back of the shelf, which is not recommended because the light is dampened — or you can place it under any shelf to illuminate the shelf below it.
If the top of your bookcase has a decorative trim piece across the front that’s greater than 2 inches wide, you don’t need a light bridge. Purchase hobby lights to fit behind it for the same affect.
Warning: Be careful when drilling through finished wood. Drill from both sides to prevent splintering. Wear safety glasses.
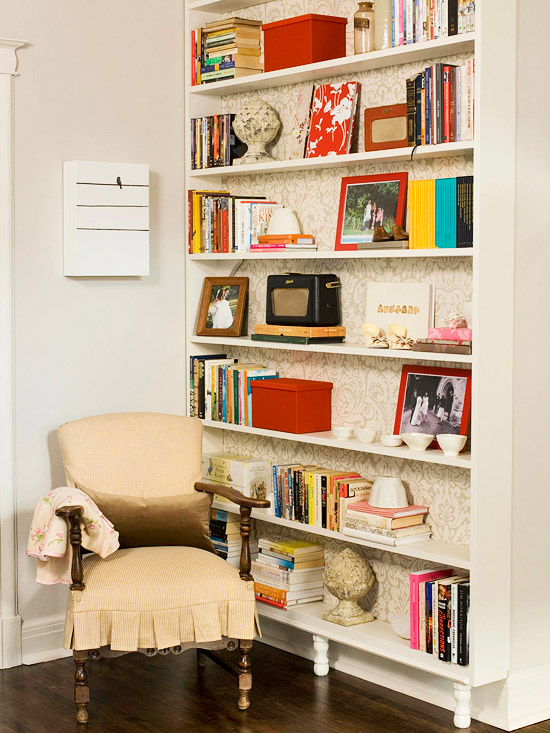
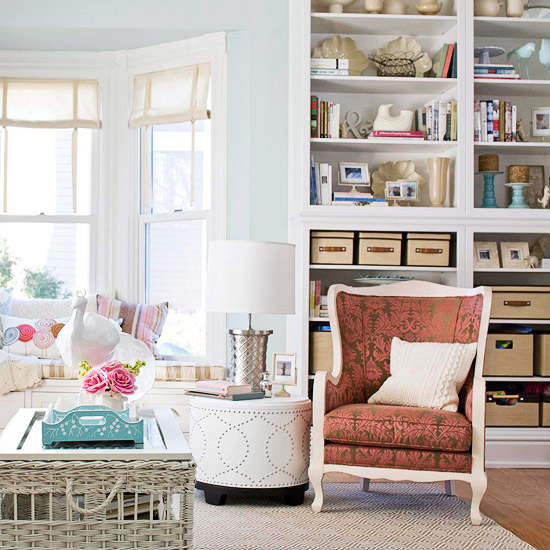
Bookshelves do double duty as storage space for books and display space for accessories. Learn how to arrange shelves so they are both fully functional and pleasing to the eye.
Keep It Simple
To style a bookcase to perfection, resist the urge to pack in accessories on every shelf. Keep a clean look by choosing a one-color or tone-on-tone scheme for vases and figurines, and make sure to mix up shapes. Every so often, step back to assess the overall balance of your arrangement. Place items off-center or try larger or smaller ones until you like what you see.
Doorway Savvy
Built-in bookshelves surrounding a doorway can be tricky; start by filling the top row with books. Alternate the remaining nooks with creatively stacked books and accessories.
Everything Fits
To add interest to your book collection, alternate stacking books horizontally and vertically. Bold-color picture frames make great bookends and help photographs stand out on shelves.
Less Is More
Mod shelves call for a sparse look, so group together a small set of books that are all of fairly uniform size. Accessorize with streamlined vases, leaving lots of open space on shelves to let the accessories shine through.
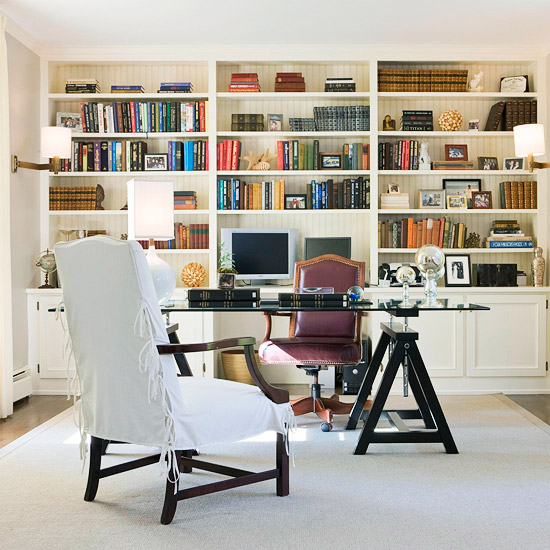
Office Symmetry
To give office shelves an organized feel, gather a wide variety of collectibles and place them between books, creating loose symmetry. If you have a picture frame or square shape in one shelf, mirror it with a collectible of a similar shape and size. In a wall of shelves such as this, it’s important to scatter books here and there to punctuate the look.
Color Smart
Carry your color scheme onto your bookshelf to give the room a sense of unity. Here, accent accessories on the shelves match the light blue wall color. Storage boxes conceal items such as toys and movies that you may not want out in the open.
Outside Interest
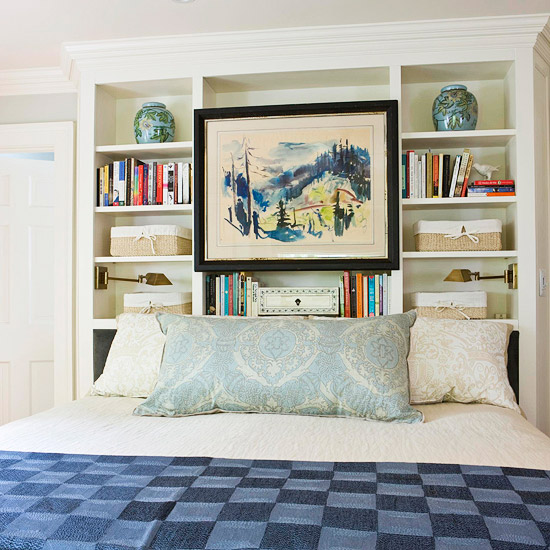
Utilize a built-in bookcase as a fashionable and functional headboard. Baskets hold eyeglasses and lotions, leaving plenty of room for a library of nighttime reading materials. Add more appeal with adjustable reading lights mounted inside the bookcase. Hang a favorite piece of artwork on the front of the shelf for visual interest.
Pleasing Prints
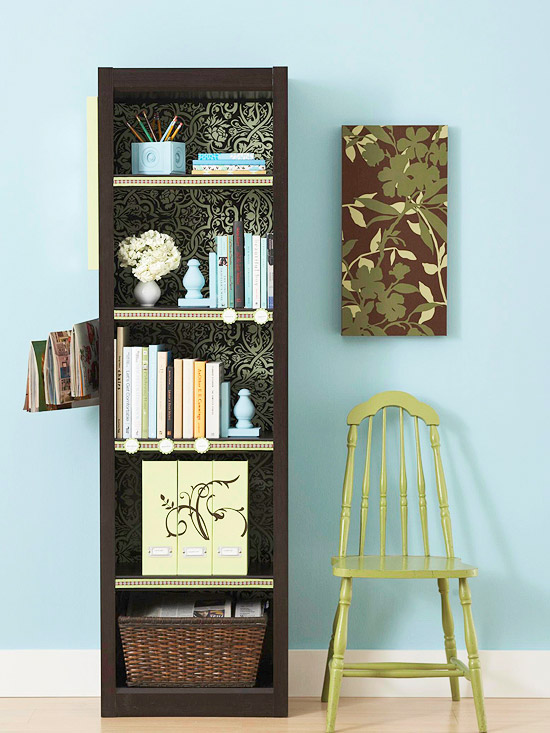
Adding wallpaper or printed fabric to the back wall of shelves creates a unique look and is an easy way to personalize a bookcase. Add woven baskets and decorative storage boxes to easily organize magazines and maintain a clean look. Attach fun labels to shelves to establish an organizing system for your books.
Pottery Panache
Use pieces of sturdy pottery as bookends to keep shelves neat. Bookends especially come in handy for paperbacks and slimmer books, which are less likely to stay upright.
Bold Yet Simple
If your book spines lack visual style, paint your bookshelf a vibrant color to make it the focus. To highlight the color even more, choose a single contrasting shade for accessories.
Great Pyramids
Books can be used to create visual interest. Pyramidal stacks on the center shelves contrast the top shelf of entirely vertical books. Layer pieces of art behind shorter books or small accessories such as figurines.
Alternative Arrangement
For a display-worthy bookcase, organize paperbacks in pretty baskets. Group like books together (by author, genre, etc.) and put labels on the baskets so books are easy to find.
Functional Form
Shelves are great tools to keep a craft workroom organized. Slip magazine holders on open shelves to hold loose papers. Storage boxes conceal clutter and can be kept a neutral color to blend in. For a bolder look, cover boxes with printed paper. Use decorative containers and flea market finds to hold paintbrushes or pens and pencils.
Jumbled Perfection
Vary heights and create interest by stacking books horizontally to use as platforms for displaying other objects. Pull together a small bookcase by arranging the top and bottom shelves in opposite ways.
Lovely Layers
Deep shelves give you the luxury to play with layers. Lean plates and artwork along the back of the shelves, and anchor them with books or heavier objects. Place a few small pieces of art near the front of the shelves to give them depth.
Photo Gallery
Turn bookshelves into a family photo zone by lining them with framed photographs. Place small photographs on stacks of books if there’s room for both. If your shelves are deep, try pushing the books to the back and placing photos in front.
Art Focus
Focus attention on a favorite small sculpture by placing it solo on a shelf. Punctuate the display with groupings of books propped up with small vases or matching bookends.
Clean Display
Get the most storage and style out of built-ins by filling the shelves with books; stack them vertically on the lower shelves and keep the top shelves more open. Arrange accessories two or three deep, keeping them fairly symmetrical for a clean look.
I truly love to see bookcases in homes because they are the perfect solution for adding storage and style to your surroundings. Books and collectibles on display add warmth and personality to any space, whether it’s a living or dining area, bedroom or home office. To any visitor, a bookcase will communicate what you read, what you collect, and what you love. Bookcases are a window into your passions and pursuits, and an opportunity for you to put your most favorite things on display.
The challenge for most people is how to style a bookcase well. How do you maximize both utility and aesthetic appeal, but also avoid monotony and clutter? Styling a bookcase is an art, but a job easily tackled if you study those done right.
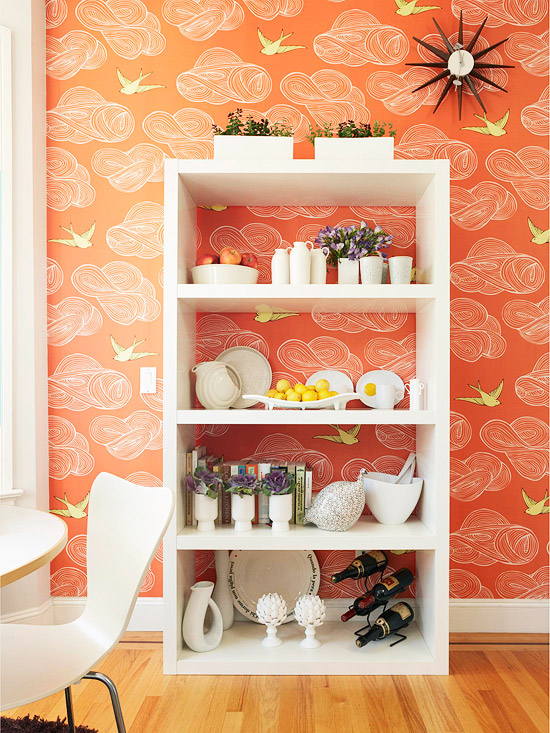
It Starts with the Back
Simple inexpensive bookcases become stunners when their backs are dressed up with paint, fabric or wallpaper. The bookcase below was brought to life with a pattern that accentuates the balanced display of books and collectibles. One of the bookcase options you can get at Highlands Designs is a beadboard back that adds character.
When styled against a backdrop of robin’s egg blue, this collection from the home of model Coco Rochas has visual appeal, and showcases a love of books, antique coffeepots, vases, and glass bottles. Highlands Designs has partition bookcases like this that divides the space into multiple cubes.
Here is a shelf masterfully styled by Emily Henderson. Notice the balance achieved between the books alternating in placement from left to right with the ceramics poised on the opposite side. The middle shelf repeats the books plus ceramics combination, and also provides the opportunity to display smaller collectibles. Different heights and textures also add to the appeal.
Did you know there are 7 ways to stack books? Karen from The Art of Doing Stuff teaches us how she styled hers in her partition bookcases to break up the columns. Notice how she doesn’t just stick to books, she adds art and natural objects too. And don’t you love that reading chair?
Inside this IKEA Expedit, the books are grouped by color, and also displayed both horizontally and vertically. Practical baskets mix with glass bowls, vases and collectibles to form an aesthetically pleasing display on a brightly painted wall.
There’s no rule you have to keep it all inside. Why not add one more layer of interest? Consider using the framing of the bookcases to suspend a dramatic mirror, framed artwork, or sentimental photographs.
Smaller cubbies look simply perfect with a textured or sculptural object placed all by itself. Notice the use of a single vase or shell in the smaller spaces of John & Sherry’s bookcase, and the fantastic contrast with bold blue and crisp white.
Objects tend to look better when gathered in odd numbers, and the basic design principle of the rule of threes is cleverly applied in this bookcase featured in Lonny Magazine. Notice how most of the books are stacked horizontally, but the bookcase becomes so stylish with the varied and perfectly placed decorative objects, prints, and forward facing book covers.
Varied groupings of three or five are always visually appealing. This bookcase from the home of Lisa Martensen is an example of a well edited display from her treasure hunts and travels all around the world.
With airy shelving, it’s best to not overwhelm and allow for plenty of breathing room around objects. Deliberate use of open space keeps the eclectic collection on this bookshelf from appearing too cluttered.
With a little concentration, it’s possible to style a bookshelf well with both books and the things you love. The secret to doing it successfully is truly all in the placement and editing of your favorite objects.
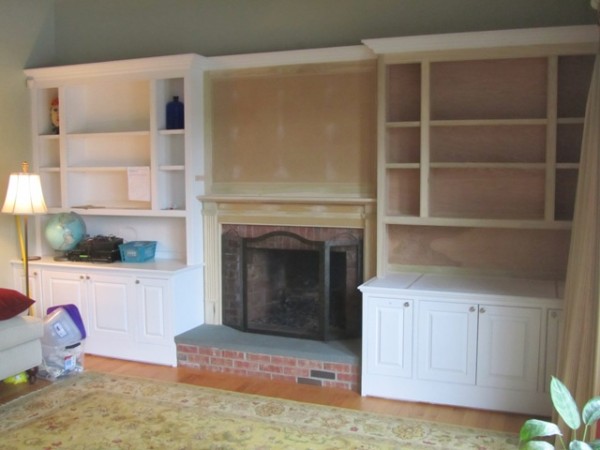
This post provides an example of how to install a bookcase, fireplace mantel and the panel above the mantel.
Earlier we prepared the blue stone fireplace mantel and brick corbel supports in order to install a shorter mantel to accommodate a flat screen TV. A new Somerset Mantel will cover and hide the torn off corbels and a larger panel will cover the exposed brick.
In order to get the panel to cover the brick we had to fur out the wall above 3-1/2″ to match the face of the brick. We used 2×4 lumber on edge and Timberlock type lag structural screws to lag the studs to the wall.
We took care to install all of the lags in the same spots on each stud.
The measurements were then recorded for when the TV wall mount is to be installed. There is nothing worse than drilling into a brand new piece of custom work and hitting a screw or lag.
Planning For A Flat Screen TV:
The electrician ran all of the HDMI, cable and power wires and we fished them to the top of our furring strips for easier access later. He will come back and mount boxes for all of the connections. These boxes will be hidden by the TV.
We purposely designed the new bookcase 3/4″ smaller than the one we were trying to match. We did this so we could fur out the wall behind the bookcase to accommodate future speaker or audio visual wires.
Prior to installing the bookcase we also cut out a rectangular slot in the base cabinet to make getting wires from the base cabinet to the rear of the bookcase.
Installing The Fireplace Mantel:
After furring the walls we set the mantel in place. We attached 3/4″ birch plywood scraps to the face of the brick with 2-1/2″ Tapcon screws. The plywood scraps will allow us to nail the mantle to the fireplace.
Both base cabinets had return molding touching the brick so we had to cut the mantle profile out in this molding.
We used a Japanese saw, utility knife and a sharp chisel to carve out the molding and then slid the mantel down.
With the mantle in place we cut installed the panel. Typically a panel this size would have been done as three smaller panels but it was decided that it would be better to have one panel since a large TV was being installed. The panel sits on top of the mantel shelf and was attached with finish screws.
Installing The Bookcase:
The bookcase was then installed. I purposely made the far right side of the bookcase trim larger to accommodate for an uneven or plumb wall. We scribed the wall and used a jigsaw to cut a bevel cut. Bevel cuts help the unit slid in place and are also a lot easier to make miner micro adjustments with a hand plane.
Once the bookcase was in place we secured it through the left side into the panel stud and along the top of the case, and through the back panel on the far right side. Pre-drilling and counter-sinking are important and We filled the screw holes when done.
All nail holes are then filled and sanded, the entire project is vacuumed and then we caulked the seams. We then installed the shelves and re-installed the existing crown molding that we had saved.