Small-business owners and entrepreneurs who work from home could save big money on their taxes by taking the home office deduction, as long as they meet the IRS’ requirements and keep good records.
If you use part of your home regularly and exclusively for business-related activity, the IRS lets you write off associated rent, utilities, real estate taxes, repairs, maintenance and other related expenses. Here’s what small businesses should know about the home office deduction. In this case, ordering our home office components, cabinets, or bookcases, might even qualify as a business deduction!
Who qualifies for the home office deduction
You can claim the deduction whether you’re a homeowner or a renter, and you can use the deduction for any type of home where you reside: a single-family home, an apartment, a condo or a houseboat. You can’t use it for a hotel or other temporary lodging.
The home office deduction rules also apply to freestanding structures. You can use a studio, garage or barn space as your home office as long as the structure meets the “exclusive and regular use” requirements.
Here are the conditions you’ll need to meet:
Regular and exclusive use: The space you’re using for business must be used exclusively for conducting business. For example, using a spare bedroom as both your office and a playroom for your children likely makes you ineligible.
There are two exceptions. If you provide day care services for children, elderly (65 or older) or handicapped individuals in that part of the house, you can probably still claim business deductions, as long as you have a license, certification or approval as a day care center under state law, according to the IRS. The other exception is if you use the office for storage of inventory or product samples you sell in your business.
Principal place of business: Although your home office doesn’t have to be the only place you meet your clients or customers, it must be your principal place of business. That means you use the space exclusively and regularly for administrative or management activities, such as billing customers, setting up appointments and keeping books and records, according to the IRS.
» Ready to work with a financial planner? The form below will put you in touch with an advisor at Facet Wealth, a fee-only, fiduciary online planning firm. They aren’t tax preparers, but they can help you with tax and estate planning.
How to determine your home office deduction
You can determine the value of your deduction the easy way or the hard way.
With the simplified option, you aren’t deducting actual expenses. Instead, the square footage of your space is multiplied by a prescribed rate. The rate is $5 per square foot for up to 300 square feet of space.
The regular, more difficult method values your home office by measuring actual expenditures against your overall residence expenses. You can deduct mortgage interest, taxes, maintenance and repairs, insurance, utilities and other expenses.
You can use Form 8829 to figure out the expenses you can deduct.
Simplified version vs. actual expense deduction
The choice whether to use the simplified deduction, if you’re eligible for it, or to deduct actual expenses depends mainly on which would net you the bigger tax deduction.
The actual expense method
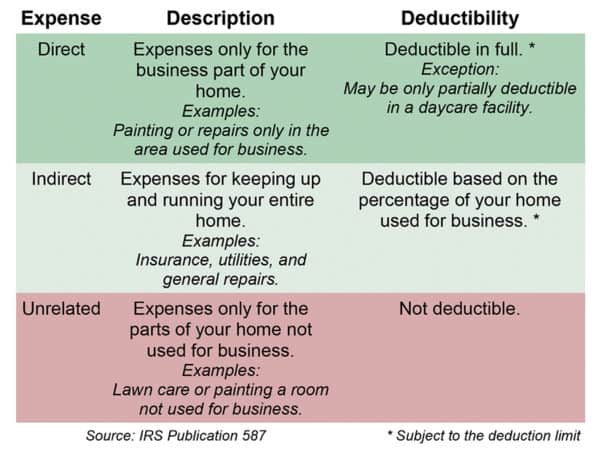
If you use the actual-expenses method, you can deduct direct expenses — such as painting or repairs solely in the home office — in full. Indirect expenses — mortgage interest, insurance, home utilities, real estate taxes, general home repairs — are deductible based on the percentage of your home used for business.
Example: Let’s say you paid $3,000 in mortgage interest, $1,000 in insurance premiums and $3,000 in utilities (all indirect expenses) plus $500 on a home office paint job (direct expense) during the year. Your home office takes up 300 square feet in a 2,000-square-foot home, so may be eligible to deduct indirect expenses on 15% of your home.
That could mean a deduction of $1,050 in indirect expenses ($7,000 in expenses, multiplied by the 15% of space used in the home), plus $500 for the direct expense of painting the home office, for a total deduction of $1,550.»
The simplified version
If your home office is 300 square feet or less and you opt to take the simplified deduction, the IRS gives you a deduction of $5 per square foot of your home that is used for business, up to a maximum of $1,500 for a 300-square-foot space.
In this case, using the simplified method could make more sense because you’d get only $50 more in deductions by documenting actual expenses. You should also consider the time it will take you to gather receipts and records.
The simplified method can work well for single-room offices and small operations.
The actual-expenses method might work better if the business makes up a large part of the home.
Things to watch out for
Receipts. If you plan on deducting actual expenses, keep detailed records of all the business expenses you think you’ll deduct, such as receipts for equipment purchases, electric bills, utility bills and repairs. If you’re ever audited by the IRS, you’ll be prepared to back up your claims.
Anxiety. Don’t let the fear of an audit keep you from taking the home office deduction.
Home sales. If you’re a homeowner and you take the home office deduction using the actual-expenses method, it could cancel out your ability to avoid capital gains tax when selling your primary residence. People who sell their primary residence after having lived in it for at least two of the five years before the sale generally don’t have to pay taxes on up to $250,000 in profit on the sale, or $500,000 if married filing jointly, according to IRS Publication 523.
Depreciation. If you use the actual-expenses method, you’re required to depreciate the value of your home. Depreciation refers to an income tax deduction that lets taxpayers recover the costs of property, due to wear and tear, deterioration or obsolescence of the property, according to the IRS. The depreciation you’re required to take in home office deductions is subject to capital gains tax when you sell your home. For example, if you own your home, use 20% of it as a home office and deduct depreciation, 20% of your profit on the home’s sale may be subject to capital gains tax. However, if you use the simplified method, depreciation isn’t a factor and you may not be subject to the tax.
The rules on tax deductions for a home office can be hard to digest. Consult with a tax advisor or use the appropriate online tax software if you’re unsure about how to proceed.
COVID-19 has brought unprecedented human and humanitarian challenges. Many companies around the world have risen to the occasion, acting swiftly to safeguard employees and migrate to a new way of working that even the most extreme business-continuity plans hadn’t envisioned. Across industries, leaders will use the lessons from this large-scale work-from-home experiment to reimagine how work is done—and what role offices should play—in creative and bold ways.
Before the pandemic, the conventional wisdom had been that offices were critical to productivity, culture, and winning the war for talent. Companies competed intensely for prime office space in major urban centers around the world, and many focused on solutions that were seen to promote collaboration. Densification, open-office designs, hoteling, and co-working were the battle cries.
But estimates suggest that early this April, 62 percent of employed Americans worked at home during the crisis,1 compared with about 25 percent a couple of years ago. During the pandemic, many people have been surprised by how quickly and effectively technologies for videoconferencing and other forms of digital collaboration were adopted. For many, the results have been better than imagined.
According to McKinsey research, 80 percent of people questioned report that they enjoy working from home. Forty-one percent say that they are more productive than they had been before and 28 percent that they are as productive. Many employees liberated from long commutes and travel have found more productive ways to spend that time, enjoyed greater flexibility in balancing their personal and professional lives, and decided that they prefer to work from home rather than the office. Many organizations think they can access new pools of talent with fewer locational constraints, adopt innovative processes to boost productivity, create an even stronger culture, and significantly reduce real-estate costs.
These same organizations are looking ahead to the reopening and its challenges. Before a vaccine is available, the office experience probably won’t remain as it was before the pandemic. Many companies will require employees to wear masks at all times, redesign spaces to ensure physical distancing, and restrict movement in congested areas (for instance, elevator banks and pantries). As a result, even after the reopening, attitudes toward offices will probably continue to evolve.
But is it possible that the satisfaction and productivity people experience working from homes is the product of the social capital built up through countless hours of water-cooler conversations, meetings, and social engagements before the onset of the crisis? Will corporate cultures and communities erode over time without physical interaction? Will planned and unplanned moments of collaboration become impaired? Will there be less mentorship and talent development? Has working from home succeeded only because it is viewed as temporary, not permanent?
The reality is that both sides of the argument are probably right. Every organization and culture is different, and so are the circumstances of every individual employee. Many have enjoyed this new experience; others are fatigued by it. Sometimes, the same people have experienced different emotions and levels of happiness or unhappiness at different times. The productivity of the employees who do many kinds of jobs has increased; for others it has declined. Many forms of virtual collaboration are working well; others are not. Some people are getting mentorship and participating in casual, unplanned, and important conversations with colleagues; others are missing out.
This post describes the steps needed to paint or stain unfinished cabinets or bookcases, which you can order online on our website to save money and get the custom finish you want.
1. Remove the doors and drawer fronts
Mark them with a number or location, so you know where each cabinet door or drawer front goes when you complete the job. Remove the hinges and hardware with a screwdriver. To remove the drawer front, take a screwdriver, and remove the screws from the back of the wood panel.
2. Prepare the surfaces
Unfinished cabinets might have some unfilled nail holes or imperfections, so they may need a little wood putty. If you plan to stain, use a stainable putty. If you plan to paint, a white putty would be good. You might need to lightly sand and prepare the surface before applying your first coat of stain or paint.
Most manufacturers will have already done the majority of sanding. Some light sanding with fine-grit sandpaper (about 200-400 grit) will help you get the smooth finish you desire. If the surface is not already smooth or you have to remove imperfections, start with 120 grit sandpaper and then switch to a more fine grit. As you start to prep your drawer fronts and cabinet doors, there are a couple of things you’ll want to focus on:
Wear protective glasses and a mask to protect you from getting the fine sawdust in your eyes or lungs.
Always sand with the grain, whether it’s vertical or horizontal.
Sand gently by hand. You’re trying to get a clean, smooth finish.
If you prefer to use a powered hand sander, be very careful. You don’t want to sand unevenly or leave some indents or scratches on your door surface.
Make sure you wipe off all the wood dust on the cabinet doors and drawer fronts once completed. Wipe the cabinet components with a damp cloth to remove any dirt or debris.
Each time you sand the panels, use a hand vacuum and a tack cloth to remove the dust left over from sanding.
3. Choose a finish or paint color
Choose a finish color for your cabinets and drawer or enhance the natural pattern in the wood grain with a colorless polyurethane finish.
Leave your existing wood unfinished: If you like the current natural wood color of your cabinets, you could apply a finish without painting or staining them. A colorless polyurethane finish protects your wood cabinetry from moisture and stain damage.
Complement the color of your rooms: Most kitchens and bathrooms are monochromatic for a clean, modern look. You can add a mix of colors to change up the look of your living space. Consider making your cabinet doors a contrasting color to your cabinets. You could also choose different colors for high and low cabinets.
Choose between natural wood or a different paint color: One natural wood panel is different from others that look like it. If you’d rather have a bold, uniform look, use any color paint you want on your wood cabinet doors and drawer fronts. White cabinets add a modern, clean look to your bathroom or kitchen. Before you choose a paint color, check the paint’s label to find out if you can use it on wood.
Consider the texture of your finish: You could choose between matte, semi-gloss and glossy. A matte finish creates a more opaque appearance. A glossy finish adds a reflection to your wood cabinet doors and drawer fronts. How you want to stain unfinished drawer fronts depends on your style.
4. See below for details about painting or staining.
What is the best way to paint unfinished kitchen cabinets?
The best way to paint kitchen cabinets is with a paintbrush and a small roller. Spray painting is also an option if you want the process to move more quickly, but it can be tricky. Done improperly, you can have thicker spots that will not sand evenly or thin spots where the paint does not evenly cover the surface.
Start by removing all of the hinges, hardware, doors and drawers from your cabinets. Label each door with masking tape so you’ll remember which one goes where and put all of the hardware in plastic bags so you don’t lose anything. If you can fit a worktable in your kitchen, it will be much easier to paint the doors. 2×4 wood boards propped on buckets, boxes, or work horses will also do. If you don’t have those materials, work on top of a drop cloth.
You’ll want to prep all of the doors and drawers properly to ensure your paint will stick. Start this process by scrubbing your cabinets to get rid of any grease or residue. If you’re planning to use new hardware, cover the current holes with wood filler. Next, use 100-grit sandpaper to make all of the surfaces smooth and make sure to wipe away any dust with a tack cloth before drilling your new holes. To ensure a nice finish, use caulk to fill in any gaps or seams.
If you want professional-style results, it’s imperative to prime the boxes, door fronts and drawers before you begin painting. Once your primer has dried, use an angled brush and a mini foam roller to apply your paint. A latex satin finish works well on kitchen cabinets and it isn’t as hard to work with as oil paint. Start working in sections with your angled brush and go over your work with the roller for a perfect finish. When you’re done painting, you can also use very fine grit sandpaper for a final sanding and even a coat of a satin polycrylic for extra durability as well. Once your paint has dried, reinstall the doors and drawers and install your hardware.
Spray paint is another option for painting kitchen cabinets, but this process is best done outside or in a designated workspace so you don’t have to worry about overspray. If spray painting your cabinets, you’ll follow the same process as above but instead of working with a paint brush and roller you’ll use spray paint instead.
What is the best way to stain unfinished kitchen cabinets?
There are liquid and gel-based stains. Liquid stains are applied similar to how you paint. Start by sanding and conditioning the wood, then apply the stain with a bristle or foam brush. After that’s dry, put on two coats of polyurethane and your cabinets will look just as good as any professional could have done for you.
After sanding, apply a wood conditioner to seal the wood and allow it to better accept the stain.
Apply liquid stain with a bristle or foam brush or a rag.
Use a rag to work stain down into the pores of the wood.
Make a final pass working in the grain of the wood.
Once the stain has dried, lightly sand again with a very fine sandpaper.
Apply a clear polyurethane top coat with a brush, taking care not to brush too quickly, which could create bubbles in the finish. Use an oil-based polyurethane with an oil-based stain or a water-based product with water-based stain.
Once the polyurethane has dried, lightly sand again with a very fine sandpaper.
Gel Stains
Instead of a traditional liquid stain, try a gel stain, which is thick like pudding. Gel stain is applied to the surface of the wood but not rubbed-in like traditional stains; the application is more comparable to painting on multiple thin layers.
While gel stain does go on thick and sit on the surface of the wood, I found that you can still see and feel the natural wood grain beneath, unlike paint.
Gel stain will not require you to sand the product to a raw wood finish. It can be applied over only lightly sanded pieces just as well.
The condition of the wood does not play as big of a role in the finished result of the gel stain. For instance, the knots in your knotty pines will look less pronounced when the job is done.
Gel stain is more forgiving. Because you will need to do multiple coats, you can even out the finish over time.
The first coat of stain is an important one. Specialists and makers of the product advise one to apply a thick first coat — so thick that you could theoretically finger paint in it. Do not wipe it clean like you would a normal stain, but also do not leave it so heavy that it is inclined to drip. Wipe the excess gel off with a rag after it has had time to soak in.
Apply 3-4 coats of gel stain. Each coat of stain needs about 24 hours to dry, so plan accordingly. Continue doing daily layers of stain in the same way until you can no longer see streaks in the finish.
Once the final coat of stain is dry, you may want to apply a polyurethane finish to seal the stain. Roughly 1-2 coats will do.
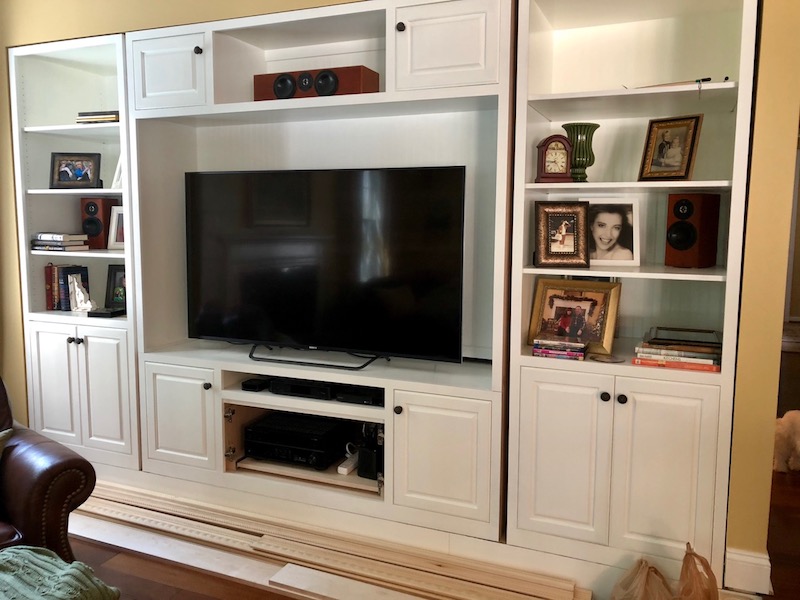
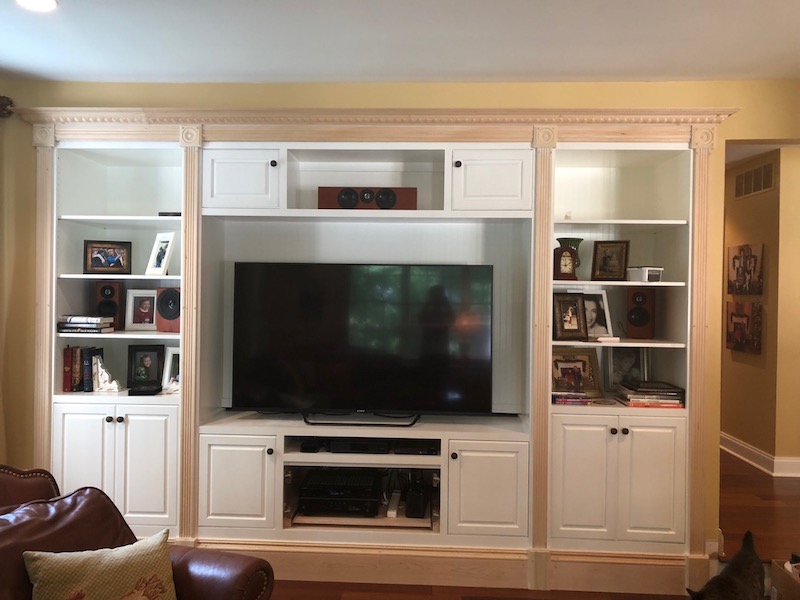
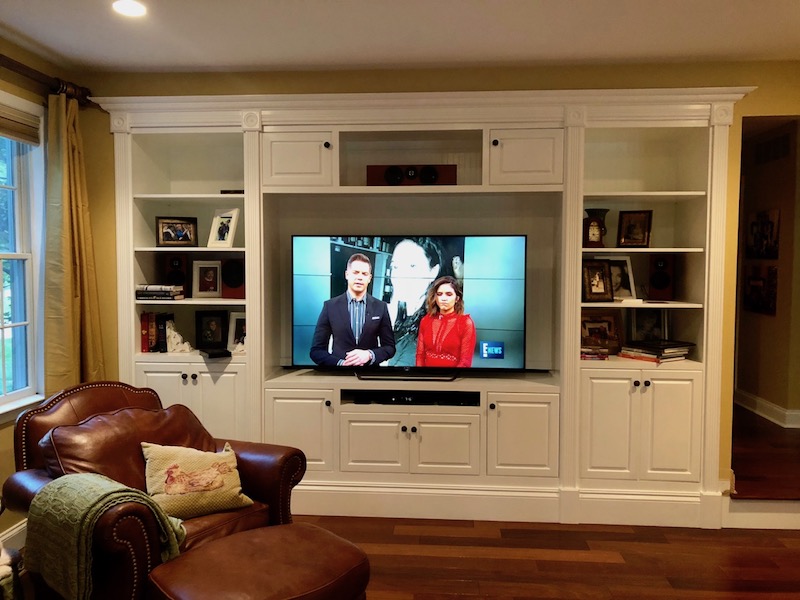
This article describes the steps I took to create a built-in entertainment system using Arthur Brown Face Frame bookcases and cabinets with custom wood moulding used to trim it out and give it a built-in look. The bookcases and cabinets have a simple face frame style so that separate mouldings could be chosen and added to fill in the gaps between the cabinets and the wall.
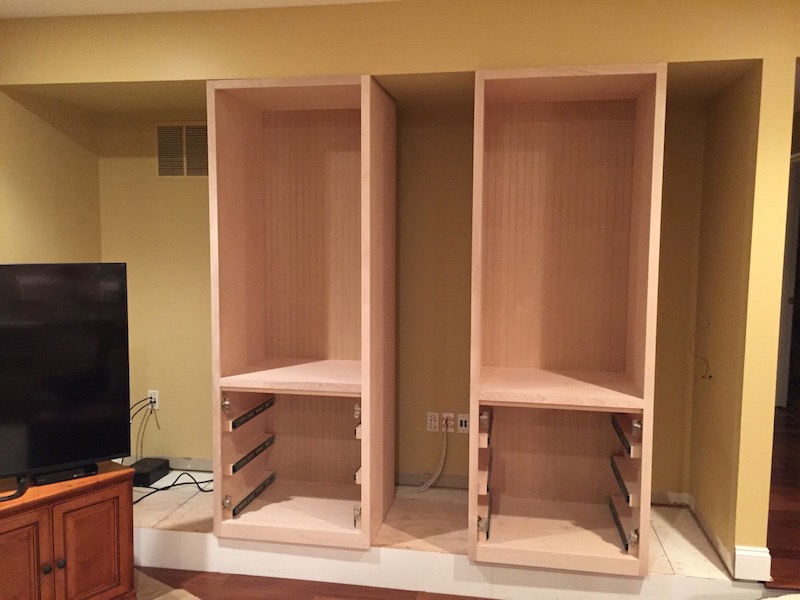
This particular home has a step-down family room with a raised opening in the wall, which isn’t exactly your typical situation. This made it all the more tricky, since the base of the opening is 12 inches off the floor. The top bulkhead is 12 inches from the ceiling, leaving only 7 feet of vertical space to work with for the cabinetry. The opening is about 11.5 feet wide.
Step 1: Design of the Space and Ordering of Components
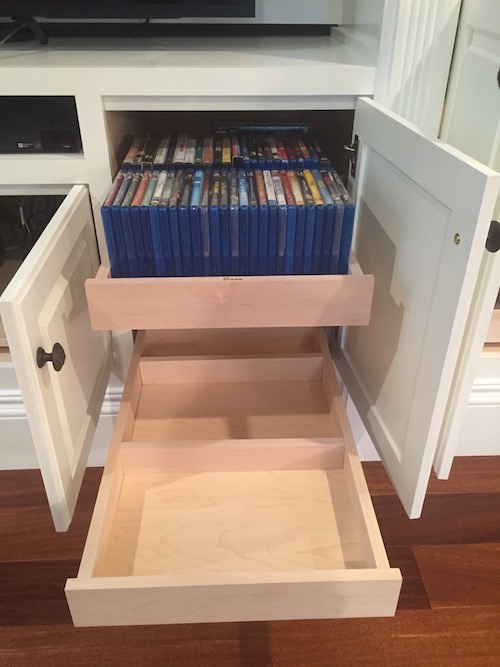
To start the project, I began by coming up with a design plan and then choosing bookcases and cabinets that would fit comfortably into the space without leaving too much space to fill on the sides and top. Since I wanted this to be used as an entertainment system, there needed to be space for a large TV, speakers to the sides and above, media components below, and plenty of storage space for DVDs, books, and other items. The center bottom piece is a CN4 entertainment console with a TV hutch above. The side pieces are Arthur Brown bookcases with doors at the bottom. Each piece has custom pull-out trays behind the doors. They were sized to fit rows of DVDs and Blu-Ray discs. The center console section has a pull-out shelf so that a heavy receiver can be rolled in and out to make it easier to connect the wiring.
Step 2: Preparation of the Area
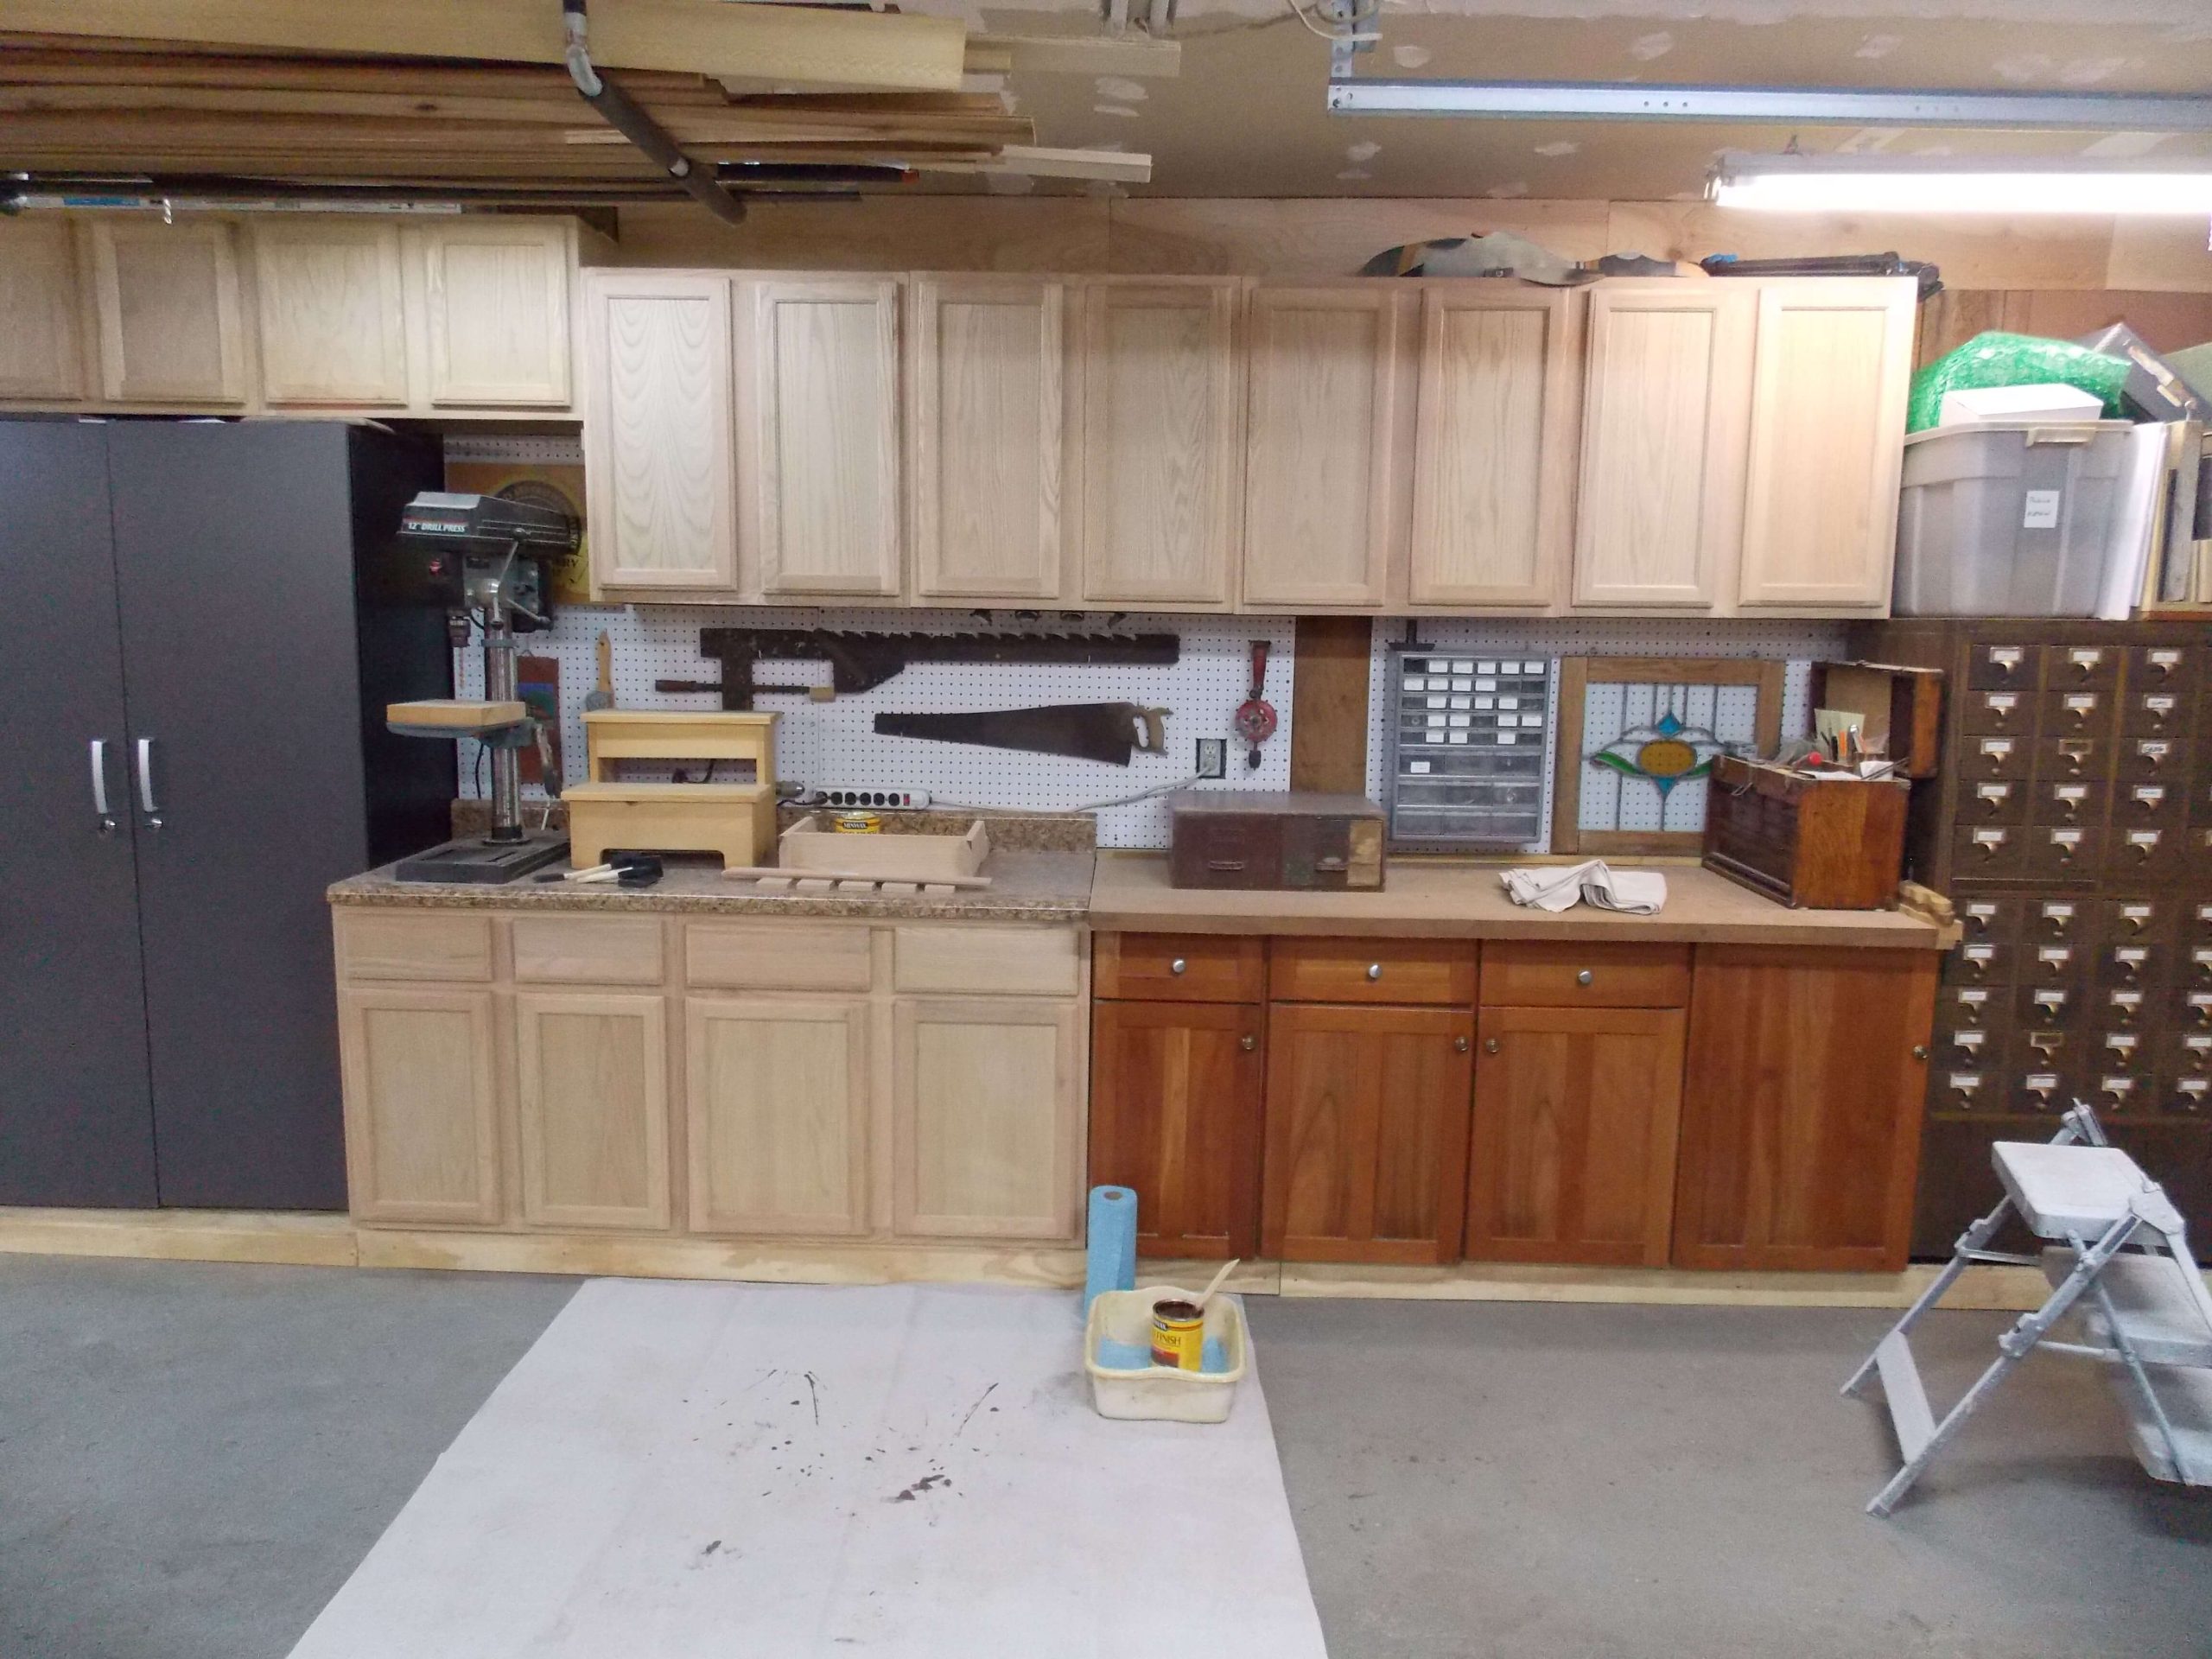
First, I removed the wood flooring from this area since it was no longer needed. Plus, the extra 3/4″ of space gained by removing the flooring made sure the 84″ tall bookcases fit in easily. The photo below shows two 30″W x 84″H x 24″D unfinished bookcases, which just barely fit into the space after having removed the flooring. The bottom section has pull-out trays and doors, but I took these off so that they could be more efficiently painted. The other pieces were moved to another area for painting.
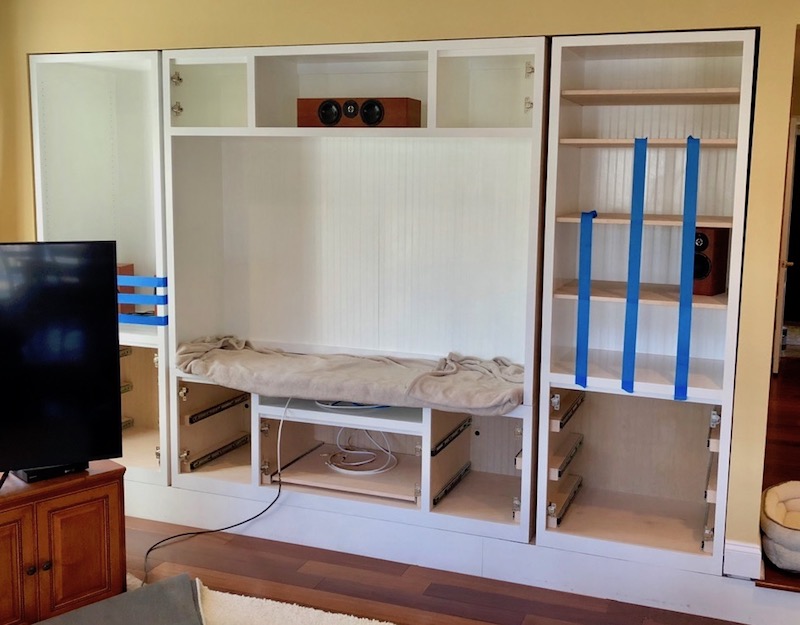
Step 3: Painting and Installation
I painted all the bookcases and other components, shelves, and doors, and then positioned them in the wall space, leaving some gaps between them. They will later be covered with crown, base, and side moulding.
Step 4: Installation of Wiring and Power Access
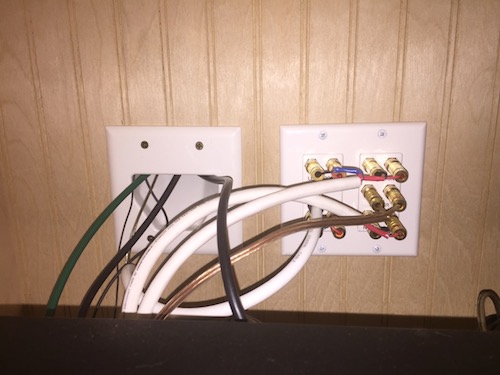
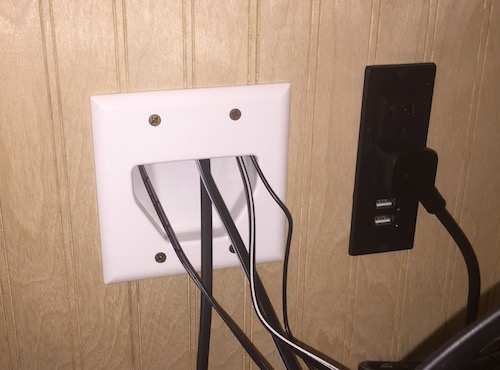
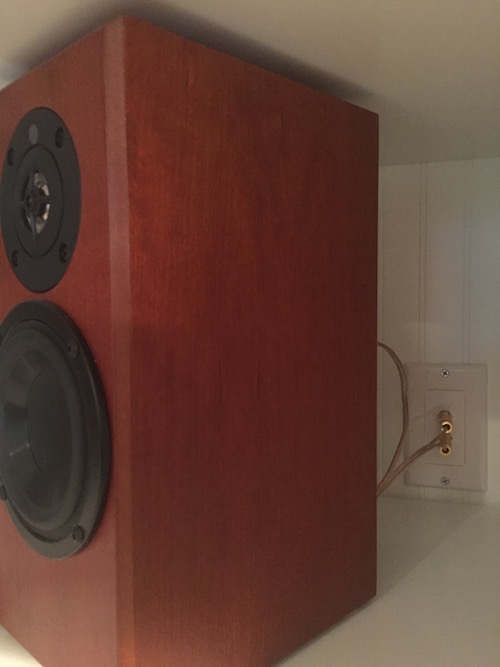
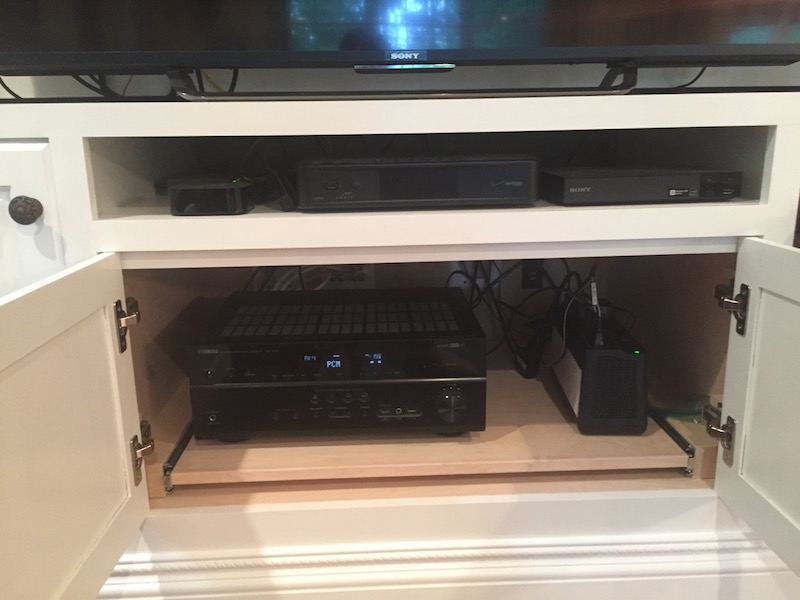
Before the pieces were permanently installed, it was necessary to run wires from where the media components go to where the speakers and TV will go. I cut holes into the back panels and installed connector panels to enable wires to easily pass through from one piece to the next. For some larger cables, like HDMI and power cables, I fed them through an open panel instead of using connectors. I then connected cables to the backs of the panels and fed them into the shelf above so that they could be quickly and easily plugged directly into the front of each panel. Power was run to the bottom cabinet.
Step 5: Finishing the Installation of Doors and Accessories
I screwed the outer two bookcases to the side walls to ensure they were not able to move, and then screwed the center pieces to the side pieces to make it a secure unit. On the floor, you can see the moulding that will be used to frame out the pieces and cover the gaps, thus making it a built in system of shelves and entertainment units.
Step 6: Installation of Equipment
I installed equipment into the entertainment console and connected the cables and power cords. At the bottom center opening of the entertainment cabinet is a battery backup/surge protector and a receiver. A pull-out shelf was installed to make it easier to slide the receiver in and out while connecting cables. In the short open shelf above are the media boxes, such as a cable TV box, Apple TV, and Blu-Ray player.
Step 7: Installation of Moulding Around Frame
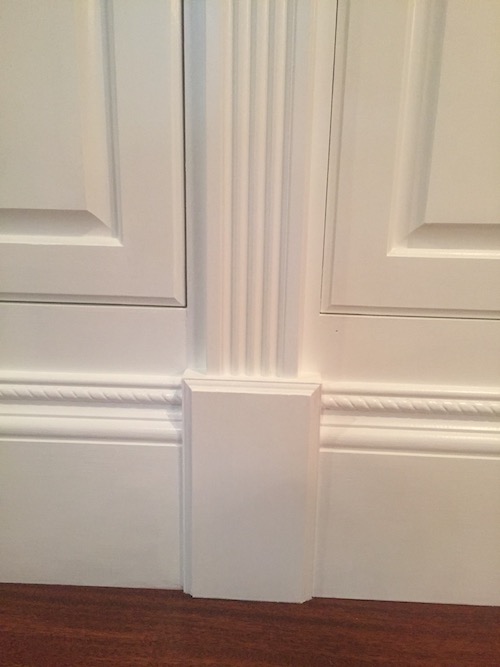
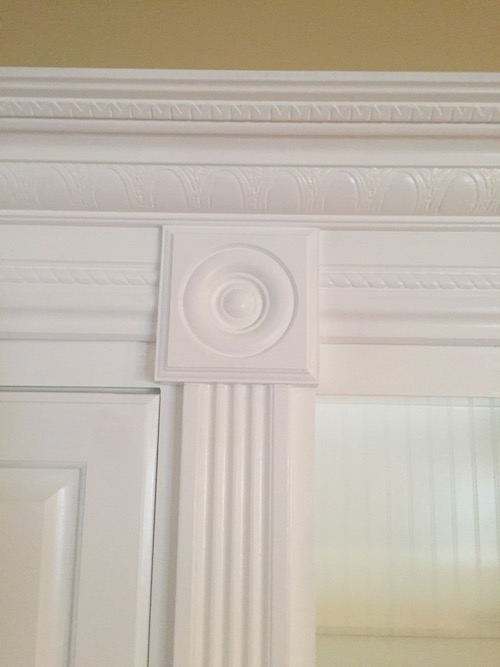
Finally, I nailed unfinished moulding from Home Depot to the wall and face frames of the bookcases and cabinets. In between each piece is a custom-built column consisting of several stacked pieces: a plinth block at the bottom, a piece of fluted column above, and a rosette at the top. In between the plinth blocks are flat pieces of Maple wood with upside down chair rail moulding added to its top. Above the cabinets is an inverted piece of base moulding that was placed in between the columns. Finally, a piece of crown moulding was added at the very top.
Step 8: Painting of Moulding
I filled in nail holes in the moulding using wood filler and applied caulk to all gaps. Then I painted the moulding so everything flowed seamlessly together. You can’t even tell which pieces are separate from each other. As far as anyone can tell, it is a custom built in. The first photo below shows the plinth block with fluted moulding stacked on top. To the side are flat pieces of wood with chair rail placed upside down on top. The second photo shows the rosette block at the top of the fluted moulding, with upside down base moulding on each side and crown above.
Step 9: Finishing Touches
Finally, I installed all the rest of the entertainment components, added books, photo frames and other nick knacks to the shelving, and plugged it all in. No more hole in the wall–it now looks completely built in! Inside the taller doors are pull-out trays for DVDs and other items. It was a lot of work, but much simpler than a fully custom job since I was able to use pre-built component bookcases and cabinets from Highlands Designs.
Furniture tariffs are soon to hit consumers (possibly by October 2018), so the time to buy is now! According to the U.S. Department of Commerce, new tariffs have been proposed on $200 billion of Chinese imports, including many types of furniture and materials. Some economists say that “at least some Chinese factories, fueled by government subsidies and a devalued currency, are selling products at or below what it costs to make them.”
While our products are all made in the USA, some raw materials, such as plywood, are processed in China. It sounds crazy, but wood is often shipped from the US to Chinese factories that are able to process it into plywood and ship it back at a lower price than manufacturers in the USA are able to achieve. With fuel prices up and tariffs on top of that, it will be more expensive to export and re-import such materials.
The good news is that American companies will be better able to compete, so tariffs could support more American jobs. The bad news is that it will cost more for almost all kinds of furniture. So, I would suggest buying soon before prices jump!
For more information, check out these articles:
https://www.cnbc.com/2018/07/25/tariffs-are-about-to-hit-consumers-and-it-wont-be-pretty.html
https://www.floordaily.net/floorfocus/chinese-furniture-may-face-us-tariffs
This article is about home office design using off-the-shelf cabinet, desk, and related components, like we offer at Highlands Designs. A typical home office includes at least one of the following items: a desk, a file cabinet, cabinets for storage of supplies, and bookshelves for books, manuals, business information, or other personal items. The following is one story about getting started.
Jo Heinz is president of Dallas interior architecture and design firm Staffelbach. Entrepreneur.com asked Heinz for advice on designing a home office for maximum efficiency. Here’s what she had to say:
How does designing an effective home office differ from designing a commercial office? And what considerations do you need to keep in mind even before you get started? Working from home is exciting because it offers an opportunity for real comfort and efficiency, but if the office is too casual, or isn’t effectively separated from the home environment, peak productivity may be lost.
While comfort is essential in any office, an office that is too casual may seriously impede the ability to get things done. You have to find a way to separate yourself from the rest of the goings-on in the home and to convey a sense of “off limits” to all other normal and natural home sounds and interruptions.
A distinction has to be made regarding the physical boundaries of this working space. The most effective way to do that is with the design of the space itself.
Ask yourself these questions before you begin:
What will you be doing in the space?
What type of work needs to be done?
Will external clients be visiting the space?
Will colleagues visit for collaborative work?
What type of materials will be referenced and/or stored?
What type of equipment is required?
When will I be doing the bulk of my work?
Will I be making conference calls?
Will I be video conferencing?
The answers to these questions will begin to develop the program for your home office.
The next step is setting up your space. Where are you going to put your office? It doesn’t need to be large or expansive, but it should be separate from other areas. You might be able to convert the guest room you only use a few times a year or another underutilized area into your office. Evaluate how the space you find can be dedicated for your use and can be “your space.”
Keep all of your work in that space because it’s important that you be able to find things, retrieve things and be efficient within this space. You will also want to keep the non-office space in your home free of work items. This promotes healthy balance and allows you to relax at home when you are not at work.
Establish set hours for your work at home. This contributes to your life balance, and should also help you be more productive and organize your day. The biggest problem home workers have is the loss of distinction between work life and home life.
Compartmentalizing your day into identifiable segments will help. Set up an established outline of time that you know you will spend in your office. That will help you develop a plan for productivity.
What are the most common mistakes people make when they’re setting up a home office?
There are five:
Thinking you can “tune out” the plasma screen on the wall. Don’t hang it anywhere near where you’ll be working.
Inadequate storage components
Lack of space for reference materials
Slow and inefficient equipment
Inadequate wire management (cords and wire spaghetti everywhere)
What are the most important five things to consider when you’re setting up a home office?
Equipment. Speed and efficiency are critical at home. But make careful decisions. Question whether that large color copier is a real necessity or if a trip to the neighborhood Kinkos will suffice. Don’t pay for equipment you won’t use on a daily basis.Investigate a wireless hub for your office so you have the flexibility to work on your laptop from your desk, your chair or a table, and at both standing and sitting heights. This simple option can enhance your creative problem-solving and thinking ability.You’ll want a separate phone line to your office so no business associate or client gets a busy signal. Also, make sure your phone has the capability for messaging, conferencing and speaker functions.
Be sure you have a local and responsive computer support team that will make home service calls promptly. You need to know you can rely on the equipment you have to work.
Be sure you invest in the fastest equipment available, so you don’t spend your time waiting for things to work.
And don’t forget insurance on that equipment. Affordable policies will insure your home office equipment in the event of a loss or disaster. You’ll want this peace of mind. Many insurance companies offer special coverage for home workers.
Lighting. Good lighting is essential. Ideally you want as much natural daylight as possible. If your space has a window, it will enhance the lighting. Daylight is the most evenly balanced source of white light available, in that sunlight has an approximately equal proportion of each color of the spectrum. This light, however, never has a constant color and its beauty comes from the way it is reflected and from the way it is refracted by the earth (as in differing times of day). The color of natural light also differs based on geographic location. It is always beneficial to have as much natural light as possible in the working area.If no daylight is available, a combination of general and task lighting will be required. A high-quality task light will be essential for late nights or cloudy days. If your home office is in a basement or a room without windows, check out daylight-replicating light sources that will provide energy-efficient, full-spectrum lighting. Many ergonomic task-lighting fixtures have dimmer switches so you can control the amount of light.The most effective lighting brings out the fullest quality of the colors illuminated. If lighting levels are too low, there can be negative psychological effects, including depression. For human comfort, a yellow-cast illumination is best. It is the color of brightness, and midway through the color progression from cool to warm.
To avoid glare, don’t place overhead lighting directly above computer screens, and don’t put a computer screen directly in front of a light source. That will cause eyestrain.
Energy guidelines are leading to new reduced-light levels in offices that are easier on the eyes. The most critical factor with lighting is the ability to control its brightness and intensity.
Privacy. No one can work effectively in a sea of noise or interruptions. When planning your office area, ensure that it affords a degree of privacy from surrounding activities. While headphones may serve to isolate certain sounds, no one wants to be forced to wear headphones all the time. Portable screens can be used to shield the work area from nearby activities. Alternatively, divider walls that double as bookcases will not only divide the area but provide superior storage solutions.To assist in creating the quiet needed for real concentration and work, a degree of white noise can be helpful. Air filters and low fans will operate at a quiet speed to muffle other noises.If a door to the office area is not practical or available, it may be helpful to add signage (e.g., “No interruptions” or “Quiet please”) to remind others in the space that this is “work time.”
Layout/organization. The old rule, “a place for everything and everything in its place” was coined to relieve stress. If you have carefully thought through your storage requirements, you’ll have the space you need.The desk surface of your choice will serve to support your laptop or desktop computer and work-related items. Your desk will likely be the place where you spend the most time. Consider the myriad of options available for organization of papers on your desk. What is essential for productivity is an organized desk that keeps pending work in order and prevents the chaos of disorganized piles.Solutions are as simple as pencil cups or trays to keep all writing instruments in one place, plus memo and business card holders so, literally, there is a place for everything. Shops such as The Container Store make it easy for you to get organized and stay that way. In this day and age, there are so many options for storage, the challenge is more in finding what works best with your flow of paper and work. Do you find yourself working from left to right? Does your paper trail have a distinct flow? Remember than when planning how you store your items.
Italian product designer and manufacturer EmmeBi has amazing examples of how it organizes an office, both commercial and residential. You can use those ideas for inspiration and, if your budget requires a more modest approach, mimic the same look with some of the items found at Target , Ikea and similar stores.
Ergonomics. Your health, safety and welfare are critical. Therefore, the items you choose should be ergonomically designed to promote your health and well-being while using them.Chair manufacturers have made significant improvements in adjustability and comfort for computer users. They have even researched the biomechanics of seating. Task chairs reflect this research and are making individuals’ lives easier even when they work on a computer the entire day.Keilhauer has produced chairs that feature a pelvis balance point and free shoulder technology. They are truly kind to your back and spine during computer work. Another favorite of ours is Humanscale . It has also taken a great amount of time and effort to study the needs of the human body when it comes to working. If you are in a position where you write or create most of the time, the company’s chairs are an investment you will be thankful for for many years.Consider foot rests, ergonomic mouse instruments shaped to fit your hand and soft keyboard pads that allow rest and relaxation for the wrist, and foot rests. All enhance the work experience and make your time at work less stressful to your body. The goal is make work comfortable for your body and to support the areas of the human form that are brought into play with the work you do.
How can you set up an office to take advantage of the “green” mind-set?
Consider sustainability. Computers contain hazardous materials such as heavy metals, vinyl and toxic chemicals. They also rely on electricity for power. Keep the computer, your printer and other office equipment turned off when idle. Activate power-saving features on your computer. When trading in for new equipment, make sure your home office equipment will be recycled. Avoid throwing office equipment into the trash. A simple internet search will offer many options in your area.
Keep the planet in mind. Eco-friendly design ensures earth-friendly materials. Consider items such as recycled glass countertops and specify materials that use resources most efficiently, such as woods from sustainable forestry and products that are recyclable. Use local and regional resources when available, as this keeps the money local, supports local business and keeps shipping and freight costs (as well as resources used) at a minimum. Also, don’t be afraid to look into ways to integrate energy conservation such as “daylighting,” which takes advantage of natural light. That will not only help you feel better as you work, but it will also help the planet.
What are the best colors for an office?
The psychology of color is real. Certain colors elicit emotional and physical reactions and responses from individuals. Color impacts mood and energy levels. Therefore, be aware of the psychological impact of the color you choose for your home office.
Blues, greens and violets are considered cool colors. These colors evoke feelings of peace and relaxation. Blue can actually make a room feel cooler and can lull occupants to sleep. It’s an ideal bedroom color, but not an ideal office color.
As the dominant color in nature, green is considered a neutral. We are very comfortable in green surroundings. Green evokes organic, fresh, restful emotions and can foster concentration. Today’s new brand images feature a lime green tint that combines yellow hues. This color can add freshness and vitality to an office. The addition of green to an office area will enhance its balance.
Yellow grabs attention. That’s why the most popular highlighters are yellow. It catches the eye like no other color. It makes people happy and evokes optimism. But a bright yellow might be distracting or overpowering in an office area and could even cause a degree of anxiety.
Red is energetic and stirring. It often produces strong feelings and can create excitement. If used in a home office, it should be used as an accent only.
White, ivory, gray and tan can carry subtle variations of color. So they can be neutral with overtones of the colors you feel most comfortable with, such as a warm gray or a cool gray. These colors do not distract and can be combined with accent colors for vitality and energy.
Accents and shades of purple have been proven to stimulate imagination. Purple or lavender tones cross the line between warm and cool tones and can evoke a favorable response when focus and concentration are required.
With all colors, it’s important to test the colors on the wall in large enough areas to ensure compatibility.
There is no real hard and fast formula for color associations. The color blending is subject to the occupant’s wishes.
How would you sum up the concept of home office design?
Make the space your own. Ensure that the space reflects your personality and that you enjoy being there. Ensure that your office reflects you and that it contains a favorite object or photo that will give you the break you need when you pause in your work. It is these small touches that help you make the space your own.
Your office should be a connection to yourself, your spirit and your productivity. It should afford focus rather than distraction and be a place you want to be and want to spend time in. That will positively influence you in the space and enhance the work you do there.
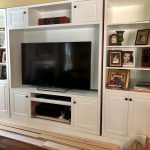
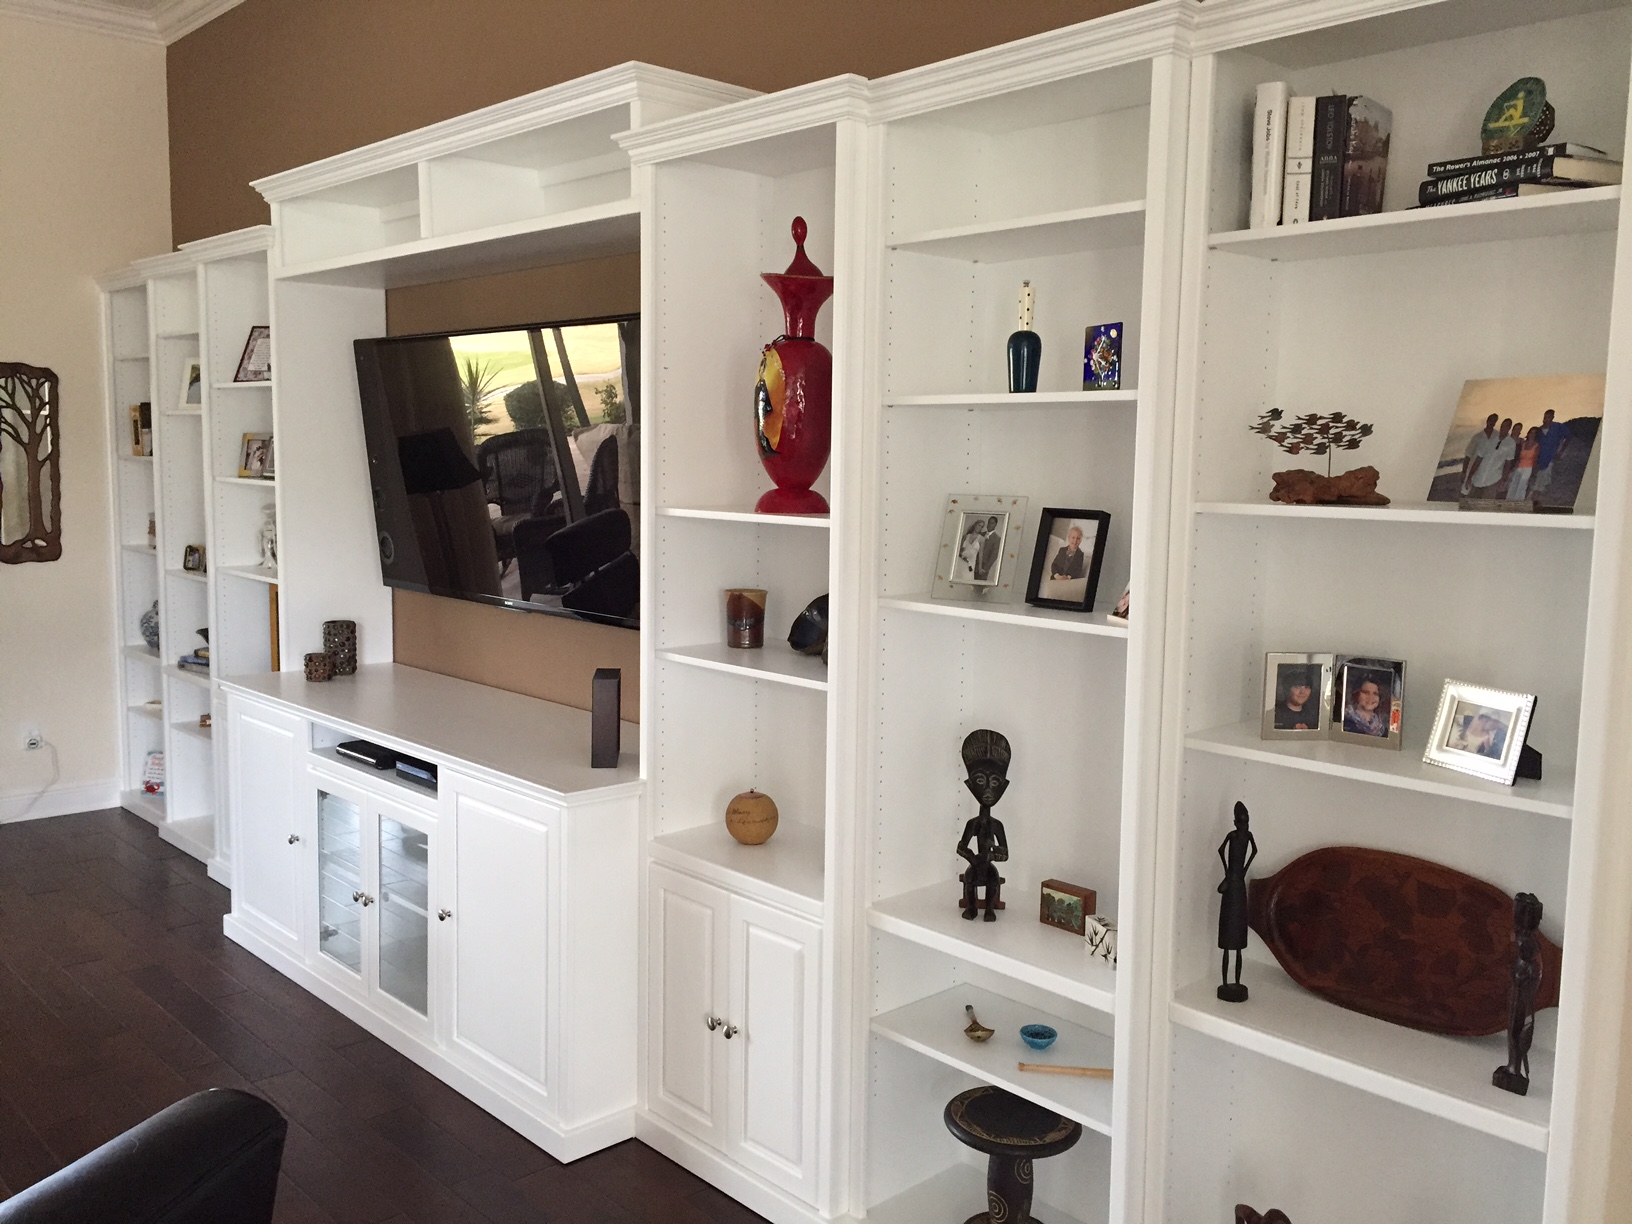
This great Maple, Face Frame Crown style, white entertainment system was put together using a combination of bookcases, a center entertainment console, and a bookcase bridge. Here is how this was put together to create a cascading wall unit with varying depths and heights.
Design Elements
Entertainment System
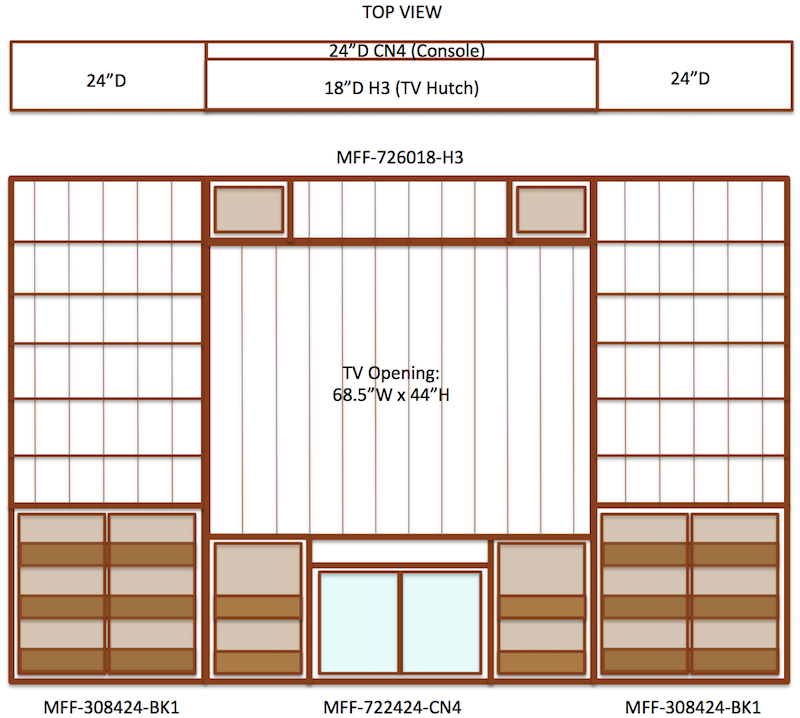
The central piece is a CN4 entertainment console 84″W x 36″H x 24″D, painted white with raised-panel doors. It has deluxe base moulding that wraps around the sides and is mitered to meet the moulding on the adjacent units.
The piece above the TV is a BR2 bookcase bridge 84″W x 12″H x 16″D set above the other bookcases with deluxe crown moulding wrapped around each side.
The bookcases on each side are stepped back, with the first 16″D, then 14″D, then 12″D. They have deluxe crown moulding that is wrapped around to meet the bookcase next to it. The pieces next to the center have a mini-miter so that the crown moulding overlaps the face frame of the bookcase bridge. On the outer side, they have a partial wrap with a mitered cut to meet the moulding on the next piece. The next piece has an inside miter cut to meet that crown, and so forth. The result is a seamless flowing sequence of moulding that appears built-in and connected. In reality, these were ordered pre-built to fit the design.
Had the homeowner wanted to go all the way to the ceiling, we could have used base units with tall hutches, but since this is a very tall ceiling, it probably would have been overkill.
Diagrams
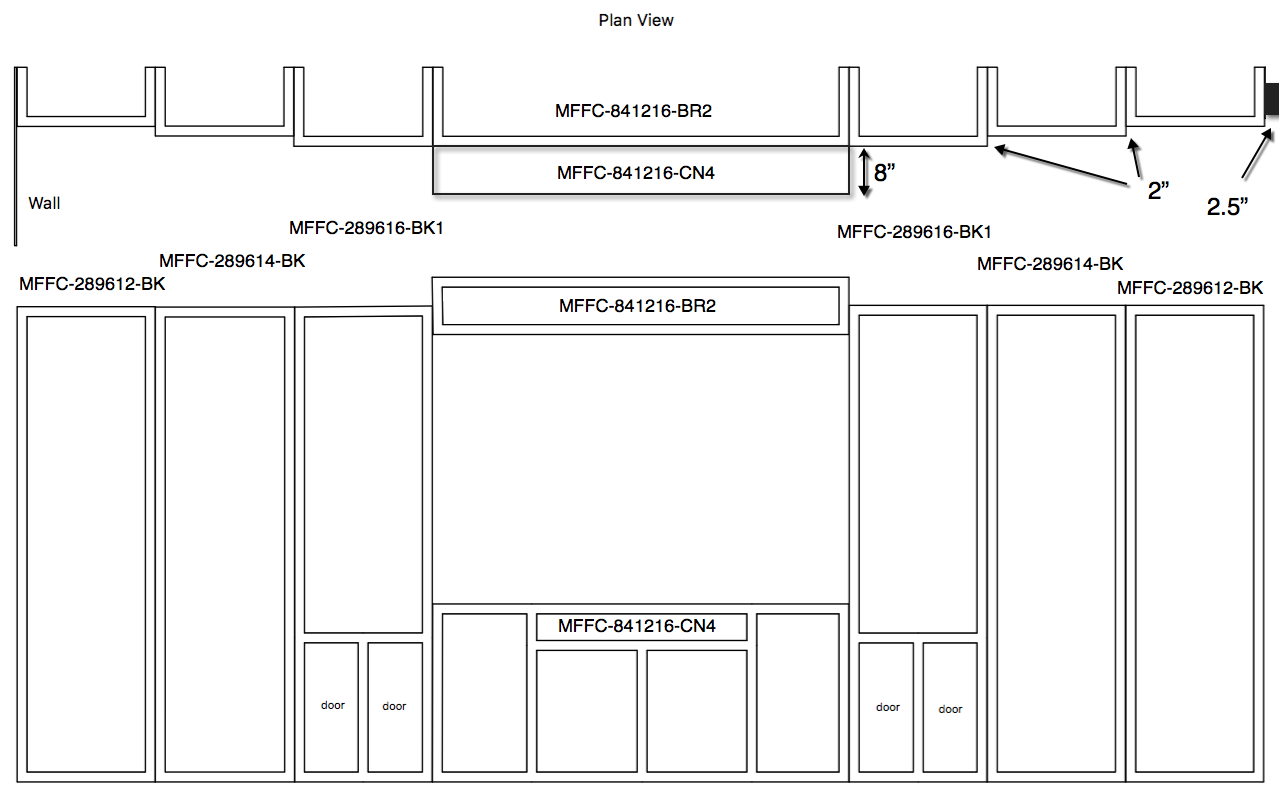
The diagram below was used to specify how everything would fit together.
Entertainment System Diagram
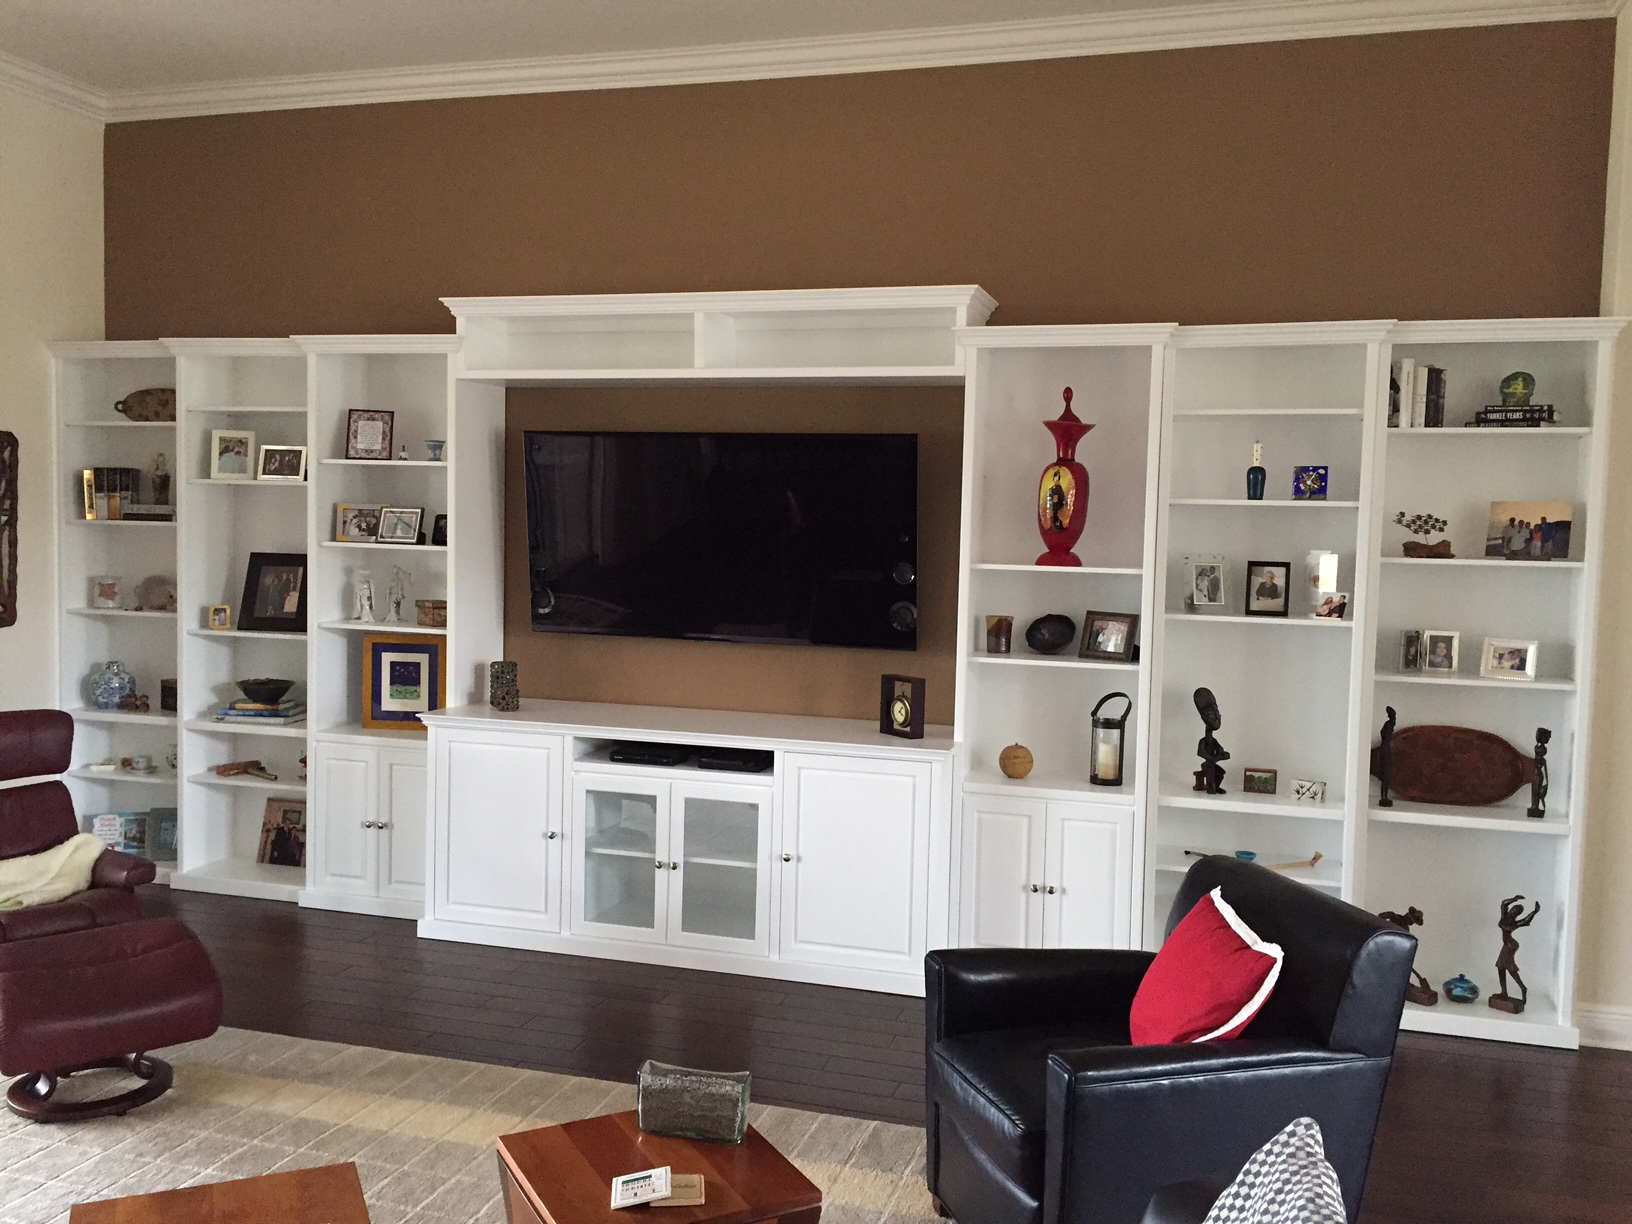
Final Overview
Entertainment System
This large custom entertainment system is nothing more than a collection of pre-built units designed to fit together as a seamless unit. All that you need is the ability to envision your project and measure the space. Then, just order bookcases and cabinets sized to fit, pre-assembled, and ready to put into place. The center pieces are deeper, with the end units the shallowest of all. There is plenty of hidden storage in the middle, where media, and other items can be placed. The electronics area is in the opening just below the TV shelf or behind glass doors so that the remote controls will still work.
Are you up to the task of building your own mudroom built-in system? If not, buy all the components you need from our storage components pages, or choose from our wide selection of cabinets, hutches and bridges to create a custom wall unit. If so, check out this article below with instructions on how to build your own.
Introduction
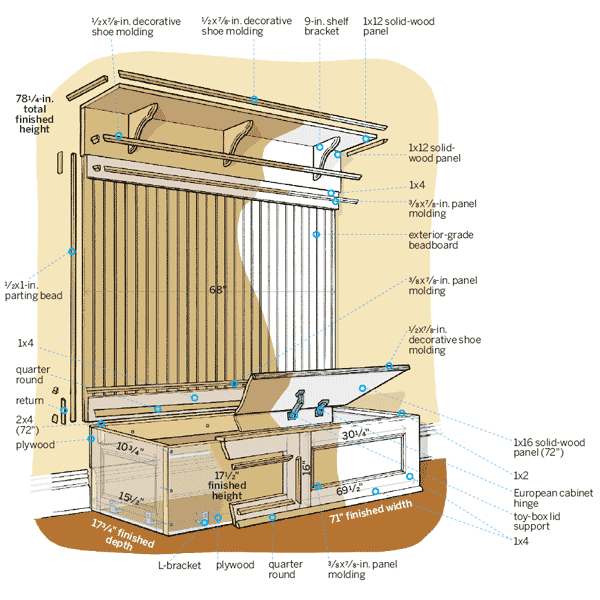
The second the sun goes away, out come the umbrellas and the raincoats and the Wellies. And with them a lot of messy wetness that can warp hardwood floors and stain your best rugs. Short of forcing your family to disrobe on the front stoop, your best bet is to create a stopping area just inside the door where everyone can leave the weather behind.
On the following pages, This Old House senior technical editor Mark Powers shows how to create the perfect catchall, complete with an open top shelf, coat hooks, and flip-top bench storage. This handsome entry hall built-in, made of plywood, shelf panels, and layered moldings, is sure to make your house more welcoming, even while protecting it from wear and tear. In fact, you may find it so convenient you’ll catch yourself stopping by even when the sun’s out.
How to build a mudroom system
Day-to-day Timeline for Building a Mudroom Bench
Friday: Build and trim out the seat box.
Saturday: Install the seat lid and beadboard panel.
Sunday: Assemble the shelf and paint the bench.
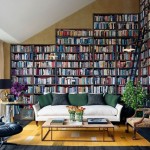
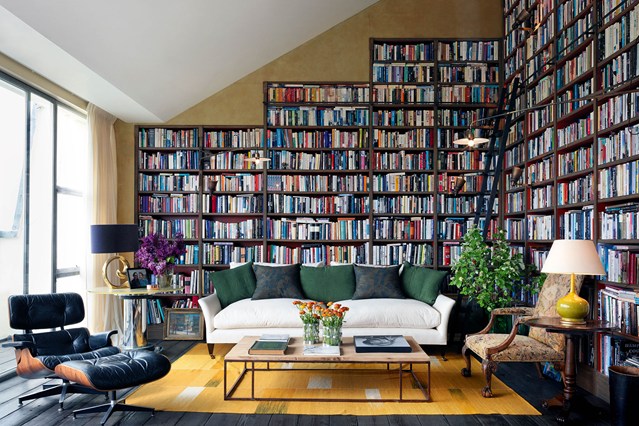
“There is no furniture so charming as books, even if you never open them or read a single word,” said the nineteenth-century writer Sydney Smith. A shelf full of books adds instant appeal to any room, whether in the form of bespoke joinery or stand-alone shelves. We’ve looked for the most inspiring designs for bookshelves in the living room, bedroom or study. From modern designs, to mid-century classics and spy novel numbers which conceal hidden doors, there are bookshelves of every type in this gallery to inspire something as intriguing as the tomes that fill them.
Once you’ve decided on the bookshelf for you, have a think about how best to organize your books. Are you someone who likes them color-coded? Or by size? Take a look at our piece on how to arrange your bookshelf for more advice.
Entryway Bookcases
In the library at Wolterton Hall in Norfolk, two panels of faux book spines, on either side of a door, drop down to reveal a drinks area hidden behind – aperitif bottles are on the left and digestifs on the right. Once closed, they are indistinguishable from the other shelves and you would never know they are there. woltertonpark.co.uk
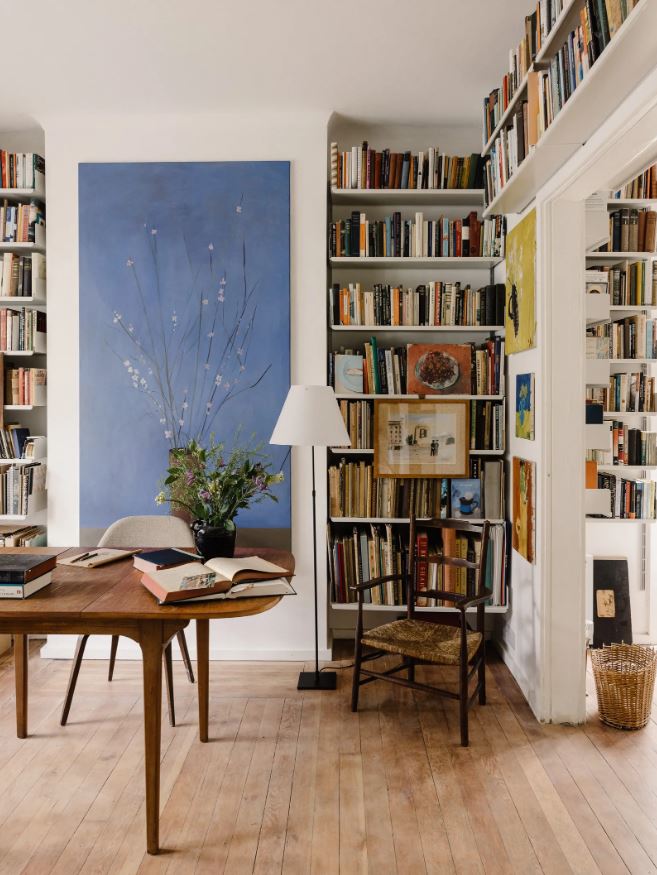
In the painter Haidee Becker’s north London house, bookshelves have been built into the recess of the wall and along the top of the archway. In the fairly neutral space, the addition of hundreds of books adds color and texture.
Floor-to-ceiling bookshelves, in a bespoke green, frame the doorway with a view across the hall to a bedroom beyond in Thomas Dane’s Gloucestershire house.
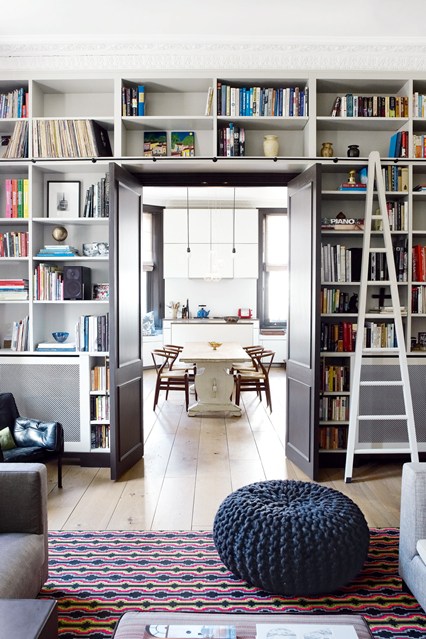
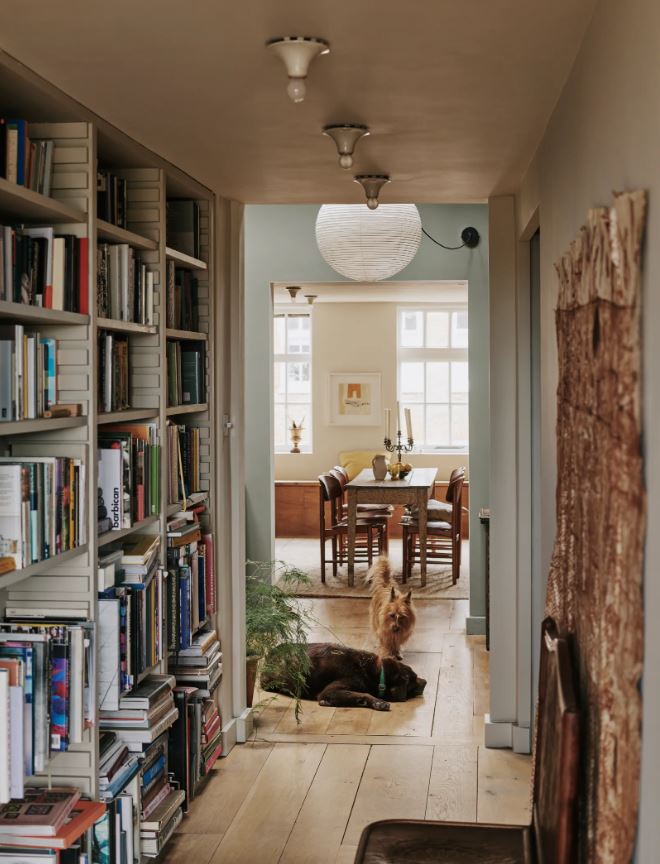
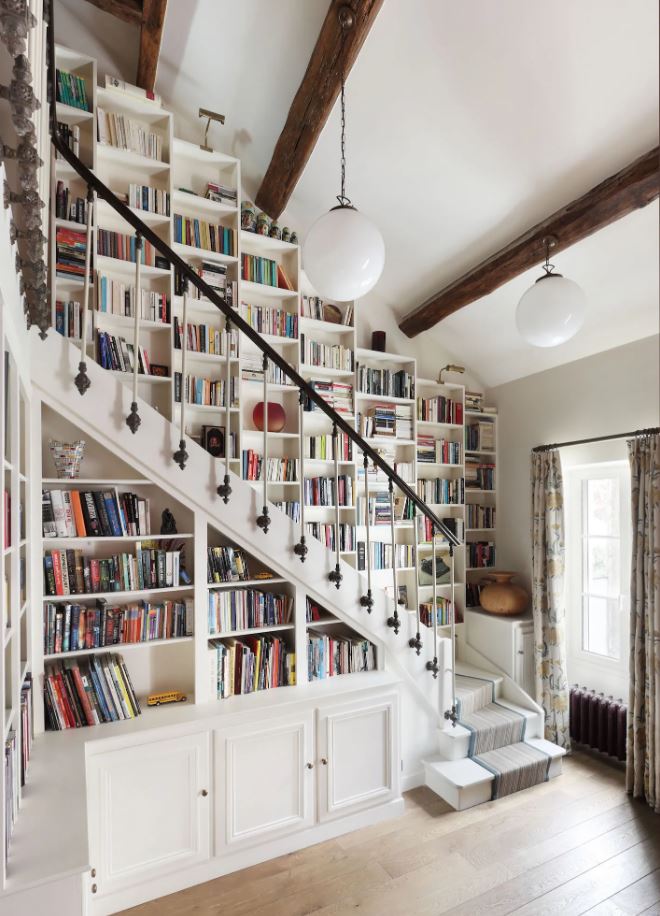
If you happen to have a reasonably wide hallway or landing, adding bookshelves can be a brilliant way to add interest (and storage). At her converted schoolhouse in Battersea, Atelier Ellis founder Cassandra Ellis has created a library with floor-to-ceiling shelves in the hallway.
Stepped Library Bookcases
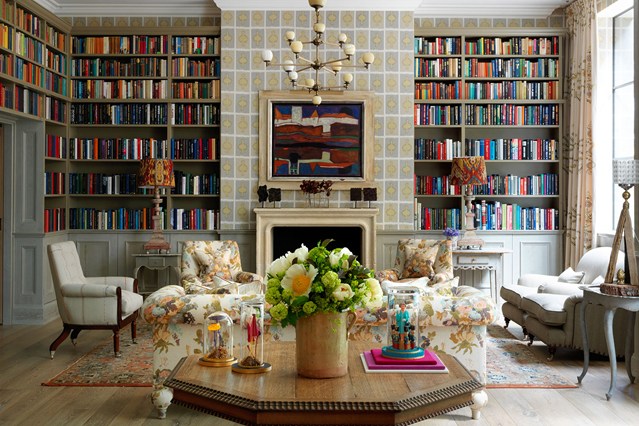
Work with the architecture of your room. The alcoves to either side of a fireplace are the ultimate spot for built-in bookshelves. In Kit Kemp’s new hotel Ham Yard, the designer has carried them round the wall and over the door-frame, (a trick also favored by our editor Sue Crewe in her home) and teamed them with a chic patterned paper in muted colors.
Kate Aslangul of Oakley Moore decorated this light-flooded library on the second floor of a Parisian home, in which architect Pascal Collange incorporated a bookshelf into the staircase, a signature style. The room is painted in Farrow & Ball‘s ‘New White’ while the pendant lights are from Mullan. Bespoke metal spindles create an arts and crafts feel together with a striped runner from Hartley Tissier, an Anglo-French carpet company.
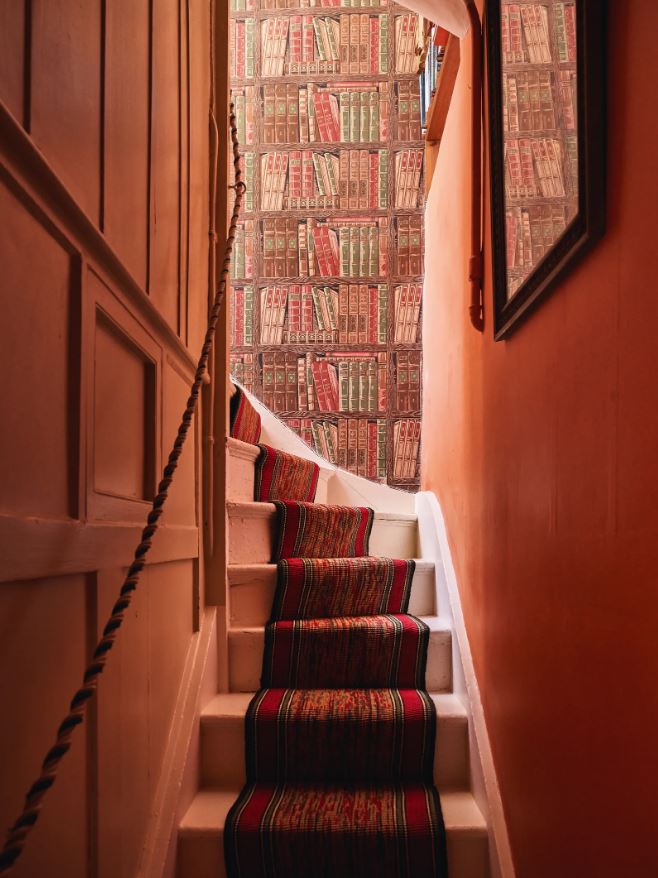
In lieu of an actual bookcase, antiques dealer Sarah Fenwick installed this Cole & Son wallpaper in the stairwell of her London home. The effect is playful and adds a sense of depth to the space.
Fireplace Bookcases
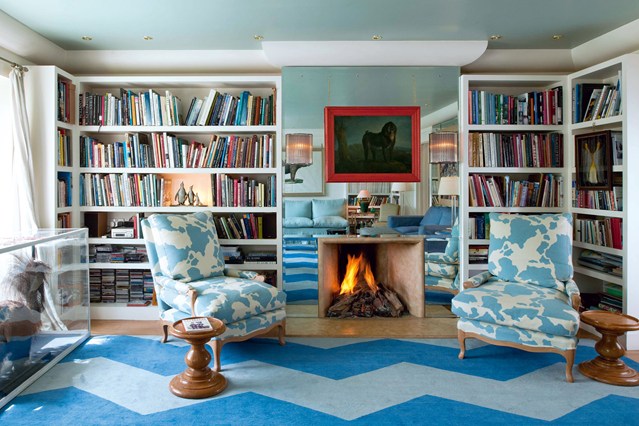
Floor to ceiling bookshelves add visual impact and character in the home of designer Beata Heuman.
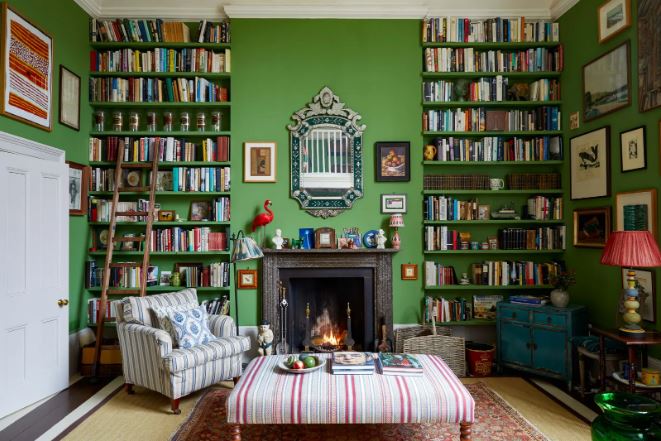
Green covers both the walls and bookshelves in the eclectic, colourful London house of a novelist and lifelong collector. A vintage Venetian mirror from Tarquin Bilgen is flanked by paintings by Anne Rothenstein and a pink lamp by Cressida Bell. A flamingo from Graham & Green is beside an armchair in an Ian Mankin blue stripe, next to which is a statue of a boy from Bora Bora.
Try combining books with mirrors. Lulu Lytle, owner and director of the interiors shop Soane, uses mirrors on the walls that are not shelved to ‘maintain the feeling of open skies in our sitting room’. The clever use of storage, wrapped beautifully around the Peter Twining designed chimney wall makes the room feel lighter than air.
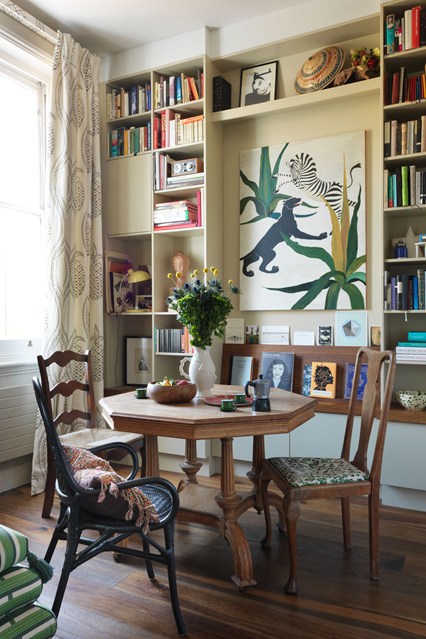
Breakfast Room Bookcases
Hidden Door Bookcases
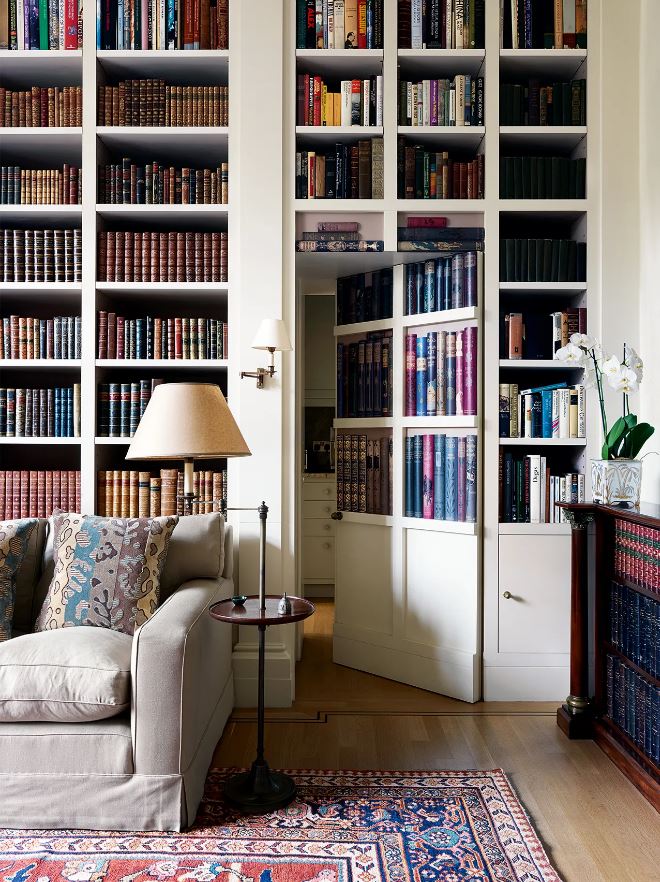
This eighteenth-century barn has been converted into a stylish sitting-room-cum-guest-cottage, by its owner Emma Burns, managing director at Sibyl Colefax & John Fowler. Emma adapted the internal configuration to create a striking way of displaying her book collection. The built-in bookcase equipped with a ladder also acts as a secret door to a hidden bathroom.
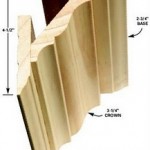
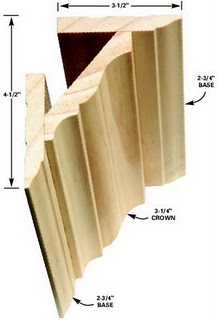
Crown molding is a decorative trim piece the sits on an angle, and is used to cover transitions between walls, bookcases or cabinets and the ceiling for decoration. It can be installed where the walls and the ceilings meet, but it can also be used to fill the gap between the top of a bookcase or cabinet and the ceiling, or sticking up at the top of a row of wall cabinets or tall bookcases. They can either be plain or sprung.
Most of today’s interior designers agree that every room benefits from the use of crown molding treatment. It is one of most important architectural elements used to define interior spaces. Moulding is typically made from solid milled wood or plaster but may be made from plastic or reformed wood. Installing crown molding to a room, or to the top of your cabinets or bookcases, instantly adds an aesthetically pleasing and classy look.
Varieties of common moldings include:
Crown
Cove
Astra-gal
Bead molding
Bed molding
Dentil
Scotia
The installation of molding improves the transition from wall to ceiling or bookcase to ceiling and defines the architectural style of a room. The size and style of crown molding used may vary widely, from a simple coves in a farmhouse kitchen to large built-up cornice in a grand entryways.
The size and style of molding used may vary widely, from a simple coves in a farmhouse kitchen to open top crown with rope lighting to large built-up cornice in a grand entryways.
Installing Crown
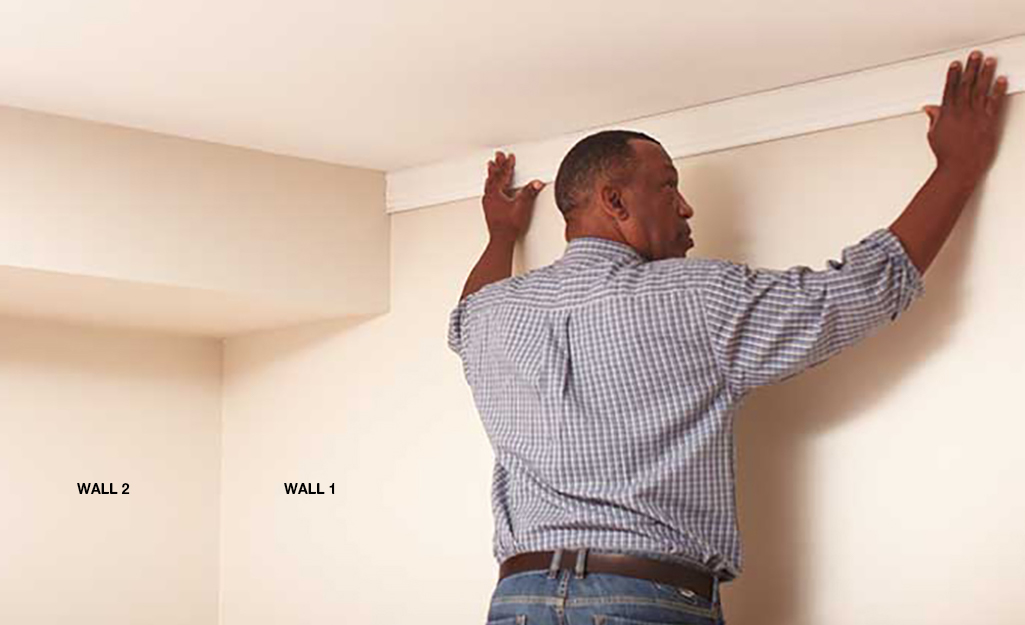
Crown moulding, also known as ceiling trim, gives a wall depth and character. It’s a budget-friendly way to update the look of most any room. You can also use crown moulding to accent the style of your pantry or kitchen cabinets. Read on for the basic steps and tips on how to install crown moulding.
Plan Your Installation
Learning how to install crown moulding starts with careful planning. The moulding pieces need to fit seamlessly around your room. The first thing to do is determine which crown moulding to use. There are a number of different decorative styles that you can install based on the decor of your room. You can also opt for cove moulding if you are interested in a look that is not as fancy but still neatly finished.
Start your planning on the wall opposite the door (wall 1 in photo above). You want the first view of your crown moulding to be the best.
Plan your way around the room. The moulding on wall 2 in the photo above will be coped, or cut to shape, where it meets the moulding on wall 1.
The third wall is treated the same way as wall 2. The fourth wall is coped at both ends.
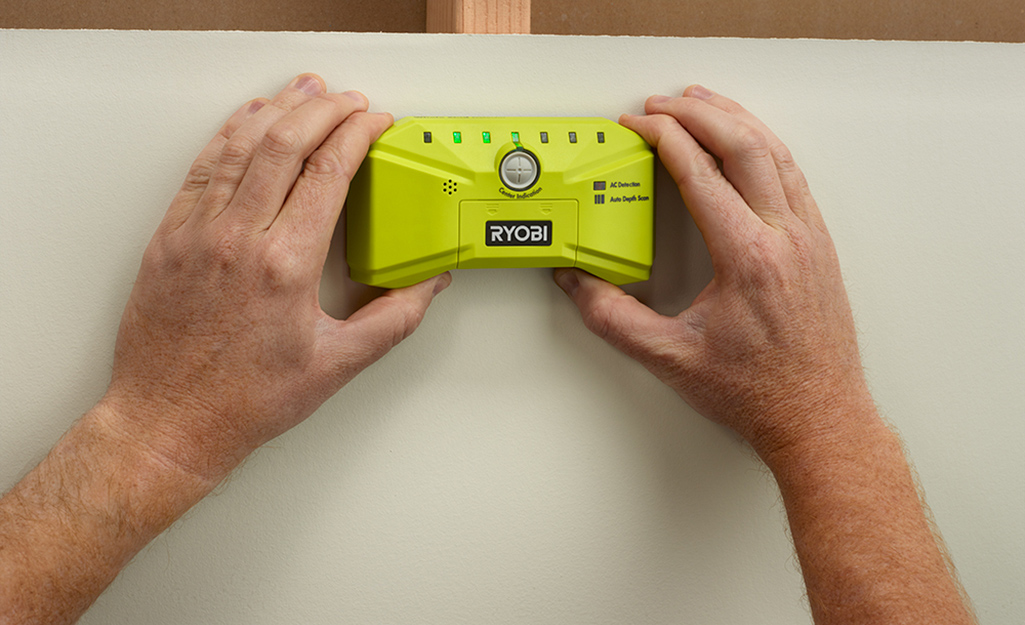
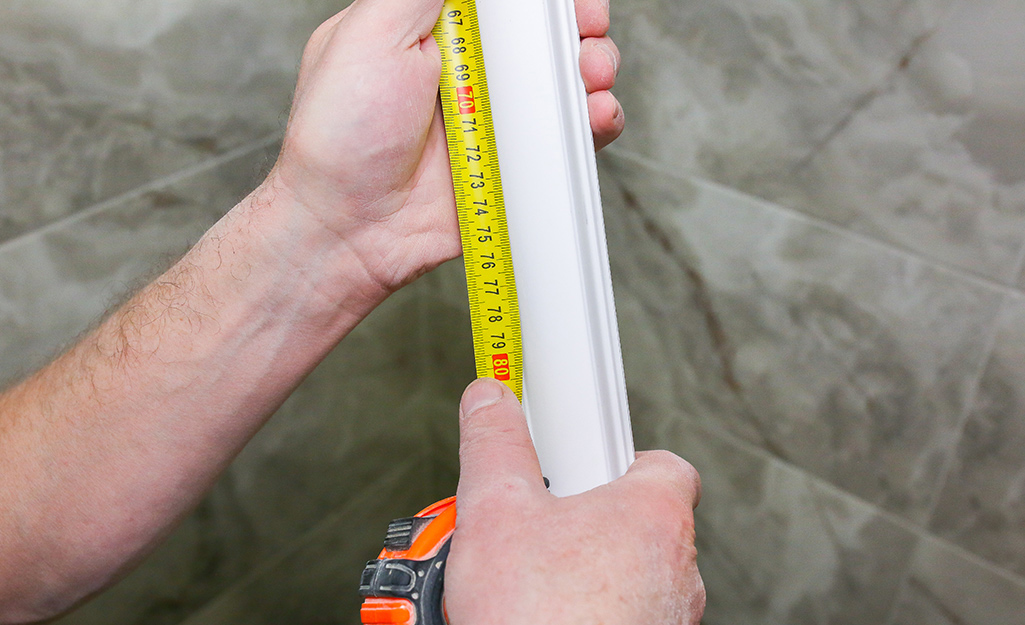
Measure the Room and Mark Studs
Each piece of crown moulding will need to be custom fitted to your wall and each other. No room is perfectly square, so measuring accurately is essential. You’ll also want to nail the crown moulding into a stud for a secure hang.
Measure the wall from corner to corner. Draw a faint line where the bottom of the crown moulding will lay. This will help you keep the moulding straight. Write your measurement down to use when cutting your crown moulding.
Use a stud finder to locate the studs. Make faint pencil marks high on the wall to guide you as you nail.
Measure and Mark Moulding
Put the moulding against a framing square, noting the distance between the face of the moulding edge and the corner.
Cut a scrap of lumber to the correct dimension and draw layout lines on the wall and ceiling.
When you install the moulding, align it with the layout lines.
Begin placing moulding against the wall opposite the door.
Mark the locations of the studs by holding the moulding in place. Transfer the stud marks onto the moulding.
Set up the Miter Saw
When first learning how to cut crown moulding, position the moulding correctly on the saw.
Set the miter saw to cut at 45 degrees in the general direction of the angle you need. See Step 5 below.
Make sure the ceiling edge is flat on the bottom of the miter box. The wall edge should be tight against the fence.
If the blade and cut line won’t align, try turning the moulding upside down and try again.
Cut close to the end.
Tip: If you do not have a miter saw, cuts can be made with a hand saw and miter box.
Cut Crown Moulding
Part of learning how to install crown moulding is figuring out which cut to use. You will make inside corner cuts, outside corner cuts and sometimes scarf joint cuts. The most common types of crown moulding cuts are:
Inside corner cuts have a long bottom edge and a short top edge. The cut on the left will angle left. The cut on the right will angle right.
Outside corner cuts have a short bottom edge and a long top. The cut on the right will angle left. The cut on the left will angle right.
Scarf cuts are used to join two pieces of moulding that meet on a wall. The cut will angle in the same direction on both sides of the moulding.
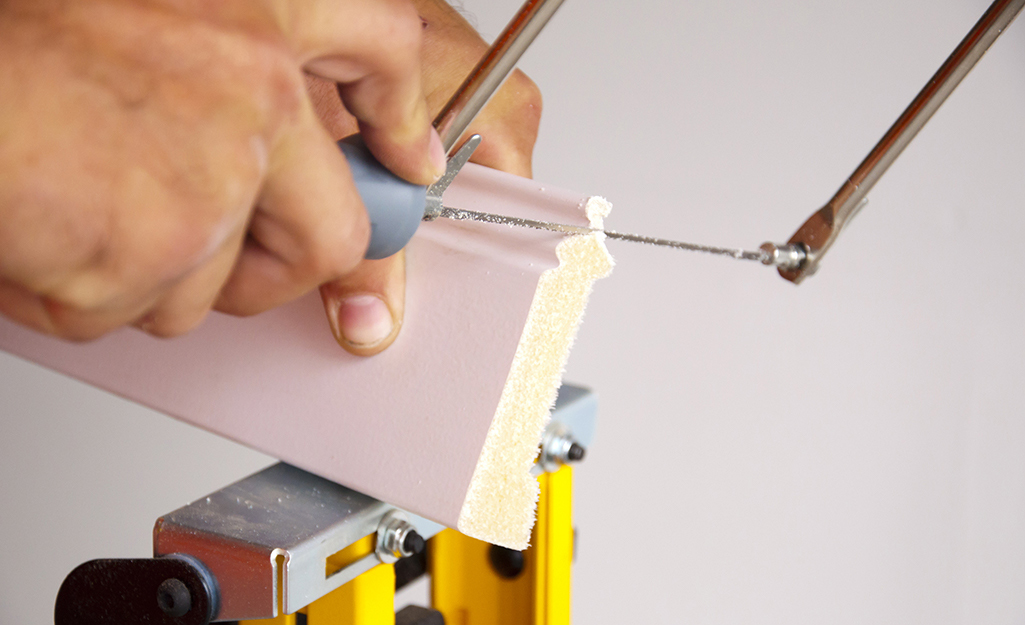
How you cut your crown moulding also depends on what kind of joints will work best. There are two kinds of joints: mitered and coped. Mitered joints meet at the corners in a perfect 90 degree angle. Coped joints work best when a corner isn’t squaring up or is not at 90 degrees.
A coped joint is when you cut the end of the moulding square and install it flush into the corner of a wall. You then cut the next piece of moulding to fit the profile of the first. Most corners are not perfect, so it’s good to know how to make a coped joint.
Lay out the cope joint on a second piece of moulding. Start with a piece that’s a few inches longer than the finished length. Flex it in place.
At the end of the moulding that you will cope, draw a line in the general direction you plan to cut. Cut at roughly a 45-degree angle.
Tip: Cut the inside corner and outside corner moulding upside down on the saw. Place the ceiling side on the bottom and the wall side on the top.
Test and Trim to Fit
You want your cuts to fit snugly together. As you cut each piece of moulding, look closely at each one. See if there is the excess wood beneath the profile. Cut away any excess with a coping saw.
Tilt the coping saw back at a 45-degree angle to create a razor-thin edge where the two mouldings will meet. You want the mouldings to overlap flat.
Check the joint by fitting it against a cutoff.
Be prepared for an imperfect fit. Fine-tune the joint until it fits.
Sand and file any high spots to create a tight fit.
Installing Crown Moulding
Once you’re sure the joints fit, you’re ready to install the crown moulding.
Measure the wall again.
Cut the moulding 1/8-inch longer than measured. The extra length will help push the cope joint closed when installing crown moulding.
Make a square cut on the uncoped end of the crown moulding.
Flex the moulding in place.
Nail or glue the moulding to the wall and ceiling. To prevent splitting, drill pilot holes the diameter of the finishing nails. Drill holes at each mark at the top and bottom of the moulding and nail in place.
Putty any nail holes.
Crown Moulding Installation Tips
Purchase a few extra feet of your crown moulding to make practice cuts.
Before you install it, prime and paint the sides and back of the moulding. This will keep your moulding from warping. You can use stain or varnish instead of paint.
Wear appropriate hearing and eye protection when cutting your moulding.
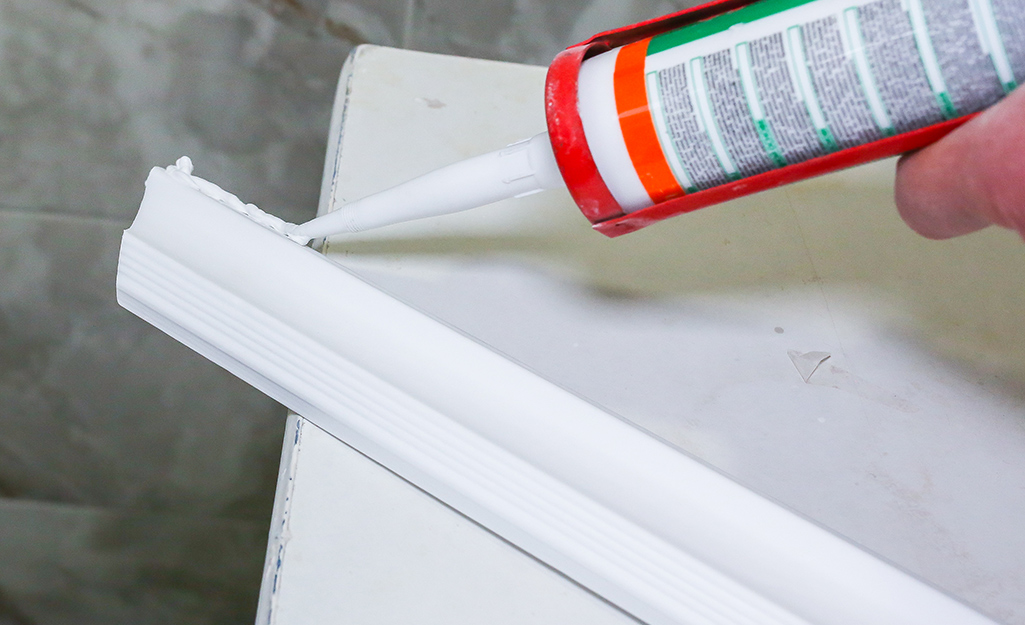
If you’re painting the moulding after installation, run a bead of caulk in the seam. Wipe it smooth with a wet finger or damp rag.
Don’t guesstimate, calculate. Know exactly how much you need with our project calculators.
Now that you know how to install crown moulding, you can improve the look of any wall. Try out different ideas: Use crown moulding to create a picture frame or to border a built-in bookshelf. Use a few different types of moulding together. Different combinations of moulding are called build-ups. Learning how to install crown moulding means you can install build-ups the same way.
Remember to measure and cut accurately for the best look. And don’t worry if you don’t own all of the tools needed to complete this DIY crown moulding project. Rent tools for any project at The Home Depot.